How to Add a Bathtub Shower: A Comprehensive Guide
Adding a shower to an existing bathtub is a common home improvement project that can significantly enhance a bathroom's functionality and value. The process involves several key steps, from initial planning and plumbing considerations to the actual installation of the shower components and ensuring proper waterproofing. This article provides a detailed overview of how to successfully add a bathtub shower, outlining the essential steps and considerations for a successful outcome.
Before embarking on the project, a thorough assessment of the existing bathroom infrastructure is crucial. This assessment involves evaluating the structural integrity of the walls surrounding the bathtub, the condition of the existing plumbing, and the overall bathroom layout. Identifying any potential issues early on allows for proactive planning and prevents unexpected complications during the installation process.
The scope of the project depends on the current state of the bathroom. In some cases, only the shower components need to be added to an existing tub and faucet setup. In other situations, a more comprehensive renovation might be necessary, including replacing the bathtub, upgrading the plumbing, and retiling the surrounding walls. Understanding the full extent of the required work is essential for accurate budgeting and project scheduling.
Key Point 1: Planning and Preparation
Effective planning is the foundation of any successful home improvement project. This stage involves several critical steps, including determining the type of shower fixture to install, selecting the appropriate materials, and obtaining any necessary permits.
Choosing the right shower fixture is a crucial decision. Several options are available, each with its own advantages and disadvantages. A basic showerhead connected to the existing tub faucet is the simplest and most cost-effective option. However, more elaborate systems, such as those with multiple showerheads, body sprays, or thermostatic valves, offer enhanced functionality and a more luxurious showering experience. The choice depends on individual preferences, budget constraints, and the existing plumbing infrastructure.
Material selection plays a vital role in the durability and aesthetics of the finished shower. Common materials for shower walls include tile, acrylic, and fiberglass. Tile offers a wide range of design options and is highly durable, but it requires careful installation to prevent water leaks. Acrylic and fiberglass are less expensive and easier to install, but they may not be as visually appealing or as long-lasting as tile.
Obtaining the necessary permits is essential for ensuring compliance with local building codes. Building codes vary from one jurisdiction to another, but they typically cover aspects such as plumbing, electrical work, and structural safety. Failing to obtain the required permits can result in fines, project delays, and potential safety hazards. Contacting the local building department early in the planning process is advisable to determine the specific permit requirements for the project.
Gathering the necessary tools and materials is another important aspect of preparation. Essential tools include a drill, screwdriver, level, measuring tape, tile saw (if installing tile), plumbing wrench, and safety glasses. Materials include the shower fixture, shower arm, shower curtain or door, sealant, grout (if installing tile), and any necessary plumbing fittings.
Protecting the surrounding area is crucial to prevent damage during the installation process. Covering the bathroom floor with drop cloths or plastic sheeting protects it from scratches, spills, and debris. Removing any nearby furniture or fixtures creates more space for working and minimizes the risk of accidental damage.
Key Point 2: Plumbing Modifications
Adding a shower to a bathtub often requires modifications to the existing plumbing system. This might involve installing a new shower valve, extending the water supply lines, and ensuring proper drainage. Understanding the existing plumbing configuration and making the necessary adjustments is essential for a functional and leak-free shower system.
The shower valve is a critical component that controls the flow of water to the showerhead. Replacing the existing tub faucet with a shower valve that includes a diverter allows for switching between the tub faucet and the showerhead. Several types of shower valves are available, including pressure-balancing valves, thermostatic valves, and mixing valves. Pressure-balancing valves maintain a constant water temperature even when there are fluctuations in water pressure. Thermostatic valves allow for precise temperature control and prevent scalding. Mixing valves are the simplest and least expensive option, but they do not offer the same level of temperature control or safety.
Extending the water supply lines may be necessary to reach the location of the new showerhead. This involves cutting into the existing water pipes and adding new sections of pipe using fittings such as couplings, elbows, and tees. Copper pipes are a common choice for water supply lines, but PEX (cross-linked polyethylene) pipes are becoming increasingly popular due to their flexibility and ease of installation. PEX pipes can be connected using crimp rings or push-fit fittings, which require less skill and specialized tools than soldering copper pipes.
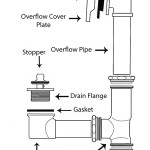
Ensuring proper drainage is essential for preventing water from accumulating in the bathtub or shower area. The existing tub drain should be able to handle the increased volume of water from the shower. If the drain is clogged or restricted, it should be cleaned or replaced. Installing a drain with a strainer helps to prevent hair and other debris from clogging the drainpipe.
Before making any modifications to the plumbing system, it is crucial to shut off the water supply to the bathroom. This prevents water from leaking or spraying during the installation process. The main water shutoff valve is typically located near the water meter. Turning off the water supply and opening the faucets in the bathroom relieves the water pressure in the pipes.
When working with plumbing, it is important to use pipe dope or Teflon tape on all threaded connections to create a watertight seal. Pipe dope is a sealant that is applied to the threads of pipes and fittings. Teflon tape is a thin, white tape that is wrapped around the threads. Both pipe dope and Teflon tape help to prevent leaks by filling any gaps between the threads.
Key Point 3: Installation and Waterproofing
The final stage of adding a bathtub shower involves installing the shower components, ensuring proper waterproofing, and finishing the surrounding area. This stage requires careful attention to detail and adherence to best practices to prevent water damage and ensure a long-lasting shower system.
Installing the shower arm and showerhead is typically a straightforward process. The shower arm is a short pipe that extends from the wall and supports the showerhead. The shower arm is screwed into a threaded fitting in the wall, and the showerhead is screwed onto the end of the shower arm. Using Teflon tape on the threads of the shower arm and showerhead ensures a watertight seal.
Installing a shower curtain or door prevents water from splashing outside the bathtub or shower area. Shower curtains are a simple and inexpensive option, but they may not provide as much privacy or protection from water as a shower door. Shower doors are available in a variety of styles, including sliding doors, pivot doors, and bi-fold doors. Installing a shower door requires more skill and effort than installing a shower curtain, but it can significantly enhance the appearance and functionality of the shower.
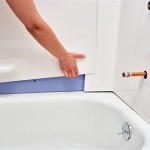
Waterproofing is essential for preventing water from penetrating the walls and floor surrounding the bathtub or shower area. Water damage can lead to mold growth, structural damage, and costly repairs. Several methods can be used to waterproof a shower, including applying a waterproof membrane, using a waterproof grout, and installing a shower pan.
A waterproof membrane is a thin, flexible sheet that is applied to the walls and floor of the shower area. The membrane creates a barrier that prevents water from penetrating the substrate. Several types of waterproof membranes are available, including liquid membranes, sheet membranes, and cementitious membranes. Liquid membranes are applied with a brush or roller, sheet membranes are applied with adhesive, and cementitious membranes are mixed with water and applied with a trowel.
Waterproof grout is a type of grout that is designed to resist water penetration. Regular grout can absorb water, which can lead to mold growth and damage to the surrounding substrate. Waterproof grout contains additives that make it more resistant to water absorption. Applying waterproof grout to the tile joints in the shower area helps to prevent water from penetrating the walls and floor.
A shower pan is a pre-fabricated base that is installed under the tile floor of the shower area. The shower pan is designed to catch any water that penetrates the tile and grout and direct it to the drain. Shower pans are typically made of acrylic, fiberglass, or cultured marble. Installing a shower pan provides an extra layer of protection against water damage.
Finishing the surrounding area involves tiling the walls, painting the ceiling, and installing any necessary trim. Tiling the walls provides a durable and aesthetically pleasing surface that is resistant to water damage. Painting the ceiling with a moisture-resistant paint helps to prevent mold growth. Installing trim around the edges of the shower area provides a finished look and helps to prevent water from penetrating the walls.

Three Ways To Add A Shower Walk In Bathtub Posh Living

How To Convert A Tub Shower

Three Ways To Add A Shower Walk In Bathtub Posh Living

How To Transform Your Tub With A Shower Conversion Kit

Three Ways To Add A Shower Tub The Handyman S Daughter

Three Ways To Add A Shower Walk In Bathtub Posh Living

Add A Shower Head To Your Walk In Bathtub Accessibly Optum Home Solutions

How To Shower When You Only Have A Bathtub

Why You Might Want To Put Your Tub In The Shower

Three Ways To Add A Shower Tub