How To Add a Handheld Shower Head to Your Bathtub
Adding a handheld shower head to a bathtub is a practical and relatively simple home improvement project that can significantly enhance the functionality and convenience of your bathing experience. A handheld shower head offers greater flexibility for rinsing, bathing children or pets, cleaning the bathtub itself, and even assisting individuals with mobility challenges. This article provides a comprehensive guide to installing a handheld shower head on your bathtub, covering the necessary tools, preparation steps, and installation procedures.
Understanding Bathtub Faucet Types and Compatibility
Before embarking on the installation process, it is crucial to identify the type of faucet currently installed on the bathtub. This understanding will determine the specific adapter or diverter valve needed to connect the handheld shower head. Common bathtub faucet types include:
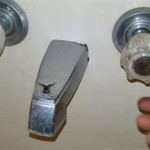
Standard Bathtub Faucet with Diverter: These faucets typically feature a spout and a diverter knob or lever. The diverter redirects water flow from the spout to an overhead shower head. If the bathtub already includes an overhead shower, adding a handheld option is usually straightforward, involving replacing the existing overhead shower head with a diverter valve or installing a secondary diverter.
Bathtub Faucet Without Diverter: This type of faucet consists solely of a spout without any mechanism to divert water to a shower head. In such cases, a diverter valve must be installed directly onto the spout to allow for connecting the handheld shower head. The diverter valve will usually screw onto the spout where the water comes out.
Roman Tub Faucet (Deck-Mounted): Roman tub faucets are typically mounted on the deck of the bathtub and feature separate hot and cold water handles. Adapting a handheld shower head to this type of faucet usually involves replacing the existing spout with a diverter spout or installing a T-adapter beneath the deck to redirect water flow to the handheld unit.
Identifying the faucet type allows for selecting the correct diverter valve or adapter, ensuring compatibility and a leak-free connection.
Gathering Necessary Tools and Materials
Prior to starting the installation, assembling the required tools and materials is essential for a smooth and efficient process. The following list outlines the items typically needed:
Handheld Shower Head Kit: This kit typically includes the handheld shower head, a flexible hose, a mounting bracket, and necessary screws.
Diverter Valve or Adapter: The type of diverter valve or adapter depends on the existing faucet type. Choose one that is specifically designed for bathtubs and compatible with the existing faucet.
Adjustable Wrench: An adjustable wrench is needed for tightening and loosening connections.
Plumber’s Tape (Teflon Tape): Plumber’s tape is used to seal threaded connections and prevent leaks.
Soft Cloth or Towel: A soft cloth or towel is useful for protecting the faucet finish from scratches during installation.
Bucket or Container: A bucket or container is helpful for catching any water that may spill during the installation process.
Screwdriver (if needed): A screwdriver may be needed to install the mounting bracket for the handheld shower head.
Having all the necessary tools and materials readily available will streamline the installation process and minimize potential delays.
Step-by-Step Installation Guide: Faucet Without Diverter
This section details the installation process for a bathtub faucet without a diverter, requiring the addition of a diverter valve for the handheld shower head connection. It includes the following steps:
Step 1: Turn Off the Water Supply: Locate the shut-off valves for both the hot and cold water supply lines to the bathtub. These valves are typically located beneath the bathtub or in an adjacent utility area. Turn both valves clockwise to completely shut off the water supply. This step is critical to prevent water damage during the installation process.
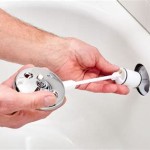
Step 2: Prepare the Faucet Spout: Clean the faucet spout thoroughly to remove any mineral deposits or debris. Ensure the threading on the spout is clean and free from obstructions. If necessary, use a wire brush to remove stubborn deposits.
Step 3: Apply Plumber's Tape: Wrap the threads of the faucet spout with plumber's tape (Teflon tape) in a clockwise direction. Overlap the tape slightly and apply several layers to create a watertight seal. This step helps prevent leaks at the connection point between the spout and the diverter valve.
Step 4: Install the Diverter Valve: Carefully screw the diverter valve onto the faucet spout. Tighten the valve securely using an adjustable wrench. Avoid overtightening, as this can damage the valve or the faucet spout. The diverter valve should fit snugly and securely onto the faucet spout.
Step 5: Connect the Handheld Shower Hose: Attach one end of the handheld shower hose to the designated outlet on the diverter valve. Tighten the connection securely using an adjustable wrench. Ensure that the hose is properly seated and that the connection is leak-free. Apply plumber's tape to the hose threads if necessary.
Step 6: Install the Mounting Bracket: Choose a suitable location on the bathroom wall or bathtub surround for the mounting bracket. The location should be easily accessible and at a comfortable height. Use the provided screws to securely attach the mounting bracket to the wall. Ensure the bracket is level and firmly attached to prevent the handheld shower head from falling.
Step 7: Connect the Handheld Shower Head to the Hose: Attach the handheld shower head to the other end of the flexible hose. Tighten the connection securely by hand. Again, make sure the hose is properly seated.
Step 8: Test for Leaks: Turn the water supply back on by slowly opening the hot and cold water shut-off valves. Carefully inspect all connections for leaks. If any leaks are detected, turn off the water supply and tighten the connections further or reapply plumber's tape.
Step 9: Test the Diverter Valve: Activate the diverter valve to redirect water flow to the handheld shower head. Ensure that the water flows smoothly and without any leaks. Test all the functions of the handheld shower head, such as different spray patterns, to ensure proper operation.
Adapting Faucets With Pre-Existing Shower Heads
If the bathtub already has a shower head attached using a diverter, adding a handheld option is simpler. The overhead shower head is often replaced with a diverter valve with outlets for both the existing shower plumbings and a handheld hose. If the goal is keeping the overhead shower, a secondary diverter can be added at the plumbing where the existing shower is mounted.
Step 1: Turn Off Water Supply: Locate and turn off the hot and cold water supply.
Step 2: Remove Existing Shower Head: Unscrew existing shower head from existing plumbing.
Step 3: Install New Diverter Valve: Screw new diverter valve into the plumbing where the old shower head was.
Step 4: Install Handheld Shower Head and Hose: Connect to the specified port on the new diverter valve.
Step 5: Test: Turn water on and test for leaks.
Addressing Potential Issues and Troubleshooting
During the installation process, certain issues may arise. The following troubleshooting tips can help resolve common problems:
Leaks: Leaks are a common issue during plumbing installations. Ensure that all threaded connections are properly sealed with plumber's tape. Tighten connections securely, but avoid overtightening. If leaks persist, disassemble the connection, reapply plumber's tape, and reassemble.
Low Water Pressure: Low water pressure in the handheld shower head may be caused by mineral deposits in the shower head or hose. Disconnect the shower head and hose and flush them with water to remove any debris. Alternatively, soak the shower head in a solution of vinegar and water to dissolve mineral deposits.
Diverter Valve Malfunction: If the diverter valve is not functioning properly, ensure that it is properly connected and that there are no obstructions preventing it from diverting water flow. If the valve is damaged, it may need to be replaced.
Hose Kinks: Kinks in the flexible hose can restrict water flow. Ensure that the hose is not twisted or bent excessively. Gently straighten out any kinks to allow for unrestricted water flow.
Incorrect Adapter Size: Using an incorrect adapter size can lead to leaks or a loose connection. Double-check the adapter size and ensure that it is compatible with the existing faucet spout. If necessary, purchase a different-sized adapter.
By following these troubleshooting tips, most common issues encountered during handheld shower head installation can be resolved effectively.

Add Handheld Shower To Tub Faucet Doityourself Com Community Forums

Three Ways To Add A Shower Tub The Handyman S Daughter

Three Ways To Add A Shower Tub The Handyman S Daughter

Three Ways To Add A Shower Tub The Handyman S Daughter

Three Ways To Add A Shower Tub The Handyman S Daughter

Diy Install A Shower Head Hand Delta Faucet Blog

Three Ways To Add A Shower Tub The Handyman S Daughter

Convert Roman Tub To Permanent Shower Terry Love Plumbing Advice Remodel Diy Professional Forum

Riser Mounted Handheld Shower Kit Add On Classic Clawfoot Tubs

Handheld Showerhead Guide The Basics Homeability Com
Related Posts