How to Remove a Bathtub Drain Plug: A Comprehensive Guide
Bathtub drain plugs are essential components for retaining water during bathing. However, they can become problematic due to wear, debris accumulation, or mechanical failure, necessitating removal for cleaning, repair, or replacement. The removal process varies based on the drain plug type, and a systematic approach is crucial to avoid damage to the tub or plumbing. This article provides a detailed guide on how to remove several common types of bathtub drain plugs.
Prior to any attempt at drain plug removal, it is advisable to gather necessary tools and materials. A basic toolkit should include: a flathead screwdriver, a Phillips head screwdriver, pliers (preferably needle-nose pliers), a drain cleaning tool (such as a drain snake or a bent wire hanger), penetrating oil (like WD-40), rags or paper towels, and gloves. Safety glasses are also recommended to protect against splashes or debris. Adequate lighting is vital for clear visibility within the drain area. If the drain is severely blocked, consider acquiring a drain auger for more aggressive clog removal.
Identifying the Drain Plug Type
The first step in removing a bathtub drain plug is to accurately identify its type. Bathtub drain plugs come in several varieties, each with a distinct mechanism and removal technique. Common types include: pop-up drains, lift-and-turn drains, toe-touch drains, trip lever drains, and push-and-pull drains. Misidentification can lead to employing incorrect removal methods, potentially causing damage to the drain plug or the drain assembly. Careful observation of the drain plug's external features and functionality is essential for proper identification.
Pop-up drains are characterized by a stopper that raises and lowers when a lever or knob is activated, typically located near the overflow drain. Lift-and-turn drains feature a stopper that rotates to open or close the drain. Toe-touch drains operate with a simple push of the foot, engaging and disengaging the stopper. Trip lever drains are connected to a lever on the overflow plate and utilize an internal linkage to control the stopper. Push-and-pull drains require the user to manually push or pull the stopper to control water flow.
Removing a Pop-Up Drain Plug
Removing a pop-up drain plug often involves accessing the linkage mechanism located beneath the tub. This typically requires accessing the overflow plate on the bathtub wall. The overflow plate is the circular or rectangular plate situated below the faucet. Remove the screws securing the overflow plate. Once the screws are removed, carefully pull the overflow plate away from the tub wall. A linkage rod connected to the drain stopper will be visible.
The linkage rod usually connects to the stopper through a clevis or a similar mechanism. Disconnect the linkage rod from the stopper. This may involve loosening a screw or detaching a clip. Once the linkage is disconnected, the stopper should be free to be removed. In some cases, the stopper may be corroded or stuck. Apply penetrating oil around the base of the stopper and allow it to soak for several minutes. Gently wiggle and pull the stopper upward. Avoid excessive force, which could damage the stopper or the drain assembly. If the stopper remains stuck, use pliers to gently grip and rotate the stopper while pulling upward. Once the stopper is removed, clean the drain opening and the stopper itself to remove any debris or buildup. Reassemble the linkage and overflow plate, ensuring proper alignment and secure screw tightening.
Removing a Lift-and-Turn Drain Plug
Lift-and-turn drain plugs are generally simpler to remove compared to pop-up drains. These plugs usually have a screw located on the top of the stopper. This screw secures the stopper to a post that extends into the drain. To remove this type of drain plug, begin by locating the screw on the top of the stopper. Use a flathead or Phillips head screwdriver, depending on the screw type, to loosen and remove the screw.
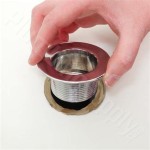
Once the screw is removed, the stopper should be free to be lifted out. Gently lift the stopper straight up. If the stopper is stuck, apply penetrating oil around the base of the stopper and allow it to soak for a few minutes. Rotate the stopper slightly while pulling upward to break any corrosion or buildup. Avoid prying with excessive force, as this could damage the drain or the stopper. After removing the stopper, inspect the drain and the stopper for any debris or damage. Clean both components thoroughly before reassembling. To reassemble, simply insert the stopper back into the drain and secure it with the screw. Ensure that the screw is tightened adequately to prevent the stopper from coming loose during use.
Removing a Toe-Touch Drain Plug
Toe-touch drain plugs often present a slightly different challenge due to their internal mechanisms. Removing a toe-touch drain plug usually involves unscrewing the entire stopper assembly. Some toe-touch drain plugs have a small set screw located on the side of the stopper. This set screw must be loosened before the stopper can be unscrewed. Locate the set screw and use a small Allen wrench or a flathead screwdriver to loosen it. Be careful not to strip the screw head.
Once the set screw is loosened, grip the stopper and turn it counterclockwise. The entire stopper assembly should begin to unscrew from the drain. If the stopper is difficult to turn, apply penetrating oil around the base and allow it to soak. Use pliers to provide a better grip if necessary, but be careful not to damage the stopper's finish. Continue unscrewing the stopper until it is completely removed. After removal, inspect the drain and the stopper for any debris or damage. Pay close attention to the threads on both components. Clean the threads and the surrounding drain area thoroughly. To reassemble, screw the stopper assembly back into the drain clockwise until it is snug. Tighten the set screw to secure the stopper in place. Test the drain plug by pressing it with your toe to ensure it operates correctly.
Removing a Trip Lever Drain Plug
Trip lever drain plugs, as mentioned earlier, are connected to an overflow plate via an internal linkage. The removal process begins with accessing the overflow plate. Remove the screws securing the overflow plate to the tub wall. Gently pull the overflow plate away from the tub, exposing the linkage mechanism. The linkage rod connects the trip lever to the drain stopper located down in the drainpipe.
In some cases, the stopper itself does not need to be removed. If the problem is a clogged drain, removing the linkage might be sufficient to access and clear the clog. Disconnecting the linkage rod from the stopper usually involves loosening a small screw or detaching a clip. Once the linkage is disconnected, use a drain cleaning tool to remove any debris or obstructions. If the stopper needs to be removed completely, it may require further disassembly within the drainpipe itself. This can be more complex and may necessitate specialized tools or professional assistance.
After clearing any obstructions or completing necessary repairs, reassemble the linkage and overflow plate. Ensure that the linkage is properly connected to the stopper and that the overflow plate is securely fastened to the tub wall. Test the trip lever to verify that the drain plug operates smoothly.
Removing a Push-and-Pull Drain Plug
Push-and-pull drain plugs are relatively straightforward in design and removal. To remove this type of drain plug, simply grip the stopper firmly and pull it straight up. The stopper is usually held in place by a friction fit or a simple mechanism. If the stopper is difficult to remove, apply penetrating oil around the base and allow it to soak for a few minutes. Rotate the stopper slightly while pulling upward to break any adhesion.
Avoid using excessive force, as this could damage the stopper or the drain assembly. If necessary, use pliers to grip the stopper more securely, but protect the finish with a cloth or rubber padding. Once the stopper is removed, inspect it and the drain for any debris or damage. Clean both components thoroughly before reassembling. To reassemble, simply push the stopper back into the drain until it is securely in place. Test the stopper to ensure that it seals properly and operates smoothly.
In conclusion, removing a bathtub drain plug requires careful identification of the plug type, appropriate tools, and a systematic approach. Applying penetrating oil can often aid in loosening stuck components, and gentle manipulation is preferable to excessive force. If unsure about any step, consulting a plumbing professional is always a safe option to prevent damage to the plumbing system.

How To Easily Remove Bathtub Drain Plug Stopper Unclog In 1 Minute Jonny Diy

How To Remove A Bathtub Drain The Home Depot

How To Remove Bathtub Drain Stopper That Spins Freely

4 Easy Ways To Remove A Tub Drain Stopper Wikihow

How To Remove The Bathtub Drain Diy Guide Fixed Today Plumbing

How To Remove A Bathtub Drain The Home Depot

Remove A Bathtub Drain Stopper To Unclog The Quick Easy

How To Remove A Pop Up Tub Drain Plug Stopper Easy No Tools Needed

How To Remove A Bathtub Drain The Home Depot

So Easy How To Remove A Watco Pop Up Drain Plug
Related Posts