How to Remove the Drain Stopper from a Bathtub
The bathtub drain stopper, a seemingly insignificant component, plays a vital role in maintaining the functionality of a bathroom. Its primary function is to effectively prevent water from draining out of the tub during bathing or showering. However, these stoppers can occasionally malfunction, become clogged with hair and debris, or require replacement. Regardless of the reason, removing the drain stopper is often a necessary task for homeowners and renters alike. The process, while seemingly straightforward, can vary significantly depending on the type of stopper installed in the bathtub. Understanding the nuances of each type and the appropriate removal techniques is crucial for a successful and damage-free outcome. This article offers a comprehensive guide to identifying and removing common bathtub drain stopper types.
There are several different types of bathtub drain stoppers, each with its own unique mechanism and removal procedure. Identifying the specific type of stopper present is the first and most important step in ensuring a smooth and efficient removal process. Attempting to remove a stopper using the wrong technique can lead to damage to the stopper itself, the drain assembly, or even the bathtub. Familiarizing oneself with the common types detailed below will prevent potential complications and facilitate a successful outcome.
Identifying Common Bathtub Drain Stopper Types
Before attempting any removal, accurately identifying the type of drain stopper present is critical. This will dictate the appropriate tools and methods required. Here are some of the most common types:
Lift-and-Turn Stopper: This type of stopper is characterized by a knob or flat disc on top that can be lifted and turned to open or close the drain. It operates through a simple lever mechanism located beneath the stopper within the drainpipe.
Push-and-Pull Stopper: Also known as a pop-up stopper, this type is operated by pressing down on the stopper to close the drain and pressing again to release and open it. They feature a spring-loaded mechanism located within the drainpipe.
Toe-Touch Stopper: Similar in appearance to the push-and-pull stopper, the toe-touch stopper is activated by pressing it with a toe. Repeated pressing toggles between the open and closed positions. The mechanism is generally a more robust spring-loaded system compared to the push-and-pull variation.
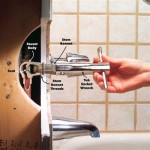
Trip-Lever Stopper: Typically found in older bathtubs, this type of stopper is controlled by a lever located on the overflow plate (the plate with a small opening near the top of the bathtub). Activating the lever raises or lowers a plunger inside the drainpipe, thus opening or closing the drain.
Flip-It Stopper: This type, also known as a universal stopper, sits directly over the drain opening. It operates by flipping a lever on top of the stopper to create a watertight seal.
Once the type of stopper is identified, the correct removal method can be selected and implemented.
Removing a Lift-and-Turn Bathtub Drain Stopper
The removal of a lift-and-turn drain stopper is generally a straightforward process. The objective is to detach the stopper from the internal linkage mechanism that controls its movement.
Step 1: Examine the Stopper: Look closely at the base of the stopper where it meets the drain. Many lift-and-turn stoppers have a visible screw or set screw holding the stopper in place. If a screw is present, proceed to the next step. If not, the stopper may simply be threaded onto the linkage.
Step 2: Loosen the Set Screw (If Applicable): If a set screw is visible, use a small Allen wrench or screwdriver to loosen it. Be careful not to strip the screw head. Once loosened, the stopper should be free to rotate.
Step 3: Unscrew or Lift the Stopper: If there was no set screw, or after loosening the set screw, try unscrewing the stopper by turning it counterclockwise. If the stopper doesn't unscrew, try gently lifting it straight up. Some stoppers are held in place by a friction fit and may require a bit of force to remove.
Step 4: Clean the Stopper and Drain: Once the stopper is removed, clean any accumulated hair or debris from the stopper and the drain opening. This will help prevent future clogs.
In some cases, the stopper may be corroded or stuck. If this happens, soaking the area with a penetrating oil (like WD-40) for a few minutes before attempting to remove it can be helpful. Always exercise caution when using tools near the bathtub's surface to avoid scratches or damage.
Removing a Push-and-Pull or Toe-Touch Bathtub Drain Stopper
Removing a push-and-pull or toe-touch stopper often involves a similar process, focusing on disconnecting the stopper from the internal spring mechanism.
Step 1: Identify the Stopper Type: Confirm whether you have a push-and-pull or a toe-touch stopper as the visual difference is minimal. The removal process is generally the same for both.
Step 2: Rotate the Stopper (If Possible): Some push-and-pull or toe-touch stoppers can be rotated. Try turning the stopper counterclockwise. If it rotates, it might be threaded onto the linkage. Continue turning until it comes loose.
Step 3: Pull Straight Up: If the stopper doesn't rotate, or after you've unscrewed it as much as possible, grip the stopper firmly and pull it straight up. It may require some force to overcome the spring tension. Wiggling the stopper gently from side to side while pulling can help loosen it.
Step 4: Inspect and Clean: Once removed, inspect the stopper and the drain opening for any debris. Clean thoroughly to ensure proper drainage.
Occasionally, push-and-pull or toe-touch stoppers become stuck due to corrosion or mineral buildup. Similar to the lift-and-turn stopper, penetrating oil can be used to loosen the stopper before attempting removal. Excessive force should be avoided to prevent damage to the drain assembly.
Removing a Trip-Lever Bathtub Drain Stopper
The trip-lever stopper presents a slightly different challenge, as the mechanism is accessed through the overflow plate rather than directly at the drain.
Step 1: Locate the Overflow Plate: Identify the overflow plate located near the top of the bathtub. This is where the trip lever is situated.
Step 2: Remove the Overflow Plate: Use a screwdriver to remove the screws holding the overflow plate in place. Carefully pull the plate away from the bathtub wall. The trip lever and its connected linkage will come out with the plate.
Step 3: Detach the Plunger: The plunger, which is the actual stopper, is connected to the trip lever mechanism. It may be connected by a rod or a chain. Carefully detach the plunger from the linkage. This may involve unscrewing a small connector or simply unclipping the chain.
Step 4: Pull Out the Plunger: Once detached, carefully pull the plunger up and out of the drainpipe. This may require some maneuvering to navigate any bends in the pipe.
Step 5: Clean the Plunger and Drain: After removing the plunger, clean it thoroughly, removing any accumulated hair, soap scum, or debris. Also, clean the drainpipe as far down as possible.
Trip-lever stoppers are often prone to corrosion and buildup due to their location and the complex mechanism involved. Regular cleaning and maintenance are crucial to prevent clogs and ensure proper operation. When reassembling the trip lever and plunger, ensure all connections are secure and properly aligned.
Removing a Flip-It Bathtub Drain Stopper
The Flip-It stopper is generally the easiest to remove due to its simple design and direct placement over the drain.
Step 1: Identify the Stopper: Confirm that it is indeed a Flip-It stopper. It will be a disc sitting directly on top of the drain opening with a lever on top.
Step 2: Flip the Lever: Ensure the lever is in the open position to release any suction or pressure holding the stopper in place.
Step 3: Lift the Stopper: Grip the stopper firmly and lift it straight up. It should come off easily. Some Flip-It stoppers may have a rubber gasket that creates a tight seal, requiring slightly more force to remove.
Step 4: Clean the Stopper and Drain: Clean any debris from the stopper and the drain opening.
The Flip-It stopper's simplicity makes it relatively trouble-free. However, the rubber gasket can wear out over time, requiring replacement to maintain a proper seal. Regular cleaning will also extend the lifespan of the stopper.
In conclusion, removing a bathtub drain stopper is a task that can be easily accomplished with the right knowledge and tools. Identifying the type of stopper is the first crucial step, followed by applying the appropriate removal technique. Regular cleaning and maintenance of the stopper and drain will help prevent clogs and ensure proper drainage, prolonging the life of the plumbing components.

How To Easily Remove Bathtub Drain Plug Stopper Unclog In 1 Minute Jonny Diy
:max_bytes(150000):strip_icc()/remove-tub-stopper-clear-a-drain-2718786-03-8a44cb29b73347d0bbd1528ffe968544.jpg?strip=all "How To Remove 6 Diffe Kinds Of Drain Stoppers")
How To Remove 6 Diffe Kinds Of Drain Stoppers

Remove A Bathtub Drain Stopper To Unclog The Quick Easy

How To Remove A Bathtub Drain Stopper
:max_bytes(150000):strip_icc()/remove-tub-stopper-clear-a-drain-2718786-hero-425b2598739f43718b6905767d2616d8.jpg?strip=all "How To Remove 6 Diffe Kinds Of Drain Stoppers")
How To Remove 6 Diffe Kinds Of Drain Stoppers

How To Remove A Bathtub Drain The Home Depot

4 Easy Ways To Remove A Tub Drain Stopper Wikihow

How To Remove A Bathtub Drain Stopper Mr Rooter

How To Remove A Bathtub Drain Stopper

How To Remove Bathtub Drain Stopper That Spins Freely
Related Posts