Hand Held Shower Hose for Bathtub Kmart: Usage Instructions
This article provides comprehensive usage instructions for a hand-held shower hose designed for bathtub use, with specific relevance to models potentially available at Kmart. While specific model numbers may vary, the general principles of installation and operation remain consistent. The instructions detail how to connect the hose, operate the shower head, and maintain the unit for optimal performance and longevity. Safety precautions are also included to prevent damage or injury during use.
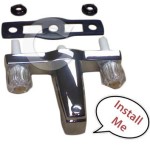
The hand-held shower hose for bathtub provides a flexible and convenient way to direct water flow during bathing or showering. It is particularly useful for rinsing hair, bathing children or pets, and cleaning the bathtub itself. The unit typically consists of a shower head, a flexible hose, and a diverter valve that allows switching between the bathtub faucet and the hand-held shower.
Key Point 1: Installation Procedures
The installation process is crucial for ensuring the proper functioning and preventing leaks. To begin, gather the necessary tools and materials. These typically include an adjustable wrench, plumber's tape (Teflon tape), and a clean cloth. Ensure the water supply to the bathtub faucet is completely shut off before commencing installation. This prevents water damage and potential injury.
The most common installation involves replacing the existing bathtub spout with a spout that integrates a diverter valve. First, carefully unscrew the existing bathtub spout. Note the direction of unscrewing; typically, it is counter-clockwise. Clean the exposed pipe threads thoroughly. Wrap the pipe threads with plumber's tape, applying several layers in a clockwise direction. This creates a watertight seal and prevents leakage.
Next, screw the new bathtub spout with the integrated diverter valve onto the pipe. Tighten it securely using the adjustable wrench, but avoid over-tightening, which can damage the pipe or the spout. Position the spout so that the diverter valve lever is easily accessible. Double-check that the spout is securely attached and does not wobble.
Now, connect one end of the hand-held shower hose to the diverter valve outlet. This connection is typically a threaded fitting. Again, wrap the threads with plumber's tape before screwing the hose onto the valve. Tighten the connection securely, but avoid over-tightening. Similarly, connect the other end of the hose to the hand-held shower head. Wrap the threads with plumber's tape and tighten the connection securely.
Once all connections are made, turn the water supply back on gradually. Check for any leaks around the connections. If leaks are detected, turn off the water supply immediately and tighten the connections further. If leaks persist, disassemble the connections, reapply plumber's tape, and reassemble. Carefully examine the threads for any damage that could be causing the leak.
Finally, test the diverter valve by switching between the bathtub faucet and the hand-held shower. Ensure the water flows smoothly and without leaks in both modes. Adjust the shower head to different spray patterns, if applicable, to ensure proper functionality. The installation is complete if the unit operates correctly and without leaks.
Key Point 2: Operational Guidelines
Operating the hand-held shower hose is straightforward once the installation is complete. The primary control is the diverter valve, which switches the water flow between the bathtub faucet and the shower head. Typically, the diverter valve is a lever that can be pulled up or pushed down, or a knob that can be turned.
To use the bathtub faucet, ensure the diverter valve is in the appropriate position. The specific position will vary depending on the model, but it is usually indicated by markings on the valve or spout. The water will then flow from the bathtub faucet as normal, controlled by the hot and cold water handles.
To switch to the hand-held shower, adjust the diverter valve to the shower position. The water will then flow through the hose and out of the shower head. The hand-held shower can be used to direct the water flow to specific areas of the body or for cleaning purposes. The user can adjust the shower head position for comfort and convenience.
Many hand-held shower heads offer different spray patterns, such as a wide spray, a concentrated spray, or a pulsating massage spray. These patterns can be selected by rotating the shower head face or by pressing a button on the shower head. Experiment with the different spray patterns to find the preferred setting.
When finished using the hand-held shower, switch the diverter valve back to the bathtub faucet position. This allows the bathtub faucet to be used again without having to readjust the diverter valve. Turn off the hot and cold water handles completely to stop the water flow. It is important to avoid leaving the water running unnecessarily, as this wastes water and can increase water bills.
Pay attention to the water temperature when using the hand-held shower. Test the water temperature with your hand before directing the water flow towards your body. This prevents scalding, especially for children and individuals with sensitive skin. Adjust the hot and cold water handles to achieve a comfortable water temperature.
Key Point 3: Maintenance and Safety
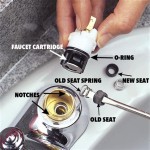
Regular maintenance is essential for extending the lifespan of the hand-held shower hose and preventing performance issues. One of the most common maintenance tasks is cleaning the shower head to remove mineral deposits and debris. Mineral deposits, such as calcium and lime, can accumulate over time and clog the shower head nozzles, reducing water pressure and affecting the spray pattern.
To clean the shower head, detach it from the hose. Soak the shower head in a solution of white vinegar and water for several hours or overnight. The vinegar helps to dissolve the mineral deposits. After soaking, use a small brush or toothpick to gently scrub away any remaining debris from the nozzles. Rinse the shower head thoroughly with clean water before reattaching it to the hose.
Periodically inspect the hose for any signs of wear and tear, such as cracks, kinks, or leaks. If the hose is damaged, replace it immediately to prevent water leakage and potential water damage. The hose should be flexible and pliable; if it becomes stiff or brittle, it is likely nearing the end of its lifespan.
Check the connections between the hose and the diverter valve and the shower head. Ensure the connections are tight and that there are no leaks. If leaks are detected, tighten the connections further. If the leaks persist, replace the plumber's tape and reassemble the connections.
Store the hand-held shower head in a safe place when not in use. Consider using a shower head holder or a suction cup hook to keep the shower head off the floor and prevent it from being damaged. Avoid dropping the shower head, as this can damage the nozzles or the housing.
Safety is paramount when using the hand-held shower hose. Never leave children unattended while they are using the shower. Supervise children closely to prevent them from playing with the shower or adjusting the water temperature unsupervised. Ensure the bathtub floor is not slippery to prevent falls. Use a non-slip mat or adhesive strips to provide traction.
Be mindful of the water temperature, especially when bathing children or individuals with sensitive skin. Test the water temperature with your hand before directing the water flow towards the body. Avoid using excessively hot water, as this can cause scalding. Adjust the hot and cold water handles to achieve a comfortable water temperature.
Do not use the hand-held shower if the hose or shower head is damaged. Damaged components can pose a safety hazard and should be replaced immediately. Avoid using excessive force when operating the diverter valve or adjusting the shower head, as this can damage the components. Follow the manufacturer's instructions for proper usage and maintenance. By adhering to these guidelines, the hand-held shower hose for bathtub can provide years of reliable and convenient use. Regularly checking for leaks and maintaining the showerhead by cleaning the mineral build up will prolong the life of the product.

How To Add Sprayer Bathtub

No Shower Problem Install A Diverter In 1 Hour The Art Of Doing Stuff

How To Install A Handheld Shower

How To Change A Shower Head Installing Handheld

The Shower Head Top Rated All Metal Set

Polished Chrome Pfister Lg16 500c Handheld Shower Slide Bar Kit Faucets

Hand Shower 2 5 Gpm 6 Setting

Handheld Shower Kit With Glide Bar For Freedom Showers Height Adjustable

Diy Hand Shower Head Installation Made Easy

No Shower Problem Install A Diverter In 1 Hour The Art Of Doing Stuff