Grohe Bathtub Faucet Leaking: Causes, Diagnosis, and Solutions
A leaking Grohe bathtub faucet presents a common household problem that can escalate quickly if left unaddressed. Water wastage leads to increased water bills, and persistent leaks can cause water damage to surrounding structures, promoting mold growth and compromising structural integrity. Understanding the potential causes of a leak, accurately diagnosing the issue, and implementing appropriate solutions are crucial steps in resolving this plumbing problem effectively and efficiently.
Grohe is a reputable brand known for its quality and durability. However, even the most well-engineered faucets are susceptible to wear and tear over time. Factors such as water hardness, frequency of use, and improper installation can contribute to the degradation of faucet components, ultimately leading to leaks. This article provides a comprehensive guide to understanding the common causes of Grohe bathtub faucet leaks, diagnosing the specific issue, and exploring various solutions to restore the faucet to its optimal working condition.
Identifying the Source of the Leak
The first step in addressing a leaking Grohe bathtub faucet is to pinpoint the exact location of the leak. Careful observation is paramount in this process. Leaks can originate from several areas, including the faucet spout, the handle(s), or the connection points to the water supply lines. Each location suggests a different underlying issue and requires a specific diagnostic approach.
A leak emanating from the faucet spout typically indicates a problem with the faucet's internal components, such as the cartridges, O-rings, or valve seats. These components are responsible for controlling the flow of water, and when they become worn, cracked, or corroded, they can fail to create a watertight seal, leading to a persistent drip. Inspect the spout closely, paying attention to any visible signs of wear or damage.
Leaks around the faucet handle(s) often suggest issues with the handle's O-rings or the cartridge underneath. O-rings are small rubber seals that prevent water from escaping around the handle stem. Over time, these O-rings can dry out, crack, or become dislodged, resulting in a leak. Similarly, the cartridge, which controls the mixing of hot and cold water, can develop cracks or internal damage, causing leaks around the handle base. Observing the handle closely while the faucet is in use, especially during handle movement, can help pinpoint the source of the leak.
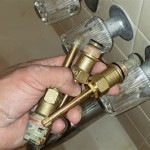
Leaks at the connection points to the water supply lines are usually indicative of loose connections, corroded fittings, or damaged supply lines. These leaks may not be immediately apparent, but they can cause significant water damage over time. Visually inspect the connection points where the supply lines attach to the faucet body, looking for signs of water droplets or corrosion. A slow, dripping leak at these points often requires tightening the connections or replacing the fittings.
Common Causes of Grohe Bathtub Faucet Leaks
Several factors can contribute to a leaking Grohe bathtub faucet. Understanding these common causes is crucial for accurate diagnosis and effective repair. These factors include worn-out cartridges, damaged O-rings, corroded valve seats, high water pressure, and hard water deposits.
Worn-out cartridges are a frequent cause of leaks in single-handle Grohe bathtub faucets. The cartridge is responsible for controlling the flow of water and mixing hot and cold water to achieve the desired temperature. Over time, the internal components of the cartridge can wear down due to constant use and exposure to water. This wear can lead to cracks, fissures, or other damage that prevents the cartridge from forming a watertight seal. Signs of a worn-out cartridge include a constant drip from the spout, difficulty controlling water temperature, or a stiff or difficult-to-turn handle.
Damaged O-rings are another common culprit behind faucet leaks, particularly around the handle(s). O-rings are small, circular rubber seals that are used to create a watertight seal between faucet components. These O-rings are susceptible to wear and tear from exposure to water, temperature fluctuations, and the chemicals present in some water supplies. Over time, O-rings can dry out, crack, shrink, or become dislodged, leading to leaks around the handle stem. Replacing the damaged O-rings is a relatively straightforward repair that can eliminate these leaks.
Corroded valve seats can also contribute to faucet leaks. Valve seats are the stationary surfaces against which the faucet's valves or cartridges seal to stop the flow of water. Over time, mineral deposits from hard water can accumulate on the valve seats, creating a rough surface that prevents a tight seal. This corrosion can lead to a constant drip from the spout, even when the faucet is turned off. Cleaning or replacing the valve seats may be necessary to resolve these leaks.
High water pressure can put undue stress on the faucet's internal components, accelerating wear and tear and increasing the likelihood of leaks. Excessive water pressure can force water past seals and connections, leading to leaks around the spout, handle(s), or connection points. Installing a pressure regulator to reduce the water pressure to a safe level (typically between 40 and 60 psi) can help prevent leaks and extend the life of the faucet.
Hard water deposits, such as calcium and magnesium, can accumulate inside the faucet, clogging waterways, corroding components, and preventing proper sealing. These mineral deposits can build up over time, particularly in areas with hard water supplies. Regular cleaning and descaling of the faucet can help prevent the buildup of hard water deposits and reduce the risk of leaks. Using a water softener can also help to reduce the hardness of the water and protect the faucet from damage.
Step-by-Step Guide to Repairing a Leaking Grohe Bathtub Faucet
Repairing a leaking Grohe bathtub faucet can be a DIY project, depending on the complexity of the issue and the homeowner's comfort level with plumbing repairs. Before starting any repair work, it is essential to gather the necessary tools and materials, including a screwdriver set, an adjustable wrench, pliers, a cartridge puller (if necessary), replacement cartridges, O-rings, valve seats (if needed), plumber's grease, and a clean rag.
The first step in any faucet repair is to shut off the water supply to the faucet. This is typically done by turning off the shut-off valves located under the sink or behind the bathtub access panel. If these valves are not present or are not functioning properly, the main water supply to the house must be shut off. Once the water supply is shut off, open the faucet to relieve any remaining pressure in the lines.
Next, remove the faucet handle(s) to access the internal components. The method for removing the handle(s) will vary depending on the specific Grohe faucet model. Some handles may be held in place by a setscrew, which can be loosened with an Allen wrench. Other handles may simply screw off or pull off. Refer to the faucet's instruction manual or online resources for specific instructions on removing the handle(s).
Once the handles are removed, inspect the O-rings and cartridges for signs of wear or damage. If the O-rings appear cracked, dry, or dislodged, replace them with new O-rings of the correct size. Lubricate the new O-rings with plumber's grease before installing them to ensure a smooth fit and prevent future leaks. If the cartridge appears cracked, damaged, or worn, replace it with a new cartridge of the correct type. Some Grohe faucets require a special cartridge puller to remove the cartridge. Follow the instructions provided with the cartridge puller to remove the old cartridge safely.
If the leak is originating from the valve seats, inspect them for signs of corrosion or damage. If the valve seats are corroded, clean them with a wire brush or a descaling solution to remove mineral deposits. If the valve seats are severely damaged, replace them with new valve seats. Make sure to use the correct type of valve seats for the specific Grohe faucet model.
After replacing the necessary components, reassemble the faucet in the reverse order of disassembly. Make sure to tighten all connections securely but avoid overtightening, which can damage the faucet components. Turn the water supply back on slowly and check for leaks. If any leaks persist, double-check the connections and ensure that all components are properly installed.
If the leak persists despite replacing the cartridges, O-rings, and valve seats, there may be a more complex problem with the faucet that requires professional assistance. Consider contacting a qualified plumber to diagnose and repair the issue.
Regular maintenance can help prevent future leaks and extend the life of the Grohe bathtub faucet. This includes cleaning the faucet regularly to remove mineral deposits, lubricating the O-rings with plumber's grease periodically, and checking for leaks regularly. Addressing small leaks promptly can prevent them from escalating into larger problems and save water and money in the long run.
When selecting replacement parts, ensure compatibility with the specific Grohe faucet model. Using generic or mismatched parts may compromise the faucet's performance and lead to future leaks. Refer to the faucet's instruction manual or online resources to identify the correct replacement parts. Grohe's website or authorized retailers are reliable sources for obtaining genuine Grohe parts, ensuring optimal compatibility and performance.

How To Fix A Leaking Grohe Shower Valve

How To Fix A Leaky Shower Valve Grohe

Grohe Leaky Faucet Repair

Diverter Tub Spout

Need Help To Identify An Old Grohe Bathtub Faucet Cartridge

Grohe Concetto 5 In Tub Spout Brushed Nickel 13366en0 The Home Depot

Grohe Crane Bathroom And Kitchen Water Faucet Sink Mixer At Bathselect Plumbing Sinks Wash Basin Whirlpool Bathtubs Pedestal

What Maintenance Can I Perform On My Grohe 33 755 Kd0 Ladylux Cafe Pull Out Kitchen Faucet Home Improvement Stack Exchange

32138gn2 By Grohe Concetto Single Hole Handle L Size Bathroom Faucet 1 2 Gpm Studio41

Grohe Quickfix Start Shower Fitting 24208002 Exposed Chrome