Grohe Bathtub Faucet Handle Removal: A Comprehensive Guide
Removing a Grohe bathtub faucet handle might seem like a daunting task, but with the right information and tools, it can be a straightforward process. This article provides a detailed guide to handle removal, covering various Grohe handle types and common issues encountered during the process. Understanding the specific mechanism of the handle in question is crucial for successful removal and avoiding damage to the faucet.
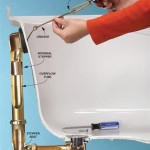
Before commencing any work, it is essential to shut off the water supply to the bathtub faucet. Typically, shut-off valves are located beneath the bathtub or within the adjacent bathroom. If individual shut-off valves are not present, the main water supply to the entire house must be turned off. Once the water supply is secured, proceed with the necessary steps for removing the Grohe bathtub faucet handle.
Identifying the Grohe Faucet Handle Type
Grohe offers a diverse range of faucet handle designs, each with its own unique method of attachment. Identifying the specific handle type is the initial and most crucial step. Common Grohe handle types include setscrew handles, screw-on handles, and handles secured with a retaining clip. Visual inspection of the handle’s base and sides will often reveal the presence of a setscrew or a cap concealing a screw. If neither is visible, the handle likely employs a retaining clip mechanism.
Consulting the Grohe product manual or searching online using the faucet's model number can also provide valuable information about the handle type and removal procedure. Grohe’s website often contains exploded diagrams and technical specifications that illustrate the handle’s construction. Accurate identification minimizes the risk of using incorrect methods and potentially damaging the faucet.
Another important aspect of identification involves noting the handle's material and finish. Certain finishes are more susceptible to scratches and damage, requiring extra caution during removal. For instance, polished chrome finishes can easily show fingerprints and light scratches, while brushed nickel finishes are more resilient. Awareness of the handle material allows for the selection of appropriate tools and techniques to protect the finish.
Removing a Grohe Handle Secured with a Setscrew
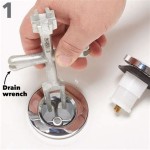
Setscrew handles are characterized by a small screw, called a setscrew, located on the side or underneath the handle. This screw, when tightened, presses against the valve stem, securing the handle in place. To remove this type of handle, locate the setscrew, typically hidden beneath a small decorative cap or simply exposed on the handle's surface.
Carefully remove the decorative cap, if present, using a small flathead screwdriver or a specialized pick tool. Avoid applying excessive force, as the cap is often made of plastic and can be easily damaged. Once the setscrew is exposed, use an appropriately sized Allen wrench (also known as a hex key) to loosen the screw. It is important to use the correct size Allen wrench to prevent stripping the screw head. Turning the wrench counterclockwise loosens the setscrew.
After the setscrew is loosened, the handle should be able to be pulled directly off the valve stem. If the handle is stuck, gently wiggle it back and forth while applying gentle pulling pressure. Avoid using excessive force, as this can damage the valve stem or the handle itself. If the handle remains stuck, consider applying a small amount of penetrating oil to the point where the handle meets the valve stem. Allow the oil to penetrate for a few minutes before attempting to remove the handle again.
In some cases, the setscrew may be corroded or seized, making it difficult to loosen. Applying penetrating oil and allowing it to sit for a longer period (several hours or even overnight) can help to break down the corrosion. If the setscrew head is stripped, it may be necessary to use a screw extractor to remove it. A screw extractor is a specialized tool that grips the damaged screw head, allowing it to be turned and removed.
Once the handle is removed, carefully inspect the setscrew and the valve stem for any signs of damage or wear. Replacing a damaged setscrew is recommended to ensure proper handle security upon reinstallation. Additionally, cleaning the valve stem with a wire brush can remove any buildup that may hinder the new handle from seating properly.
Removing a Grohe Handle Secured with a Screw-On Mechanism
Screw-on handles typically feature a screw concealed beneath a decorative cap located on the top or front of the handle. This screw secures the handle directly to the valve stem. The removal process involves accessing and unscrewing this hidden screw.
Begin by carefully removing the decorative cap. Similar to the setscrew handle, use a small flathead screwdriver or a specialized pick to gently pry off the cap. Exercise caution to avoid scratching or damaging the handle finish. Once the cap is removed, the screw will be visible.
Select a screwdriver that appropriately fits the screw head. Using the wrong size screwdriver can easily strip the screw head, making removal much more difficult. Carefully turn the screw counterclockwise to loosen it. If the screw is tight, apply gentle pressure and ensure the screwdriver is firmly seated in the screw head to prevent slippage.
After the screw is removed, the handle should pull straight off the valve stem. If the handle is stuck, gently wiggle it back and forth while applying gentle pulling pressure. Avoid applying excessive force. A small amount of penetrating oil can be applied to the point where the handle meets the valve stem if resistance is encountered.
Inspect the removed screw for any signs of corrosion or damage. If the screw is damaged, replace it with a new screw of the same size and thread. Cleaning the valve stem with a wire brush is also recommended to remove any buildup that may hinder the new handle from seating properly. When reinstalling the handle, ensure that the screw is tightened securely, but avoid over-tightening, which can damage the handle or the valve stem.
Removing a Grohe Handle Secured with a Retaining Clip
Handles secured with retaining clips often do not have visible screws or setscrews. Instead, a spring-loaded clip holds the handle in place. Removing these handles can be slightly more challenging, as it requires a specific technique to disengage the clip.
Locate the point where the handle meets the faucet body. In most cases, there will be a small gap or seam. This is where the retaining clip is typically located. Use a small flathead screwdriver or a specialized clip removal tool to carefully pry the handle away from the faucet body. The goal is to compress the retaining clip, allowing the handle to be pulled off.
Applying gentle, even pressure is crucial. Avoid using excessive force, as this can damage the handle or the clip. Wiggling the handle while applying pressure can help to disengage the clip. If the handle is stuck, try rotating it slightly while applying pressure. This can help to align the clip and make it easier to disengage.
Once the clip is disengaged, the handle should slide off the valve stem. Inspect the clip for any signs of damage or wear. If the clip is damaged, it should be replaced. When reinstalling the handle, ensure that the clip is properly aligned and engaged. You should hear a click when the handle is properly seated.
Sometimes, removing these types of handles requires a specific tool designed for Grohe faucets. These tools are often available online or at plumbing supply stores. They are designed to safely and efficiently disengage the retaining clip without damaging the handle or the faucet body. Consulting the Grohe product manual or searching online using the faucet's model number can provide information about whether a specific tool is required for the handle removal.
When working with retaining clips, it is important to be aware that they can sometimes be spring-loaded and may eject when disengaged. Wear safety glasses to protect your eyes. Also, be careful not to lose the clip, as it is essential for securing the handle upon reinstallation.
Regardless of the handle type, always exercise patience and care during the removal process. Rushing or using excessive force can lead to damage and additional repair costs. Taking the time to properly identify the handle type and using the appropriate tools and techniques will ensure a successful and damage-free removal.
After removing the handle, proceed with the necessary repairs to the faucet. This may involve replacing worn-out cartridges, O-rings, or other components. Once the repairs are complete, reinstall the handle, following the reverse steps of the removal process. Ensure that all screws, caps, and clips are securely in place before turning the water supply back on.

Grohe Shower Thermostatic Mixer Valve Replacement

How To Fix A Leaking Grohe Shower Valve

Grohe Shower Faucet Handle Removal Sincovaga Com Br

My Grohe Ladylux Faucet Leaks And I Can T Remove The Lever Doityourself Com Community Forums

Grohe Shower Valve Handles Keep Falling Off Lets Get To Fixin

Old Shower Valve Identification Easy Diy Guide Hunker

Help Removing Grohe Grohmix Faucet Cartridge Terry Love Plumbing Remodel Diy Professional Forum

How To Fix A Leaking Grohe Shower Valve

Plumbing How Can I Remove This Thermostatic Mixing Shower Faceplate Home Improvement Stack Exchange
Related Posts