Glacier Bay Bathtub Faucet Installation: A Comprehensive Guide
Upgrading your bathtub faucet can transform the look and functionality of your bathroom. Glacier Bay, a renowned brand, offers a wide range of high-quality faucets to enhance your bathing experience. Installing a Glacier Bay bathtub faucet is a straightforward task that can be completed with the right tools and some basic plumbing knowledge. This guide will provide you with step-by-step instructions on how to install a Glacier Bay bathtub faucet, ensuring a smooth and successful installation.
Materials Required
- Glacier Bay bathtub faucet
- Adjustable wrench
- Pipe wrench
- Teflon tape
- Plumber's putty
- Basin wrench
- Phillips screwdriver
- Flathead screwdriver
- Safety glasses
Step-by-Step Instructions
1. Prepare the Work Area
Safety first! Put on your safety glasses and gather all the necessary tools. Remove the old faucet by unscrewing the nuts holding it in place. Clean the surface where the new faucet will be installed.
2. Install the Mounting Bracket
Place the mounting bracket over the faucet holes. Apply plumber's putty around the base of the bracket and secure it with the mounting nuts.
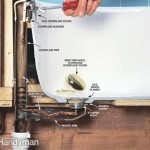
3. Connect the Supply Lines
Wrap Teflon tape around the threads of the supply lines and hand-tighten them into the corresponding hot and cold water valves. Use an adjustable wrench to tighten the connections further.
4. Position the Faucet
Place the faucet body over the mounting bracket and align the handles. Secure the faucet with the mounting nuts.
5. Install the Cartridge
Follow the manufacturer's instructions to insert the cartridge into the faucet body. Secure the cartridge with the retaining clip or screw.
6. Connect the Handle Assemblies
Insert the handle assemblies into the faucet body and tighten the screws to hold them in place.
7. Finalize the Installation
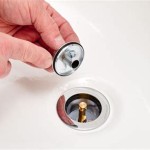
Turn on the water supply and check for any leaks. If you find any, retighten the connections as needed. Install the drain stopper assembly and the decorative trim.
Tips for Success
- Use Teflon tape to prevent leaks from the supply line connections.
- Tighten the mounting nuts securely, but avoid overtightening.
- If you encounter any difficulties, refer to the manufacturer's instructions or consult a licensed plumber.
- Always test the faucet for proper operation before completing the installation.
Congratulations! You have successfully installed your Glacier Bay bathtub faucet. With proper care and maintenance, your new faucet will provide years of reliable service, enhancing your bathroom's style and functionality.

Glacier Bay 873w 6101 Single Handle Tub And Shower Faucet User Manual

Glacier Bay Builders Single Handle 1 Spray Tub And Shower Faucet 8 Gpm In Brushed Nickel Valve Included Hd873x 0804 The Home Depot

How To Fix A Glacier Bay Shower In 10 Minutes

Glacier Bay Oswell Single Handle 1 Spray Tub And Shower Faucet 8 Gpm In Matte Black Valve Included Hd873x 1910h The Home Depot

How To Install A Glacier Bay 3 Piece Bathroom Faucet

Glacier Bay Constructor Single Handle 1 Spray Tub And Shower Faucet In Chrome Valve Included Hd873x 8501 The Home Depot

Installed Bath Hd Glacier Bay Faucet Brushed Nickel Mr Alligator Plumber And Tile Contractor

Glacier Bay 2 Handle Deck Mounted Roman Tub Faucet For

Glacier Bay Single Handle Tub And Shower Cartridge Assembly 864660 The Home Depot

Glacier Bay Builders 1 Handle Spray Tub And Shower Faucet In Broe Valve Included Com