Freestanding Bathtub Drain Connection Diagram: A Comprehensive Guide
Freestanding bathtubs have become increasingly popular in modern bathroom design, offering a sleek and luxurious alternative to traditional built-in tubs. However, their unique design presents specific challenges when it comes to drain connections. Unlike standard tubs connected directly to the plumbing within a wall or floor, freestanding tubs require exposed drain lines, necessitating careful planning and execution to ensure proper functionality and aesthetic appeal. A clear understanding of the freestanding bathtub drain connection diagram is crucial for both professional plumbers and DIY enthusiasts embarking on this installation process. This article provides a detailed overview of the key components, connection methods, and considerations involved in successfully connecting a freestanding bathtub drain.
The drain connection for a freestanding bathtub differs significantly from that of a traditional tub due to its exposed nature. With a built-in tub, the drain is typically hidden behind walls or beneath the floor, allowing for a direct connection to the existing plumbing system. In contrast, a freestanding tub sits independently, requiring a visible drain pipe that needs to connect to the drain outlet beneath the floor. This necessitates a more intricate setup, incorporating elements like a freestanding tub drain kit, P-trap assembly, and often extending or modifying the existing plumbing to accommodate the new tub's location. The visual aspect adds another layer of complexity, as the exposed drain must be both functional and aesthetically pleasing, blending seamlessly with the bathroom's design.
Understanding the Key Components
A freestanding bathtub drain connection comprises several key components, each playing a vital role in ensuring efficient drainage and preventing leaks. Familiarizing yourself with these components is essential before initiating the installation process.
1. Freestanding Tub Drain Kit: This kit typically includes the necessary hardware for connecting the tub's drain to the floor drain. It usually includes a tailpiece extension, waste and overflow tubes, couplings, and decorative flanges. The tailpiece extension is a vertical pipe that connects to the tub's drain outlet and extends down to the floor. The waste and overflow tubes manage both the primary drain and any excess water that might overflow from the tub, preventing water damage. Couplings are used to connect various pipe sections, ensuring watertight seals. The decorative flanges conceal the pipe connections at the floor level, providing a clean and finished look.
2. P-Trap Assembly: The P-trap is a U-shaped pipe section designed to hold a small amount of water. This water barrier prevents sewer gases from entering the bathroom through the drain. Sewer gases can be harmful and possess unpleasant odors, making the P-trap a critical component in maintaining a sanitary and comfortable environment. The P-trap must be installed correctly and maintained to ensure its effectiveness.
3. Drain Pipe Extension: This component is often required to bridge the gap between the P-trap and the existing drain outlet in the floor. The length and diameter of the drain pipe extension will vary depending on the specific layout of the bathroom and the placement of the freestanding tub. The material used for the extension should be compatible with the existing plumbing, typically PVC or ABS.
4. Floor Flange: The floor flange is a decorative cover that conceals the connection point where the drain pipe enters the floor. It provides a clean and finished appearance, hiding any rough cuts or imperfections in the flooring around the drain. Floor flanges are available in various styles and finishes to complement the bathroom's design.
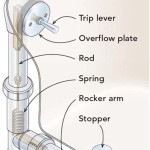
5. Waste and Overflow Mechanism: This mechanism controls the drainage of the bathtub and prevents overflows. It typically consists of a stopper that can be opened and closed to allow water to drain and an overflow tube that channels excess water down the drain if the tub is filled too high. Proper installation and adjustment of the waste and overflow mechanism are crucial for ensuring proper drainage and preventing water damage.
The materials used for these components are typically PVC, ABS, or brass. PVC and ABS are common choices due to their durability, affordability, and ease of installation. Brass is often used for decorative components like flanges and stoppers, providing a more elegant and durable finish.
Methods for Connecting a Freestanding Bathtub Drain
Several methods can be employed to connect a freestanding bathtub drain, each with its own advantages and disadvantages. The best method will depend on factors such as the location of the existing drain outlet, the type of flooring, and the overall design of the bathroom.
1. Direct Connection: In this method, the freestanding tub drain kit is directly connected to the existing drain outlet in the floor. This is the simplest and most straightforward approach, but it requires the drain outlet to be located directly beneath the tub's drain. If the drain outlet is not properly aligned, adjustments will be necessary.
2. Offset Connection: This method is used when the existing drain outlet is not directly beneath the tub's drain. An offset connection involves using angled fittings and pipe extensions to redirect the drain line to the appropriate location. This method requires careful planning and precise measurements to ensure proper alignment and avoid creating excessive bends in the drain line.
3. Under-Slab Connection: This method is the most complex and involves running the drain line beneath the concrete slab floor. This is typically done during new construction or major renovations when access to the subfloor is readily available. An under-slab connection allows for a clean and seamless installation, hiding the drain line completely. However, it requires careful planning and meticulous execution to avoid leaks and ensure accessibility for future maintenance or repairs.
4. Through-the-Floor Connection: In this method, a hole is drilled through the floor to connect the drain line to the plumbing beneath. This method is often used when the existing drain outlet is not accessible from above, or when the flooring is difficult to remove. A through-the-floor connection requires careful drilling and sealing to prevent water damage and ensure structural integrity.
Each connection method necessitates specific tools and materials. For instance, direct and offset connections primarily require standard plumbing tools like pipe cutters, wrenches, and Teflon tape. Under-slab connections demand more extensive tools and expertise, including concrete saws, excavating equipment, and specialized plumbing fittings. Through-the-floor connections require drill bits appropriate for the flooring material and sealant to ensure a waterproof connection.
Considerations for Successful Installation
Beyond understanding the components and methods, several key considerations are vital for a successful freestanding bathtub drain installation. Ignoring these factors can lead to complications, leaks, and aesthetic inconsistencies.
1. Proper Measurement and Planning: Accurate measurements are essential for ensuring that the drain line is properly aligned and that all components fit together correctly. Before beginning the installation, carefully measure the distance between the tub's drain outlet and the existing drain outlet in the floor. Also, consider the height of the tub and the necessary length of the tailpiece extension. Create a detailed plan that outlines the steps involved in the installation and identifies any potential challenges.
2. Accessibility for Maintenance: While a seamless and concealed drain connection is aesthetically desirable, it is crucial to ensure that the drain line remains accessible for future maintenance and repairs. Consider incorporating access panels or removable sections of flooring to allow for easy access to the P-trap and other critical components. This will save time and effort in the long run if any problems arise.
3. Ensuring Proper Slope: The drain line must have a proper slope to ensure efficient drainage. A general rule of thumb is to allow for a ¼-inch slope per foot of drain line. This slope ensures that water flows freely through the drain and prevents the buildup of debris and blockages. Use a level to verify the slope of the drain line during installation. Any back pitch in the drain line will cause issues.
4. Sealing and Leak Prevention: Proper sealing is critical for preventing leaks. Use Teflon tape or pipe dope on all threaded connections to create a watertight seal. Ensure that all compression fittings are properly tightened and that rubber gaskets are in good condition. After completing the installation, thoroughly test the drain line for leaks by filling the tub with water and checking all connections for any signs of leakage.
5. Adhering to Plumbing Codes: All plumbing installations must comply with local plumbing codes. These codes specify requirements for pipe materials, installation methods, and drainage slopes. Consult with a local plumbing inspector to ensure that your installation meets all applicable codes. Failure to comply with plumbing codes can result in fines or the need to redo the installation.
6. Aesthetic Integration: The exposed drain for a freestanding bathtub is a visible element of the bathroom design. Choose drain components and finishes that complement the overall style of the bathroom. Decorative flanges and pipe coverings can enhance the aesthetic appeal of the drain line, blending it seamlessly with the surrounding decor.
Finally, consider the long-term durability of the materials used. While PVC and ABS are common and cost-effective, brass or stainless steel may offer greater longevity and resistance to corrosion, particularly in areas with hard water or high humidity. This decision impacts the overall lifespan and maintenance requirements of the freestanding bathtub installation.

Bathtub Drain System 2024 Guide Badeloft

7 Bathtub Plumbing Installation Drain Diagrams

Freestanding Tubs Installation Guide Tyrrell And Laing

Bathtub Plumbing Installation Drain Diagrams Edmond Refinishing

How A Bathtub Works Types Plumbing Diagrams Hometips

7 Bathtub Plumbing Installation Drain Diagrams

Bathroom Tub Plumbing Diagram

7 Bathtub Plumbing Installation Drain Diagrams

Bathtub Parts Everyone Should Know About Part Names 2024

Determine Your Size For Freestanding Bathtub
Related Posts