Free-Standing Bathtub Drain Installation Instructions
Installing a drain for a free-standing bathtub is a crucial step in completing your bathroom renovation. This process requires precision and careful attention to detail, ensuring a watertight seal and proper functionality. This guide will provide a comprehensive overview of the installation process with clear instructions and helpful tips to ensure a successful outcome.
Preparing for Installation
Before initiating the installation, it's essential to gather the necessary materials and prepare the area.
- Free-Standing Bathtub Drain: Choose a drain that complements your bathtub style and material. Look for a high-quality drain with a secure locking mechanism and a smooth finish.
- Plumbing Supplies: This includes PVC pipe, fittings, glue, tape, and a pipe cutter. Ensure the pipe diameter matches the drain's outlet.
- Tools: You'll need a level, tape measure, adjustable wrench, channel-lock pliers, utility knife, and a drill.
- Safety Gear: Wear safety glasses, gloves, and protective clothing during the installation.
Once you have gathered the necessary materials, prepare the area by clearing any obstructions and ensuring adequate ventilation.
Installing the Drain
Installing the bathtub drain involves several steps, each requiring careful execution.
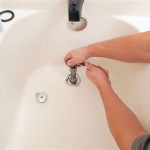
- Positioning and Marking: Determine the drain's location within the bathtub. Ensure it's centered and easily accessible for future maintenance. Use a pencil to mark the drain's position on the tub floor.
- Cutting the Hole: Carefully cut a hole in the bathtub floor using a hole saw or jigsaw, following the marked position. The size of the hole should correspond to the drain's specifications.
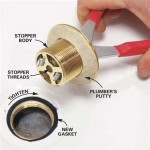
- Installing the Drain Body: Securely attach the drain body to the tub floor using included screws or adhesive. Ensure the drain is level and centered.
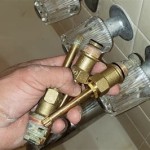
- Connecting the Drain to the Waste Pipe: Attach the drain's outlet to the waste pipe using appropriate fittings and glue. Use thread sealant tape on the threads of fittings to ensure a watertight seal.
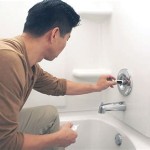
- Testing for Leaks: After connecting the drain to the waste pipe, thoroughly test for leaks by running water through the drain.
During the installation, adhere to the manufacturer's instructions for specific drain models.
Connecting the Drain to the Waste Pipe
The drain connects to the waste pipe, leading to the sewer system. This connection requires careful plumbing work to ensure a smooth flow of water and prevent leaks.
- Routing the Waste Pipe: Route the waste pipe from the drain to the existing drain line. Use a level to ensure the pipe maintains a consistent slope of 1/4 inch per foot to prevent water from pooling.
- Cutting and Joining the Waste Pipe: Measure and cut the waste pipe to the desired lengths. Use a pipe cutter for accurate and clean cuts. Connect the cut pipe sections using appropriate fittings and glue.
- Securing the Waste Pipe: Secure the waste pipe to the wall or floor using pipe hangers or straps. Ensure the pipe is securely fastened to prevent movement or leaks.
- Connecting to the Existing Drain Line: Connect the waste pipe to the existing drain line using a wye fitting or a sanitary tee. Secure the connection using glue and tape.
When making connections, ensure all fittings and pipes are clean and free from debris.
Troubleshooting and Maintenance
After completing the installation, regularly check for leaks and ensure the drain functions correctly.
- Leaks: Inspect the connections for any signs of leaks, such as dampness or dripping. Tighten any loose fittings and re-apply sealants if necessary.
- Clogs: Regularly clean the drain to prevent clogs. Use a plunger or drain snake to remove blockages.
- Overflow: If the drain overflows, check for blockages in the waste pipe and ensure the drain's overflow hole is clear.
By following these instructions and adhering to safety precautions, you can successfully install a free-standing bathtub drain, enhancing your bathroom's functionality and aesthetics. Regular maintenance is crucial to ensure the drain's longevity and prevent future problems.

Freestanding Tubs Installation Guide Tyrrell And Laing

Comprehensive Guide Installing A Freestanding Bathtub In 8 Simple Steps

Determine Your Size For Freestanding Bathtub

Determine Your Size For Freestanding Bathtub

Oatey Pvc Freestanding Tub Drain Kit 46000p The Home Depot

Freestanding Soaking Tub Easiest Way To Install L Plan Learn Build

Oatey Pvc Freestanding Tub Drain Kit 46000p

How To Install A Freestanding Tub

Plumbing How To Drain A Free Standing Bathtub Home Improvement Stack Exchange

Freestanding Tub Drain Rough Kit
Related Posts