Fixing a Leaky Delta Bathtub Faucet: Single Handle
A dripping bathtub faucet is more than just an annoyance; it wastes water, increases water bills, and can eventually damage the fixture and surrounding area. A single-handle Delta bathtub faucet, while generally reliable, is not immune to leaks. Understanding the common causes of leaks and the steps involved in repairing them can save homeowners significant expense and prevent further damage. This article outlines a comprehensive approach to diagnosing and fixing a leaky single-handle Delta bathtub faucet.
The complexity of faucet repairs can vary depending on the faucet model and the underlying cause of the leak. While some repairs are straightforward and can be completed by homeowners with basic plumbing skills, others may require the expertise of a professional plumber. Disconnecting and reconnecting water lines, especially without prior experience, can lead to water damage if not performed correctly. Therefore, assessing one's skill level and the complexity of the repair before proceeding is crucial.
Identifying the Cause of the Leak
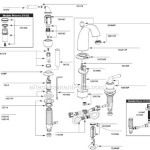
Before attempting any repairs, pinpointing the source and cause of the leak is paramount. A single-handle Delta bathtub faucet operates using a cartridge system, which controls the flow and temperature of the water. The most common cause of leaks in these faucets is a worn or damaged cartridge. Over time, mineral deposits, corrosion, and general wear and tear can degrade the cartridge's seals and internal mechanisms, leading to drips. Other potential causes of leaks include worn O-rings on the faucet body, loose connections, or damage to the faucet valve seat.
To diagnose the leak effectively, observe when and where the dripping occurs. Does the faucet drip constantly, or only when it's turned off? Does the water leak from the spout, or from around the base of the handle? The characteristics of the leak can provide clues about its origin. For instance, a constant drip from the spout usually indicates a problem with the cartridge. A leak around the handle might point to worn O-rings. Leaks that occur when the faucet is in use could indicate a loose connection or a problem with the valve seat.
Once the circumstances of the leak have been documented, a visual inspection of the faucet can provide further insights. Check for any visible signs of damage, such as cracks or corrosion, on the faucet body, handle, and spout. Examine the area around the base of the faucet for mineral buildup, which could indicate a persistent leak. If possible, remove the handle to inspect the cartridge for visible damage or wear. Look for cracks, breaks, or deterioration of the rubber seals.
Gathering the Necessary Tools and Materials
Having the right tools and materials on hand is crucial for a successful faucet repair. A basic toolkit should include: a flathead screwdriver, a Phillips head screwdriver, an adjustable wrench, a set of Allen wrenches (hex keys), a pair of pliers, a utility knife, and a set of O-rings. A faucet handle puller can also be useful, especially if the handle is stuck or corroded. In addition to these tools, it is essential to have the correct replacement parts for the specific Delta faucet model. This usually means a replacement cartridge and possibly new O-rings.
Identifying the correct replacement cartridge is critical. Delta faucets come in various models, each with a specific cartridge type. Using the wrong cartridge will not only fail to fix the leak but could also damage the faucet. The faucet model number is typically located on the faucet body, either under the handle or near the base. Once the model number is identified, search for the corresponding replacement cartridge at a local hardware store or online retailer. Take the old cartridge with you to the store to ensure the replacement is an exact match. If the model number is not readily accessible, consult the faucet's installation manual or contact Delta's customer support for assistance.
Before starting the repair, gather a few additional supplies to protect the work area and prevent further damage. A bucket or container should be placed under the faucet to catch any residual water. A towel or cloth should be used to protect the bathtub surface from scratches. A small container or bag can be used to store small parts, such as screws and O-rings, to prevent them from being lost during the repair.
Step-by-Step Repair Process
The repair process involves several steps, each requiring careful attention to detail. The following outlines a general procedure; however, it is always advisable to consult the faucet's specific installation manual for model-specific instructions.
Step 1: Shut Off the Water Supply. This is the most critical step. Locate the shut-off valves for the hot and cold water lines leading to the bathtub faucet. These valves are typically located under the sink or in an access panel behind the bathtub. Turn both valves clockwise until they are completely closed. To verify that the water is shut off, turn on the faucet. If no water flows, the shut-off valves are working correctly. If water continues to flow, the shut-off valves may be faulty and require replacement. In this case, shut off the main water supply to the house before proceeding. Failure to shut off the water supply can result in significant water damage.
Step 2: Remove the Faucet Handle. The process for removing the handle varies depending on the faucet model. Some handles are secured with a set screw, which is typically located on the side or underside of the handle. Use an Allen wrench of the appropriate size to loosen the set screw and then pull the handle off. Other handles may be held in place by a decorative cap or cover. Use a flathead screwdriver or a small utility knife to carefully pry off the cap and expose the screw underneath. Remove the screw with a Phillips head screwdriver and then pull the handle off. If the handle is stuck, a faucet handle puller can be used to gently remove it.
Step 3: Remove the Faucet Escutcheon. The escutcheon is the decorative plate that covers the faucet body. It is usually held in place by screws or a retaining nut. Remove the screws or loosen the retaining nut to detach the escutcheon. Be careful not to scratch the surrounding tile or surface when removing the escutcheon.
Step 4: Remove the Cartridge Retaining Clip. The cartridge is held in place by a retaining clip. The clip is typically made of metal and is located on the top or side of the cartridge. Use a pair of pliers or a flathead screwdriver to carefully remove the clip. Some clips may be difficult to remove, especially if they are corroded. In this case, apply a small amount of penetrating oil to loosen the clip before attempting to remove it.
Step 5: Remove the Old Cartridge. Once the retaining clip is removed, the old cartridge can be pulled out of the faucet body. Grasp the cartridge firmly and pull straight out. If the cartridge is stuck, use a cartridge puller tool or gently rock the cartridge back and forth to loosen it. Be careful not to damage the faucet body when removing the cartridge. Inspect the inside of the faucet body for any debris or mineral buildup. Clean the inside of the faucet body with a soft cloth or brush.
Step 6: Install the New Cartridge. Before installing the new cartridge, lubricate the O-rings with plumber's grease. This will help to create a watertight seal and prevent the cartridge from sticking. Align the new cartridge with the faucet body and push it firmly into place. Ensure that the cartridge is fully seated and that the O-rings are properly aligned. Reinstall the cartridge retaining clip to secure the cartridge in place.
Step 7: Reassemble the Faucet. Replace the escutcheon and secure it with the screws or retaining nut. Reattach the faucet handle and secure it with the set screw or decorative cap. Ensure that the handle is properly aligned and that it moves smoothly and freely.
Step 8: Turn on the Water Supply. Slowly turn on the hot and cold water supply valves. Check for leaks around the faucet body, spout, and handle. If any leaks are detected, tighten the connections or replace the O-rings as needed. Allow the water to run for a few minutes to flush out any debris from the plumbing lines. Check the water temperature and adjust the cartridge if necessary. Some cartridges have an adjustment mechanism that allows you to control the water temperature.
Step 9: Test the Faucet. Turn the faucet on and off several times to ensure that it is functioning properly and that there are no leaks. Check the water flow and temperature. If the faucet is still leaking, the problem may be with the valve seat or other internal components, requiring further investigation or professional assistance.
Preventive Measures and Maintenance
Preventing future leaks and extending the lifespan of the Delta bathtub faucet requires regular maintenance. One of the most important preventive measures is to avoid overtightening the faucet handle. Overtightening can damage the cartridge and accelerate wear and tear on other components. Instead, turn the handle gently until the water is fully off.
Regularly clean the faucet to remove mineral deposits and prevent corrosion. Use a mild detergent and a soft cloth to clean the faucet body, handle, and spout. Avoid using abrasive cleaners, as they can scratch the finish. For stubborn mineral deposits, use a solution of vinegar and water. Soak a cloth in the solution and apply it to the affected area for a few minutes, then scrub gently with a soft brush.
Periodically inspect the faucet for signs of leaks or damage. Check the area around the base of the faucet for mineral buildup. Look for cracks or corrosion on the faucet body, handle, and spout. If any leaks are detected, address them promptly to prevent further damage. Regularly replacing O-rings and cartridges according to the manufacturer's recommendations can help prevent leaks and maintain the faucet's performance. Following these preventive measures and performing routine maintenance can significantly reduce the likelihood of future leaks and prolong the life of the Delta bathtub faucet.

Fix A Leaky Delta Single Handle Shower Faucet For Under 2

How To Replace A Delta Cartridge And Fix Leaky Bathtub Faucet It Tutorials

Repairing A Leaky Delta Bath Or Shower Faucet Single Lever And Setting Temp

How To Fix A Leaking Single Handle Bathtub Faucet Quick And Easy

How To Repair A Delta Tub Shower Valve

Fix The Leaky Delta Bathtub Faucet A Step By Leak Repair Guide

Repairing A Leaky Single Handle Tub Shower Ball Type Faucet

How To Fix A Leaky Bathtub Faucet Delta Shower Cartridge L Replace

How To Fix A Leaking Delta Monitor Tub Shower Faucet Tutorial

Leaking Faucet Single Handle Shower Head Diy Home Improvement Forum
Related Posts