Drop-In Bathtub Surround Ideas: DIY Inspirations
A drop-in bathtub, also known as a deck-mounted tub, offers flexibility in design and installation within a bathroom. Unlike alcove tubs, which are enclosed on three sides, or freestanding tubs, which stand alone, drop-in bathtubs are installed within a custom-built surround. This surround not only conceals the plumbing and structural elements of the tub but also presents a significant opportunity to enhance the bathroom's aesthetic and functional features. Pursuing a DIY approach to building a drop-in bathtub surround can be a cost-effective method to achieve a unique and personalized bathroom space. Careful planning, material selection, and execution are crucial for a successful project.
The primary purpose of a bathtub surround is to create a waterproof and aesthetically pleasing enclosure for the tub. The surround should seamlessly integrate with the existing bathroom design while also offering practical benefits such as storage, seating, or decorative displays. The DIY route allows for complete control over the materials, dimensions, and overall style of the surround, enabling homeowners to tailor the design to their specific needs and preferences. This article will explore various DIY drop-in bathtub surround ideas, providing insights into material options, design considerations, and practical tips to aid in the construction process.
Planning and Design Considerations
Before embarking on a DIY bathtub surround project, meticulous planning and design are essential. This phase involves accurately measuring the bathtub and the available space, determining the desired dimensions of the surround, and selecting the appropriate materials. It is also critical to consider the existing bathroom layout and style to ensure that the new surround complements the overall design. Furthermore, planning involves addressing potential challenges, such as plumbing access, waterproofing requirements, and structural support.
Begin by accurately measuring the dimensions of the drop-in bathtub, including its length, width, and height. Record these measurements precisely, as they will be the foundation for the surround's design. Next, assess the available space in the bathroom and determine the maximum dimensions of the surround without obstructing movement or interfering with other fixtures. Consider factors such as door swing, toilet placement, and vanity size. Create a detailed sketch or digital model of the proposed surround, incorporating the bathtub dimensions and the desired overall size. This visual representation will help to identify potential design flaws and ensure that the final product meets the homeowner's expectations.
The design of the surround should also take into account the existing bathroom style. For a modern bathroom, clean lines, minimalist details, and contemporary materials such as glass or metal may be appropriate. For a more traditional bathroom, classic designs, ornate details, and materials like wood or tile could be selected. Consider the color scheme of the bathroom and choose materials that complement or contrast with the existing palette. Pay attention to details such as trim, molding, and hardware, as these elements can significantly impact the overall aesthetic of the surround. It is also crucial to factor in the functionality of the surround. Consider incorporating storage niches, shelving, or seating areas to enhance the usability of the bathtub area. These features can provide convenient storage for toiletries, towels, or decorative items.
Plumbing access is a critical consideration when designing a bathtub surround. Ensure that the design allows for easy access to the plumbing connections for maintenance and repairs. Incorporate access panels or removable sections in the surround to provide access to the drain, water supply lines, and other plumbing components. It is also important to address waterproofing requirements to prevent water damage. Use waterproof materials and sealants to protect the surround from moisture. This may involve applying a waterproof membrane or using a waterproof grout for tiled surfaces. Structural support is another key consideration. The surround must be strong enough to support the weight of the bathtub and any additional features, such as seating areas or decorative elements. Use sturdy framing materials and ensure that the surround is properly anchored to the floor and walls.
Material Options for a DIY Bathtub Surround
The choice of materials for a DIY bathtub surround is a crucial factor that will affect its appearance, durability, and cost. Common material options include tile, wood, stone, and acrylic. Each material offers unique advantages and disadvantages, and the selection should be based on the homeowner's aesthetic preferences, budget, and DIY skill level. Proper preparation and installation techniques are essential to ensure the longevity and performance of the chosen material.
Tile is a popular choice for bathtub surrounds due to its durability, water resistance, and wide range of design options. Ceramic, porcelain, and natural stone tiles are all suitable for use in bathtub surrounds. Ceramic tiles are an affordable and versatile option, available in various colors, patterns, and sizes. Porcelain tiles are denser and more durable than ceramic tiles, making them a good choice for high-moisture areas. Natural stone tiles, such as granite, marble, and slate, offer a luxurious and unique look but require more maintenance and can be more expensive. When using tile, ensure that the substrate is waterproof and apply a waterproof grout to prevent water penetration. Proper tile installation is essential to prevent cracks, leaks, and other problems.
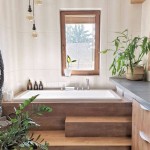
Wood can be used to create a warm and inviting bathtub surround, but it requires careful selection and treatment to prevent water damage. Water-resistant wood species, such as cedar, redwood, or teak, are good choices for bathtub surrounds. These woods naturally resist moisture and decay. However, even water-resistant woods should be properly sealed and protected from direct contact with water. Apply a waterproof sealant or varnish to the wood surface to prevent water penetration. Wood can be used to create a variety of design styles, from rustic to contemporary. It can be stained, painted, or left natural to complement the existing bathroom decor. It is crucial to ensure that the wood is properly supported and secured to prevent warping or movement over time.
Stone, such as granite, marble, or slate, can create a luxurious and elegant bathtub surround. Stone is durable, water-resistant, and adds a touch of sophistication to any bathroom. However, stone can be more expensive and require more specialized installation techniques. Granite is a durable and scratch-resistant stone that is resistant to water and stains. Marble is a softer stone that is more prone to scratches and stains but offers a classic and timeless look. Slate is a durable and water-resistant stone that provides a rustic and natural appearance. When using stone, ensure that the substrate is strong enough to support its weight. Apply a sealant to protect the stone from water and stains. Proper stone installation is essential to prevent cracks and other damage.
Acrylic is a lightweight and durable material that is often used for prefabricated bathtub surrounds. Acrylic is water-resistant, easy to clean, and available in various colors and styles. Acrylic sheets can be custom-cut and shaped to fit the dimensions of the bathtub surround. Acrylic is a good choice for DIY projects because it is easy to work with and requires minimal maintenance. However, acrylic can be more expensive than other materials, such as tile or wood. Ensure that the acrylic sheets are properly supported and secured to prevent warping or cracking. Use a waterproof sealant to seal the edges of the acrylic sheets and prevent water penetration.
DIY Surround Design Ideas and Construction Tips
Once the planning and material selection phases are complete, the construction of the DIY bathtub surround can begin. Various design ideas can be implemented to create a unique and functional surround. It is important to follow proper construction techniques and pay attention to detail to ensure a professional-looking and long-lasting result. This section will explore several DIY surround design ideas and provide practical construction tips to aid in the building process.
A popular DIY bathtub surround design idea is to create a tiled surround with built-in storage niches. Tile provides a durable and waterproof surface, while the niches offer convenient storage for toiletries and other items. Frame the surround using wood studs and sheathing, ensuring that the structure is level and plumb. Install a waterproof membrane over the sheathing to protect against water damage. Tile the surround using your choice of tile material, and incorporate storage niches in the design. These niches can be framed using wood or metal and tiled to match the surround. Use a waterproof grout to seal the tile joints and prevent water penetration. Another design idea is to create a wooden surround with a seating area. This design provides a comfortable and relaxing space to enjoy a bath. Frame the surround using water-resistant wood, such as cedar or redwood. Incorporate a seating area by extending the surround outward and creating a bench. Seal the wood with a waterproof sealant or varnish to protect it from moisture. Add cushions or pillows to the seating area for added comfort.
Another popular option is a stone surround. Stone surrounds offer a luxurious look and can be integrated with floating shelves or other decorative elements. Use proper stone cutting tools and techniques. Apply a sealant for stains and water protection. Consider adding LED accent lighting beneath the floating shelves to create a spa-like atmosphere.
During construction, it is essential to follow proper safety precautions. Wear safety glasses, gloves, and a dust mask when working with power tools and potentially hazardous materials. Use proper ventilation when working with sealants, adhesives, and other chemicals. Ensure that all electrical connections are properly grounded and protected. Before starting any work, turn off the power to the bathroom circuit to prevent electrical shock. When cutting wood or tile, use a saw with a dust collection system to minimize dust exposure. Work in a well-lit area to ensure that you can see clearly and avoid accidents. Follow the manufacturer's instructions for all materials and tools. Double-check all measurements and cuts before proceeding. Take your time and work carefully to avoid mistakes. If you are unsure about any aspect of the project, consult with a professional.
Waterproofing is crucial for a successful DIY bathtub surround project. Apply a waterproof membrane to the substrate before installing tile or other water-resistant materials. Use a waterproof grout to seal the tile joints and prevent water penetration. Seal all seams and joints with a waterproof sealant. Ensure that the surround is properly ventilated to prevent moisture buildup. Regularly inspect the surround for leaks or damage and make repairs as needed. Proper maintenance will help to extend the life of the surround and prevent water damage to the surrounding areas.

31 Diy Tub Surround Ideas Waterproof Bathtub Wall Panels

How To Install Wood Planking On A Bathtub Brepurposed

Drop In Tub Guide Types Sizes And Cost Modernize

Diy Tub Skirt Decorative Panel For A Standard Soaking
:max_bytes(150000):strip_icc()/2-56a49d095f9b58b7d0d7d6a2.JPG?strip=all "10 Ideas For Bathtub Surrounds")
10 Ideas For Bathtub Surrounds

Drop In Tub Guide Types Sizes And Cost Modernize

Diy Tub Skirt Decorative Panel For A Standard Soaking

40 Unique Bathtub Tile Surround Ideas To Revamp Your Space

Drop In Tub Guide Types Sizes And Cost Modernize
:max_bytes(150000):strip_icc()/1-56a49d095f9b58b7d0d7d69f.JPG?strip=all "10 Ideas For Bathtub Surrounds")
10 Ideas For Bathtub Surrounds
Related Posts