Delta Bathtub Drain Stopper Removal: A Comprehensive Guide
Bathtub drain stoppers are essential components in maintaining the functionality of a bathing fixture. They prevent water from escaping down the drain, allowing the tub to fill for bathing. While various types of drain stoppers exist, each with its unique mechanism, they all serve the same fundamental purpose. Over time, these stoppers can malfunction due to the accumulation of hair, soap scum, and other debris. When a stopper becomes clogged or fails to operate correctly, removal is necessary for cleaning, repair, or replacement. This article provides a comprehensive guide to removing Delta bathtub drain stoppers, addressing various types and offering detailed instructions for each.
Delta is a well-known manufacturer of plumbing fixtures, including bathtub drain stoppers. Their stoppers are generally reliable, but like any mechanical component, they can experience issues. Understanding the different types of Delta bathtub drain stoppers is crucial before attempting removal. This understanding will enable the use of the appropriate technique and prevent damage to the drain assembly or the tub itself.
Types of Delta Bathtub Drain Stoppers
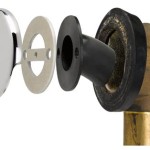
Delta offers several types of bathtub drain stoppers, each with a distinct design and removal procedure. Identifying the specific type present in a bathtub is the first step towards successful removal. The most common types include lift-and-turn stoppers, pop-up stoppers, toe-touch stoppers, and push-and-seal stoppers. Each type utilizes a different mechanism to control the flow of water, which dictates the approach to removal.
Lift-and-Turn Stoppers: This type is characterized by a knob or lever on the top of the stopper. Rotating the knob either opens or closes the drain. The stopper is typically connected to a vertical rod that interacts with a lever inside the drain pipe.
Pop-Up Stoppers: Pop-up stoppers are operated by a lever located on the overflow plate, usually situated below the faucet. When the lever is moved, it pulls or pushes a rod that raises or lowers the stopper in the drain.
Toe-Touch Stoppers: These stoppers are activated by pressing down on the top of the stopper with a toe. Pressing once seals the drain; pressing again releases it. The mechanism relies on an internal spring-loaded assembly.
Push-and-Seal Stoppers: Similar to toe-touch stoppers, push-and-seal stoppers are activated by pressing down on the stopper. However, the mechanism uses a series of rubber seals and a more simplified internal structure compared to toe-touch models.
Tools and Preparation for Removal
Before initiating the removal process, gathering the necessary tools and preparing the work area is essential. Having the correct tools on hand will streamline the process and minimize the risk of damage. The required tools may vary slightly depending on the type of stopper, but some common items include:
- Screwdriver (both flathead and Phillips head)
- Pliers (slip-joint or adjustable)
- Small bucket or container
- Flashlight
- Clean rags or paper towels
- Penetrating oil (e.g., WD-40) if the stopper is stuck
- Drain snake or wire hook for removing debris
Preparation is also crucial. This involves protecting the bathtub surface from scratches by placing a towel or cloth around the drain opening. The work area should be well-lit, and a flashlight may be necessary to inspect the drain assembly more closely. Turning off the water supply to the bathtub is generally not required for stopper removal, but it's a good practice to avoid accidental water spillage.
Step-by-Step Removal Instructions for Each Stopper Type
The following sections provide detailed instructions for removing each type of Delta bathtub drain stopper. It is important to carefully follow these steps and exercise caution to avoid damaging the drain or the tub. If unsure about any step, consult a qualified plumber.
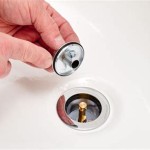
Removing a Lift-and-Turn Stopper
Lift-and-turn stoppers are relatively simple to remove, but the approach depends on the specific design. Some models have a visible screw on the top of the knob, while others require unscrewing the entire knob. The following steps outline the general procedure:
- Inspect the Stopper: Check for a visible screw on the top of the knob. If present, use a screwdriver to remove it.
- Unscrew the Knob: If there is no visible screw, try unscrewing the entire knob. Turn it counterclockwise until it comes loose. Note that some models may require a bit of force.
- Remove the Stopper Body: Once the knob is removed, carefully lift the stopper body out of the drain. It may be connected to a vertical rod or linkage.
- Inspect and Clean: Examine the stopper body and the drain opening for any accumulated debris. Remove any hair or soap scum using a drain snake or wire hook.
- Reassemble (if applicable): If the stopper is being reinstalled, clean all parts thoroughly before reassembling. Follow the reverse order of removal to reinstall the stopper.
Removing a Pop-Up Stopper
Pop-up stoppers are linked to a lever on the overflow plate. The removal process involves accessing the linkage through the overflow drain. The steps are as follows:
- Locate the Overflow Plate: The overflow plate is usually located just below the bathtub faucet.
- Remove the Overflow Plate: Use a screwdriver to remove the screws holding the overflow plate in place. Gently pull the plate away from the tub wall.
- Extract the Linkage: Behind the overflow plate, there is usually a vertical rod or linkage connected to the stopper. Carefully pull this linkage out of the overflow drain. It may be necessary to wiggle the rod to dislodge it.
- Remove the Stopper: Once the linkage is removed, the stopper should be free to lift out of the drain opening.
- Inspect and Clean: Check the stopper and the drain opening for debris. Clean thoroughly before reinstalling.
- Reassemble: Reinstall the stopper and the linkage, ensuring that the linkage is properly connected to the stopper and the overflow plate. Secure the overflow plate with the screws.
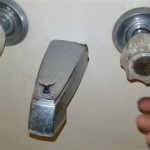
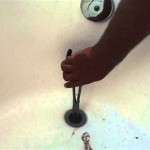
Removing a Toe-Touch Stopper
Toe-touch stoppers can be slightly more complex due to their internal spring-loaded mechanism. However, the removal process is usually straightforward:
- Grip the Stopper: Firmly grip the top of the stopper. This may require using pliers, but be careful not to scratch the stopper surface. Wrap the stopper with a cloth to protect it before using pliers.
- Unscrew the Stopper: Turn the stopper counterclockwise to unscrew it from the drain assembly. It may require some force to initially break the seal.
- Remove the Stopper Body: Once unscrewed, lift the stopper body out of the drain.
- Disassemble (if necessary): Depending on the design, the stopper may be disassembled for cleaning. This usually involves unscrewing or detaching internal components. Note the order of assembly for easy reinstallation.
- Inspect and Clean: Clean all parts thoroughly, paying attention to the spring and the sealing surfaces.
- Reassemble: Reassemble the stopper (if disassembled) and screw it back into the drain assembly.
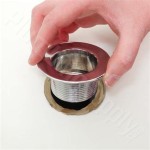
Removing a Push-and-Seal Stopper
Push-and-seal stoppers are generally the easiest to remove. They typically require only a simple pulling or unscrewing action.
- Grip the Stopper: Firmly grip the top of the stopper.
- Pull or Unscrew: Depending on the design, the stopper may either pull straight out or unscrew. Try pulling first. If it doesn't budge, try unscrewing it counterclockwise.
- Remove the Stopper Body: Once loose, remove the stopper body from the drain.
- Inspect and Clean: Examine the stopper and the drain opening for debris. Clean thoroughly.
- Reinstall: To reinstall, simply push the stopper back into the drain opening or screw it in, depending on the removal method.
If the stopper is stuck or difficult to remove, applying penetrating oil (such as WD-40) around the base of the stopper and letting it sit for a few minutes can help loosen any corrosion or debris. Gentle rocking or wiggling the stopper while attempting to remove it can also be effective.
It's essential to remember that forcing the stopper can damage the drain assembly or the stopper itself. If encountering significant resistance, consult a professional plumber. After removal, it is crucial to clean the stopper and the drain opening to prevent future clogs and ensure proper operation. Regular maintenance, such as periodic cleaning, can extend the life of the drain stopper and prevent the need for frequent removal.

How To Remove A Bathtub Drain Stopper

How To Remove A Bathtub Drain Stopper Mr Rooter

How To Remove A Bathtub Drain Stopper

How To Easily Remove Bathtub Drain Plug Stopper Unclog In 1 Minute Jonny Diy

4 Easy Ways To Remove A Tub Drain Stopper Wikihow

How To Remove A Bathtub Drain Stopper

Install A Drain Stopper So The Is Removable

Bathtub How Can I Remove A Stuck Bath Stopper Assembly Home Improvement Stack Exchange

How To Remove Most Common Bathtub Stoppers Replace With Watco

How To Remove A Delta Drain Plug Draincleaning Cleaning S Tiktok
Related Posts