Chipped Bathtub Repair: A Comprehensive Guide to Restoring Your Tub's Flawless Finish
A chipped bathtub can be an eyesore, detracting from the overall aesthetic of your bathroom. Whether it's a result of a dropped object or everyday wear and tear, repairing a chipped bathtub is essential to maintain its pristine condition.
Essential Aspects of Chipped Bathtub Repair
To successfully repair a chipped bathtub, it's crucial to follow a systematic approach. Here are the key aspects to consider:
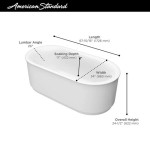
1. Determine the Type of Bathtub Material
The type of material your bathtub is made of will determine the appropriate repair method. Common bathtub materials include acrylic, fiberglass, cast iron, and porcelain. Each material has its own specific properties and requires a tailored repair technique.
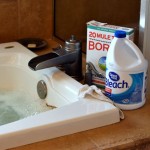
2. Gather the Necessary Tools and Materials
Depending on the material and extent of the chip, you may need specific tools and materials for the repair. These may include sandpaper, epoxy resin, fiberglass cloth, paint, and a glaze agent. It's advisable to gather all the necessary materials before starting the repair.
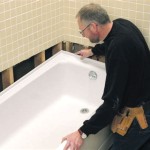
3. Prepare the Chipped Area
Thoroughly clean the chipped area with a degreaser or mild detergent to remove any dirt or debris. Use sandpaper to gently smooth the edges of the chip and create a better surface for the repair material to adhere to.
4. Fill and Reinforce the Chip
Depending on the size and depth of the chip, you can either fill it with epoxy resin or reinforce it with fiberglass cloth. Epoxy resin is ideal for small chips, while fiberglass cloth provides additional strength for larger or deeper chips.
5. Sand and Glaze
Once the chip is filled and reinforced, sand the repair area gently to create a smooth surface. Next, apply a glaze agent to match the original color and finish of your bathtub. Allow the glaze to dry and cure according to the manufacturer's instructions.
6. Seal the Repair
To ensure the repair lasts, apply a sealant around the edges of the repaired area. This will prevent moisture from seeping in and compromising the repair over time.
Professional vs. DIY Repair
While chipped bathtub repair is possible as a DIY project, it's important to assess the extent of the damage and your own skill level. For larger or complex chips, it's highly recommended to consult a professional bathtub repair specialist to ensure a flawless and long-lasting repair.
Conclusion
Chipped bathtub repair requires careful attention to detail and the right materials and techniques. By following the essential aspects outlined in this guide, you can successfully restore your bathtub to its original pristine condition, enhancing the overall aesthetic of your bathroom.

Bathtub Chip Repair Tubworx And Showere Services

Bathtub Chip Repair For Only 199 Happy Tubs

Bathtub Chip Repair For Only 199 Happy Tubs

Bathtub Refinishing Chip Repair Tile Steam Cleaning In San Francisco Ca The Medic

Bathtub Chip Repair Ugly Tub Ohio

Chipped Porcelain Tub Repaired Kingsway

Repairing Chipped Porcelain Bathtubs Us Bath S

How To Fix A Chipped Bathtub Floor Diy Repair

Napco Bathtub Inlays Ltd

How To Repair A Chipped Bathtub Metro Plumb