Changing a Bathtub Drain Gasket: A Comprehensive Guide
A leaky bathtub drain can be a frustrating and potentially damaging home maintenance issue. One of the most common culprits behind such leaks is a worn or damaged bathtub drain gasket. This seemingly small component plays a crucial role in creating a watertight seal between the drain flange and the tub itself. Understanding how to identify a faulty gasket and replace it effectively is a valuable skill for any homeowner, potentially saving significant repair costs and preventing water damage.
This article provides a comprehensive guide on how to change a bathtub drain gasket, covering the necessary tools, step-by-step instructions, and important considerations to ensure a successful and leak-free repair. The process involves careful dismantling, cleaning, and reassembly, emphasizing the importance of precision and attention to detail. Prioritizing safety and using the correct materials are essential to achieve a durable and long-lasting solution.
Identifying a Leaky Bathtub Drain Gasket
The first step in addressing a potential drain leak is to accurately identify the source. While other factors can contribute to leaks, such as faulty plumbing connections or cracks in the drainpipe, a worn or deteriorated gasket is a prime suspect. Several telltale signs may indicate a problem with the bathtub drain gasket.
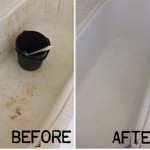
Visible water damage around the base of the bathtub is a strong indicator of a leak. This damage might manifest as stains, discoloration, or even the growth of mold or mildew on the surrounding floor or wall. If the affected area is located directly beneath the drain, the gasket is a likely cause.
Another indication of a leaking gasket is a persistent dripping sound coming from the drainpipe after the bathtub has been emptied. Even a slow, steady drip can waste a significant amount of water over time and contribute to moisture buildup within the bathroom. It is important to completely dry the area beneath the tub and then carefully monitor for any new water droplets forming around the drain connections.
Finally, a visual inspection of the gasket itself, if accessible, can reveal signs of deterioration. Cracks, brittleness, or general wear and tear on the gasket material suggest that it has lost its ability to effectively seal the drain. This inspection may require removing the drain stopper and carefully examining the area around the drain flange.
Once a leaky gasket is suspected, it is important to address the issue promptly to prevent further water damage and potential structural problems. Ignoring a small leak can lead to significant and costly repairs down the line.
Tools and Materials Required for Replacement
Successful replacement of a bathtub drain gasket requires having the correct tools and materials on hand before beginning the project. Gathering these items beforehand streamlines the process and minimizes potential delays.
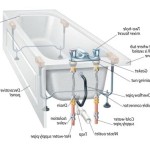
A primary tool needed is a bathtub drain wrench, often referred to as a "dumbbell wrench" or a "spider wrench." This specialized tool is designed to grip the crossbars inside the drain flange, allowing it to be easily loosened and removed. Using pliers or other generic wrenches can damage the drain flange and make removal difficult.
Plumbing pliers or channel-lock pliers are also necessary for gripping and loosening plumbing connections associated with the drainpipe beneath the tub. These pliers provide a secure grip and allow for adjusting the size of the jaws to accommodate different pipe diameters.
A screwdriver, typically a flathead or Phillips head depending on the screws used in the drain assembly, is needed for removing any fasteners that secure the drain components. It is recommended to have both types of screwdrivers available to address different screw configurations.
A putty knife or scraper is useful for removing old caulk or sealant that may be present around the drain flange. This tool helps to create a clean surface for the new gasket to adhere to.
In terms of materials, a replacement bathtub drain gasket is the most essential item. It is important to purchase a gasket that is specifically designed for the type of drain being used, ensuring a proper fit and seal. These gaskets are readily available at most hardware stores and plumbing supply retailers.
Plumber's putty or silicone caulk is also necessary for creating a watertight seal between the drain flange and the bathtub surface. Plumber's putty is typically used for the initial seal, while silicone caulk can be applied around the edges of the drain flange for added protection.
Finally, rags or towels are needed for cleaning up any spills or excess putty or caulk during the replacement process. Having these materials readily available helps to maintain a clean and organized workspace.
Step-by-Step Instructions for Replacing the Gasket
Replacing a bathtub drain gasket involves a series of careful steps to ensure a proper seal and prevent future leaks. It is important to follow these instructions meticulously and to exercise caution throughout the process.
The first step is to shut off the water supply to the bathtub. This prevents any accidental water flow during the repair process. Typically, shut-off valves are located near the bathtub or in the adjacent bathroom.
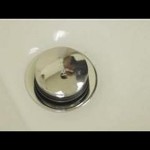
Next, remove the bathtub drain stopper. The specific method for removing the stopper varies depending on the type of drain assembly being used. Some stoppers can be unscrewed, while others require lifting or pulling to disengage them from the drain mechanism. Consult the drain manufacturer's instructions if needed.
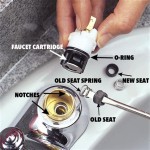
Using the bathtub drain wrench, carefully loosen and remove the drain flange. Insert the wrench into the drain opening and engage the crossbars inside the flange. Turn the wrench counterclockwise to loosen the flange. If the flange is stuck, apply gentle pressure and consider using penetrating oil to help loosen the threads.
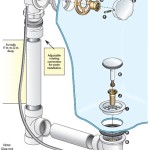
Once the drain flange is removed, carefully remove the old gasket. This may involve scraping away old caulk or sealant with a putty knife. Inspect the drain opening and surrounding area for any debris or corrosion and clean it thoroughly. A wire brush may be needed to remove stubborn buildup.
Apply a bead of plumber's putty around the underside of the new drain flange. This putty will create a watertight seal between the flange and the bathtub surface. Ensure that the putty is evenly distributed to provide a consistent seal.
Position the new gasket onto the drain opening, ensuring that it is properly aligned. Carefully insert the drain flange into the opening, pressing down firmly to compress the plumber's putty and create a seal. Screw the flange in clockwise using the bathtub drain wrench. Tighten the flange securely, but avoid over-tightening, which can damage the drain or the bathtub.
Remove any excess plumber's putty that has squeezed out from under the drain flange. Use a rag or putty knife to clean the surrounding area and create a smooth, professional finish.
Apply a bead of silicone caulk around the perimeter of the drain flange where it meets the bathtub surface. This caulk will provide an additional layer of protection against leaks. Smooth the caulk with a wet finger or a specialized caulking tool.
Allow the plumber's putty and silicone caulk to cure completely according to the manufacturer's instructions. This typically takes several hours. Avoid using the bathtub during this time to allow the seal to fully set.
After the curing period, reinstall the bathtub drain stopper. Turn the water supply back on and check for any leaks around the drain. If any leaks are detected, retighten the drain flange or reapply the silicone caulk as needed.
Preventative Measures and Maintenance
Once the bathtub drain gasket has been successfully replaced, it is important to implement preventative measures and regular maintenance to prolong its lifespan and prevent future leaks. These measures include careful usage habits and periodic inspections of the drain assembly.
Avoid using harsh chemicals or abrasive cleaners in the bathtub. These chemicals can damage the gasket material and cause it to deteriorate prematurely. Instead, use mild, non-abrasive cleaning products that are specifically designed for use in bathrooms.
Regularly clean the bathtub drain to prevent the buildup of hair, soap scum, and other debris. This debris can obstruct the drain and put unnecessary stress on the gasket. Use a drain screen or a plumber's snake to remove any obstructions as needed.
Periodically inspect the drain assembly for any signs of leaks or damage. Check the area around the drain flange for water stains, discoloration, or mold growth. If any problems are detected, address them promptly to prevent further damage.
Consider replacing the bathtub drain gasket every few years, even if there are no apparent signs of leaks. This proactive approach can help to prevent future problems and ensure a consistently watertight seal. The lifespan of a bathtub drain gasket can vary depending on the quality of the material and the usage patterns of the bathtub.
By following these preventative measures and maintenance practices, homeowners can significantly extend the lifespan of their bathtub drain gasket and minimize the risk of future leaks and water damage. Regular maintenance is a small investment that can save significant repair costs in the long run.

How To Replace Bathtub Drain Shoe Gasket

How To Replace A Bathtub Drain

Replacing A Tub Drain Bathtub Removal And Replacement

How To Replace Bathtub Drain Stopper With A Lift And Turn Diy

How To Replace A Bathtub Drain

How To Replace Bathtub Overflow Drain Gasket

How To Replace Bathtub Drain Stopper With A Lift And Turn Diy

Easy Replacement Of A Bathtub Drain

How To Replace A Bathtub Drain

Plumbing Can I Use Silicone To Glue Drain Gasket Before Setting Tub Home Improvement Stack Exchange
Related Posts