Changing a Bathtub Faucet Handle: A Comprehensive Guide
A worn, damaged, or simply outdated bathtub faucet handle can detract from the overall aesthetic and functionality of a bathroom. Replacing a faucet handle is often a straightforward do-it-yourself project that can significantly improve the look and usability of the bathtub. This article provides a comprehensive guide to changing a bathtub faucet handle, encompassing the necessary tools, step-by-step instructions, and troubleshooting tips.
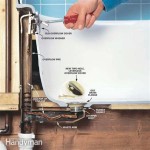
Before beginning any plumbing project, safety precautions are paramount. Water and electricity can create hazardous conditions. Therefore, it is essential to shut off the water supply to the bathtub before commencing any work on the faucet. The primary water shut-off valve for the entire house is typically located in the basement, garage, or near the water meter. Turn the valve clockwise until it is completely closed. After shutting off the water supply, open the bathtub faucet to relieve any remaining pressure in the pipes. Place a towel or bucket beneath the work area to catch any residual water.
The selection of a replacement faucet handle is crucial to the success of the project. The new handle must be compatible with the existing faucet stem. There are various types of faucet handles, including single-handle faucets, two-handle faucets (with hot and cold water controls), and more specialized designs. A handle designed for a different faucet type may not fit or function correctly. To ensure proper compatibility, it is recommended to identify the make and model of the existing faucet, if possible. Alternatively, bring the old handle to a hardware store or plumbing supply store to compare it with available replacements. When choosing a new handle, consider the desired style and finish to complement the bathroom decor.
Identifying the Type of Faucet Handle
The first step in changing a bathtub faucet handle is to determine the type of handle that needs to be replaced. Different handle types require different removal and installation techniques. Common types of bathtub faucet handles include:
- Knob Handles: These handles are typically round or oval and are attached with a screw, often concealed beneath a decorative cap.
- Lever Handles: Lever handles are elongated and provide a more ergonomic grip. They are also usually secured with a screw under a cap.
- Cross Handles: Cross handles have a four-pronged design and are common in older homes. They may be fastened with a screw or may thread directly onto the faucet stem.
- Set-Screw Handles: These handles are secured with a small set screw, often located on the side or underside of the handle. A hex wrench (Allen wrench) is used to loosen the set screw.
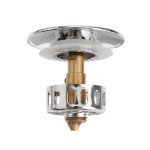
- Cartridge Handles: These handles are typically found on single-handle faucets and control both water temperature and flow. Replacement often involves replacing the entire cartridge assembly.
Correctly identifying the handle type will guide the subsequent steps in the replacement process.
Removing the Old Faucet Handle
Once the water supply is shut off and the handle type is identified, the next step is to remove the old faucet handle. Depending on the handle type, the removal process may involve the following steps:
- Locate and Remove the Decorative Cap: Many faucet handles have a decorative cap that conceals the screw. The cap can usually be removed with a small flathead screwdriver or a utility knife. Gently pry the cap off, being careful not to damage the surrounding finish.
- Loosen or Remove the Screw: After removing the cap, a screw will be visible. Use a screwdriver that matches the screw head (usually Phillips-head or flathead) to loosen and remove the screw. In some cases, the screw may be rusted or corroded, making it difficult to remove. Applying a penetrating oil, such as WD-40, may help to loosen the screw. Allow the oil to soak for several minutes before attempting to remove the screw again.
- Remove the Handle: Once the screw is removed, the handle should be able to be pulled off the faucet stem. If the handle is stuck, try gently rocking it back and forth while pulling. Avoid using excessive force, as this could damage the faucet stem or the surrounding plumbing. A handle puller tool can be used if the handle is exceptionally stubborn.
- For Set-Screw Handles: Locate the set screw on the side or underside of the handle. Use a hex wrench of the appropriate size to loosen the set screw. Once the set screw is loose, the handle should slide off the faucet stem.
- For Cartridge Handles: Specific instructions will vary depending on the manufacturer and model. Generally, there will be a set screw to loosen, followed by removal of decorative trim and then access to the cartridge itself. Consult the faucet's documentation if available.
After the old handle has been removed, inspect the faucet stem for any damage or corrosion. If the stem is damaged, it may be necessary to replace the entire faucet.
Installing the New Faucet Handle
With the old handle removed and the faucet stem inspected, the new handle can be installed. The installation process is generally the reverse of the removal process:
- Position the New Handle: Align the new handle with the faucet stem. Ensure the handle is oriented correctly so that it turns in the appropriate direction to control the water flow.
- Attach the Handle: Slide the handle onto the faucet stem. If the handle is designed to be secured with a screw, insert the screw through the handle and tighten it securely. Be careful not to overtighten the screw, as this could damage the handle or the faucet stem.
- For Set-Screw Handles: Slide the handle onto the faucet stem and align the set screw with the flat part of the stem. Tighten the set screw securely with a hex wrench.
- Replace the Decorative Cap: If the handle has a decorative cap, snap it back into place. Ensure the cap is securely attached to prevent it from falling off.
- For Cartridge Handles: After the cartridge is installed (following manufacturer's instructions), reattach any decorative trim and tighten the set screw if applicable.
Once the new handle is installed, turn the water supply back on slowly. Check for any leaks around the handle and the faucet stem. If any leaks are detected, tighten the screw or set screw slightly. If the leak persists, the faucet may need further inspection or replacement of internal components such as O-rings or washers.
In some instances, the new handle may not fit perfectly onto the existing faucet stem. This could be due to variations in manufacturing tolerances or differences in the design of the old and new handles. If the handle is too loose, consider using shims to create a tighter fit. Shims can be made from thin pieces of plastic or metal. If the handle is too tight, it may be necessary to file down the faucet stem slightly to allow the handle to fit properly. However, exercise caution when filing down the stem, as excessive filing could damage the faucet.
After completing the installation and verifying that there are no leaks, test the functionality of the new faucet handle. Turn the handle on and off several times to ensure that it controls the water flow smoothly. If the handle is stiff or difficult to turn, apply a small amount of silicone grease to the faucet stem. The grease will help to lubricate the stem and make the handle easier to operate.
Disposal of the old faucet handle should be done responsibly. Metal handles can often be recycled at a local recycling center. Plastic handles may need to be disposed of in the regular trash. Check with local recycling guidelines for specific instructions on how to dispose of plumbing fixtures.
While replacing a bathtub faucet handle is generally a manageable DIY project, certain situations may require the expertise of a professional plumber. If there are signs of significant corrosion, leaks that persist despite troubleshooting, or damage to the surrounding plumbing, it is advisable to consult a qualified plumber to avoid further complications and potential water damage.

Replace Upgrade Your Shower And Bath Handle
:max_bytes(150000):strip_icc()/how-to-replace-a-bathtub-faucet-5210836-08-dde7e85413a9421cb4414bb4655e49e3.jpg?strip=all "How To Replace A Bathtub Faucet")
How To Replace A Bathtub Faucet
:max_bytes(150000):strip_icc()/how-to-replace-a-bathtub-faucet-5210836-09-018c0bd035424eae9f9b55faff2d7605.jpg?strip=all "How To Replace A Bathtub Faucet")
How To Replace A Bathtub Faucet

How To Replace Bathtub Faucet Handles
:max_bytes(150000):strip_icc()/how-to-replace-a-bathtub-faucet-5210836-hero-dbea72550ab646829a3fb289eb4e9a65.jpg?strip=all "How To Replace A Bathtub Faucet")
How To Replace A Bathtub Faucet

Diy Bathtub Faucet Repair

How To Fix A Leaking Bathtub Faucet Diy Family Handyman
:max_bytes(150000):strip_icc()/how-to-replace-a-bathtub-faucet-5210836-10-6825223c1e75442187d5ab09690510d4.jpg?strip=all "How To Replace A Bathtub Faucet")
How To Replace A Bathtub Faucet

How To Replace A Bathtub Faucet
:max_bytes(150000):strip_icc()/how-to-replace-a-bathtub-faucet-5210836-04-7b7d953ade8141c1a4750f082aad38d4.jpg?strip=all "How To Replace A Bathtub Faucet")
How To Replace A Bathtub Faucet