Caulking Around a Bathtub Spout: A Comprehensive Guide
Maintaining a watertight seal around a bathtub spout is crucial for preventing water damage and preserving the structural integrity of the bathroom. The spout, where water exits the plumbing and enters the tub, is a common point for leaks to develop. Effective caulking acts as a barrier, preventing water from seeping behind the wall, which can lead to mold growth, wood rot, and costly repairs. This article provides a detailed guide on the importance of caulking around a bathtub spout, identifying potential issues, and outlining the steps involved in proper application.
The Importance of Caulking and its Potential Consequences
Caulking is a flexible sealant applied to joints and seams to create a waterproof barrier. Around a bathtub spout, this barrier is essential due to the constant exposure to water. Without a proper seal, water can migrate behind the wall, creating a breeding ground for mold and mildew. Mold thrives in damp, dark environments and can cause health problems, including allergic reactions, respiratory issues, and skin irritation. Furthermore, prolonged water exposure can weaken the structural components of the wall, such as drywall and wood studs, leading to significant damage that requires extensive and expensive repairs.
Ignoring signs of damaged or missing caulk can have escalating consequences. Initially, small leaks may go unnoticed, but over time, they can saturate the surrounding materials. This constant moisture can rot wooden framing, causing instability in the wall itself. Drywall can crumble and lose its structural integrity. In severe cases, the water can even seep into adjacent rooms or floors, causing damage beyond the immediate vicinity of the bathtub. Regular inspection and maintenance of the caulk around the spout are, therefore, paramount to preventing these long-term issues.
The cost of neglecting caulk repair far exceeds the relatively low expense and effort required to maintain it. Simple caulking repair can prevent thousands of dollars in potential water damage restoration. Additionally, addressing minor caulk imperfections can prevent the more serious issue of hidden mold growth, which can be problematic to remove and remediate. Therefore, preventative maintenance through regular caulk inspection and timely applications leads to significant cost savings and ensures a healthier living environment.
Furthermore, the aesthetic appeal of a bathroom is enhanced by properly applied and maintained caulk. Cracking, discolored, or missing caulk detracts from the overall appearance of the bathroom and can make it look neglected. Fresh, clean caulk around the bathtub spout contributes to a clean and well-maintained bathroom environment.
Identifying Problems and Assessing the Situation
Before attempting to re-caulk around a bathtub spout, it's crucial to identify any existing problems and assess the overall condition of the surrounding area. The first step is a thorough visual inspection. Look for cracks, gaps, discoloration, or peeling caulk. These are clear indicators that the existing caulk has deteriorated and is no longer providing a proper seal. Additionally, examine the area for signs of water damage, such as water stains, mold growth, or soft spots on the wall or surrounding tiles. These signs suggest that water has already penetrated the existing seal and may have caused underlying damage.
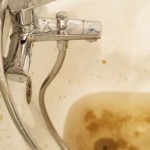
Pay close attention to the area where the spout meets the wall or tile. This is a common point for leaks to occur. Run your finger along the caulk to check for any soft or spongy areas, which indicate water saturation. If the caulk is easily removed or crumbles when touched, it is definitely time for replacement. Also, inspect the spout itself for any signs of corrosion and any loose fittings that could be contributing to water leakage. Tighten any loose connections if possible before addressing the caulking.
Before embarking on any caulking project, it's wise to test the integrity of the existing seal. After taking a shower or bath, observe the area around the spout for any signs of water leakage. Use a dry cloth to wipe the area and note if any water reappears. This will clearly indicate whether the existing caulk is effectively preventing water from seeping behind the wall. If any dampness is detected, it confirms the need for replacement. Also, checking the wall on the opposite side of the spout can identify if any water has migrated through the wall cavity. This indicates a more significant leak that will require additional intervention.
Finally, consider the type of caulk that was previously used. Silicone caulk is generally recommended for wet areas due to its superior water resistance. However, it can be difficult to apply and doesn't adhere well to all surfaces. Acrylic latex caulk is easier to apply and paintable, but it is less water-resistant and may not be suitable for areas with constant water exposure. Knowing the type of caulk that was previously used will help inform your decision on which type to use for the replacement.
Step-by-Step Guide to Caulking Around the Bathtub Spout
Once the problems have been identified and the situation has been assessed, the next step is to properly prepare the area and apply the new caulk. Following these steps will ensure a durable and watertight seal.
Step 1: Gather Supplies.
First, gather all the necessary supplies. This includes: a caulk gun, a tube of high-quality silicone caulk (specifically designed for bathrooms and kitchens), a caulk removal tool or utility knife, a scraper, a stiff brush, rubbing alcohol, clean rags or paper towels, painter's tape (optional), and safety glasses.Step 2: Remove Old Caulk.
This is perhaps the most important step. Use a caulk removal tool or utility knife to carefully cut along both edges of the existing caulk. Be careful not to damage the bathtub surface or the surrounding tiles. Once the edges are cut, use a scraper to remove as much of the old caulk as possible. A heat gun or hairdryer can be used to soften the stubborn pieces of caulk to make removal easier. Clean the area thoroughly with a stiff brush and rubbing alcohol to remove any remaining residue, mold, or mildew. This ensures that the new caulk will adhere properly. Allow the area to dry completely before proceeding to the next step.Step 3: Prepare the Area.
Ensure the area is clean, dry, and free of any debris. Use painter's tape to mask off the edges of the bathtub and tile, creating a clean and professional line for the caulk. This will help to prevent smearing and make clean-up easier. The tape should be applied carefully, ensuring that it is straight and even. Leaving a small gap between the tape and the spout will allow for a consistent bead of caulk.Step 4: Apply the Caulk.
Load the tube of caulk into the caulk gun and cut the tip of the nozzle at a 45-degree angle. The size of the opening will determine the width of the caulk bead. Apply a steady and even bead of caulk along the joint between the bathtub spout and the wall or tile. Hold the caulk gun at a consistent angle and move it smoothly along the joint. Apply enough caulk to fill the gap completely, but avoid applying too much, as this can create a messy finish.Step 5: Smooth and Finish the Caulk.
Immediately after applying the caulk, smooth it with a wet finger or a caulk smoothing tool. This will create a concave shape that helps to shed water and improve the overall appearance. Wipe away any excess caulk with a damp rag or paper towel. If using painter's tape, carefully remove it while the caulk is still wet. This will create a clean and crisp edge. Allow the caulk to dry completely according to the manufacturer's instructions before using the bathtub or shower. Typically, silicone caulk requires at least 24 hours to dry completely.Step 6: Inspect and Maintain.
After the caulk has dried, inspect it carefully for any gaps or imperfections. If necessary, apply a second layer of caulk to fill any voids. Regularly inspect the caulk around the bathtub spout for signs of damage or wear. Address any issues promptly to prevent water damage. Cleaning the caulk regularly with a mild detergent will help to prevent mold and mildew growth.By following these steps, a durable and watertight seal around the bathtub spout can be ensured, protecting the bathroom from water damage and maintaining a clean and healthy environment. Regular inspection and maintenance will prolong the life of the caulk and prevent costly repairs in the future.

How To Seal Tub Spout And Valve Trim With Silicone Caulking The Fixer Clips

How To Apply Caulk Around A Tub Spout Bathroomaccessories Plumbingissues Howto Diy
:max_bytes(150000):strip_icc()/wipe_dap-56a73ba03df78cf77293815a.jpg?strip=all "How To Caulk Shower And Bathtub Trim")
How To Caulk Shower And Bathtub Trim

How To Install A Tub Spout The Home Depot

How To Fix A Failed Tub Spout Seal Diy Friendly Task

Resealing Shower Fixtures With Quality Caulk

How To Caulk A Bathtub 13 Steps With Pictures Wikihow

Don T Caulk Here

Stop Water Damage Re Caulk Your Tub Today 1 Tom Plumber

How To Caulk A Bathtub 13 Steps With Pictures Wikihow
Related Posts