Caulking a Bathtub: A Comprehensive Guide to Professional Results
Caulking a bathtub is a crucial step in bathroom maintenance, ensuring a watertight seal between the tub and surrounding surfaces. By effectively caulking, you prevent water damage, mold growth, and unsightly gaps. Here's a comprehensive guide to caulking a bathtub like a pro:
Materials and Tools:
- Silicone or latex caulk
- Caulk gun
- Caulk removal tool
- Rubbing alcohol
- Paper towels or cloths
- Painter's tape (optional)
Step 1: Preparation
Start by thoroughly cleaning the bathtub surface, especially the areas where the old caulk has worn away. Use rubbing alcohol to remove any dirt, soap scum, or mildew. Allow the surface to dry completely before applying new caulk.
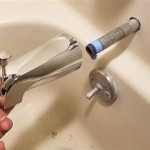
Step 2: Caulk Removal
Carefully remove the old caulk using a caulk removal tool. Gently scrape away any excess adhesive, being cautious not to damage the bathtub. Avoid using sharp objects that may scratch the surface.
Step 3: Application (Optional)
If desired, apply painter's tape along the edges of the bathtub where you will be caulking. This will help create a clean and precise line. However, skip this step if you are confident in your freehand caulking abilities.
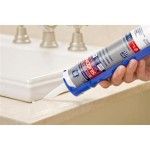
Step 4: Caulk Gun Loading
Load the caulk gun with a tube of silicone or latex caulk. Cut the tip of the tube at a 45-degree angle, ensuring the opening is slightly smaller than the width of the gap you are filling. Insert the tube into the gun and puncture it with the piercing rod.
Step 5: Caulk Application
Apply a continuous bead of caulk along the seam between the bathtub and the surrounding surface. Hold the gun at a 45-degree angle and move it steadily to maintain an even flow. Press down firmly on the trigger to ensure the caulk fully adheres to both surfaces.
Step 6: Smoothing
Before the caulk dries, use a finger dipped in soapy water or a caulk smoothing tool to smooth out the bead. This step ensures a professional-looking finish and eliminates any excess caulk. Remove any tape you used.
Step 7: Drying and Curing
Allow the caulk to dry and cure according to the manufacturer's instructions, which typically takes 24-48 hours. Avoid using the bathtub during this period. Once fully cured, the seal will be watertight and durable.
Tips:
- Use high-quality silicone or latex caulk designed for bathroom applications.
- Apply caulk in small sections at a time to prevent it from smudging.
- If you make a mistake, remove the excess caulk immediately with a damp cloth.
- Recaulk the bathtub every few years or as needed to maintain a watertight seal and prevent leaks.
By following these steps and tips, you can effectively caulk your bathtub and ensure a professional-looking, leak-free finish.

How To Caulk A Bathtub On Sutton Place

How To Caulk A Bathtub 13 Steps With Pictures Wikihow

Caulking A Bathtub Simple Steps For Successful Seal

How To Caulk A Shower Or Tub True Value

How To Caulk A Bathtub On Sutton Place

How To Caulk A Bathtub 13 Steps With Pictures Wikihow

How To Re Caulk A Bathtub

How To Use Bathroom Caulk For A Fresh New Seal

How To Re Caulk A Bathtub

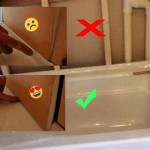
Don T Caulk Here