Can You Spray Paint A Bathtub? Examining the Viability and Process
The question of whether a bathtub can be successfully spray painted is a common one, often arising from a desire to refresh a bathroom's aesthetics without the significant expense and disruption of a full bathtub replacement. While it is technically possible to spray paint a bathtub, the process is far more involved than simply applying a coat of paint. The success and longevity of a spray-painted bathtub depend heavily on meticulous surface preparation, the selection of appropriate materials, and careful application techniques. Failure to adhere to these stringent requirements will likely result in a finish that is prone to chipping, peeling, and discoloration, ultimately leading to a more significant repair or replacement expense.
The primary reason many consider spray painting a bathtub is cost. Replacing a bathtub can involve significant plumbing work, demolition, and reinstallation costs. Spray painting, conversely, presents the illusion of a quick and affordable fix. However, this shortcut often proves to be a false economy if the proper steps are not rigorously followed. The durability of a professionally refinished or reglazed bathtub is significantly higher than that of a DIY spray-painted one, making professional services a more cost-effective solution in the long run when considering the lifespan of the finish.
Understanding the Challenges of Spray Painting a Bathtub
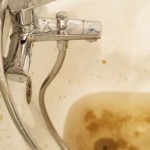
Spray painting a bathtub presents several unique challenges stemming from the bathtub's inherent environment and function. Primarily, bathtubs are constantly exposed to moisture, including standing water and high humidity. This moist environment promotes the growth of mold and mildew, which can compromise the adhesion of any coating if not thoroughly addressed during the preparation phase. The expansion and contraction of the bathtub material due to temperature fluctuations from hot water also place stress on the painted surface, increasing the likelihood of cracking and peeling. Furthermore, bathtubs are subjected to regular cleaning, often involving abrasive cleansers and scrubbing, which can quickly degrade a poorly applied or unsuitable paint finish.
Another significant challenge lies in the inherent properties of bathtub materials. Many bathtubs are made of porcelain-enameled cast iron, fiberglass, or acrylic. Each of these materials requires a specific type of primer and topcoat to ensure proper adhesion and durability. Using the wrong type of paint or failing to properly prepare the surface can lead to a finish that simply does not bond correctly, resulting in rapid failure. The smooth, non-porous surface of these materials demands aggressive preparation techniques to create the necessary bonding profile for the new coating. This typically involves sanding, etching, and the application of specialized bonding agents.
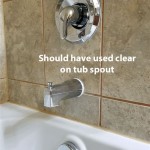
Finally, achieving a professional-looking, uniform finish with spray paint requires a high degree of skill and experience. Runs, drips, and uneven coverage are common issues encountered by inexperienced individuals attempting to spray paint a bathtub. These imperfections not only detract from the aesthetic appeal but also create weak points in the finish that are more susceptible to damage and degradation. Proper spray painting technique involves maintaining a consistent distance from the surface, using overlapping passes, and applying multiple thin coats rather than a single thick coat.
Essential Steps for Spray Painting a Bathtub
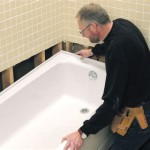
If one chooses to proceed with spray painting a bathtub, despite the inherent challenges, a rigorous and methodical approach is absolutely crucial. The success of the project hinges on meticulous surface preparation, careful product selection, and precise application techniques. Skipping or compromising on any of these steps will almost certainly lead to a subpar and short-lived result.
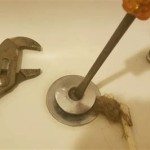
The first step, and arguably the most important, is thorough cleaning and surface preparation. This begins with removing all traces of soap scum, mildew, and other contaminants. A strong alkaline cleaner, specifically designed for bathroom surfaces, should be used to scrub the bathtub thoroughly. After cleaning, the surface must be meticulously rinsed and allowed to dry completely. Once dry, the surface should be sanded with progressively finer grits of sandpaper, starting with a coarse grit (e.g., 180 grit) to remove any existing imperfections and create a rough profile for the primer to adhere to. Subsequent sanding with finer grits (e.g., 320 grit, 400 grit) will smooth out the surface and prepare it for the primer application.
After sanding, the bathtub should be thoroughly cleaned again to remove all sanding dust. A tack cloth can be used to pick up any remaining particles. Next, an etching solution is often applied to further improve adhesion, especially on porcelain or enamel surfaces. The etching solution creates microscopic pores on the surface, providing a better bonding surface for the primer. The etching solution must be applied according to the manufacturer's instructions and thoroughly rinsed off before proceeding.
The next step is to apply a high-quality epoxy primer specifically designed for use on bathtubs. This primer serves as a bonding agent between the original bathtub surface and the topcoat. It is crucial to select a primer that is compatible with the bathtub material (e.g., porcelain, fiberglass, acrylic) and the chosen topcoat. The primer should be applied in thin, even coats, allowing each coat to dry completely before applying the next. Multiple thin coats are preferable to a single thick coat, as this minimizes the risk of runs and drips and ensures proper adhesion.
Finally, the topcoat should be applied using a high-quality spray paint specifically formulated for bathtub refinishing. These paints are typically epoxy-based or acrylic-urethane, offering good durability and resistance to water and cleaning chemicals. As with the primer, the topcoat should be applied in thin, even coats, allowing each coat to dry completely before applying the next. Multiple thin coats will result in a smoother, more durable finish. Proper ventilation is essential during the application process, as these paints often contain strong solvents. A respirator should be worn to protect against inhalation of fumes. After the final coat has been applied, the bathtub should be allowed to cure for the recommended time, typically several days, before being used.
Selecting the Right Materials for the Job
The selection of appropriate materials is paramount to the success of any bathtub spray painting project. Using the wrong type of paint or primer can result in a finish that is prone to failure, regardless of how meticulously the surface is prepared. It is crucial to choose products that are specifically designed for use on bathtubs and that are compatible with the bathtub's material (e.g., porcelain, fiberglass, acrylic).
For porcelain-enameled cast iron bathtubs, an epoxy-based primer and topcoat are generally recommended. Epoxy coatings offer excellent adhesion, durability, and resistance to water and chemicals. However, they can be more difficult to work with than other types of coatings, requiring careful mixing and application. For fiberglass and acrylic bathtubs, an acrylic-urethane primer and topcoat may be a better choice. Acrylic-urethane coatings are more flexible than epoxy coatings, making them less prone to cracking on these less rigid materials. They also tend to be easier to apply and offer good resistance to fading and yellowing.
When selecting a spray paint, it is important to look for a product that is specifically labeled for use on bathtubs. These paints typically contain additives that improve adhesion, flexibility, and resistance to water and cleaning chemicals. Avoid using standard household spray paints, as these are not designed to withstand the harsh environment of a bathtub and will likely fail quickly. It is also important to choose a paint with the desired sheen. Bathtub paints are typically available in gloss, semi-gloss, and satin finishes. A gloss finish will be the most durable and easiest to clean, but it may also show imperfections more readily. A satin finish will be less durable but will hide imperfections better.
In addition to the primer and topcoat, other essential materials include sandpaper of various grits (e.g., 180 grit, 320 grit, 400 grit), a strong alkaline cleaner, an etching solution (if necessary), a tack cloth, masking tape, drop cloths, and a respirator. High-quality masking tape is essential for protecting surrounding surfaces from overspray. Drop cloths should be used to cover the bathroom floor and any other surfaces that are not being painted. A respirator is absolutely necessary to protect against inhalation of fumes during the application process.
It is important to note that the quality of the materials used will directly impact the durability and longevity of the finish. Investing in high-quality products may cost more upfront, but it will ultimately save time and money in the long run by reducing the likelihood of premature failure and the need for costly repairs or replacements.

Super Simple How To Paint A Bathtub

Before After How To Paint A Bathtub And Clean It Does Last Thrift Diving

To Spray Or Not A Bathtub That Is The Caldwell Project

How To Paint A Tub With Rustoleum What Not Do

Before After How To Paint A Bathtub And Clean It Does Last Thrift Diving

How To Paint A Bathtub Yourself The Nifty Nester

Yes You Can Paint Your Bathtub And Tile Here S How Toolbox Divas

Paint A Bathtub How To Easily Inexpensively My Creative Days

How To Paint A Bathtub Yourself The Nifty Nester

How To Paint A Bathtub Ace Hardware
Related Posts