Bootz Aloha Bathtub Installation Instructions
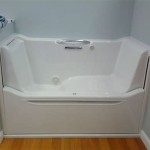
The Bootz Aloha bathtub represents a popular choice for homeowners seeking a durable and aesthetically pleasing fixture for their bathrooms. Its enamel-coated steel construction offers resistance to scratches and stains, while its classic design integrates seamlessly into various bathroom styles. Proper installation is crucial to ensure the bathtub functions correctly and maintains its structural integrity. These instructions provide a comprehensive guide for the installation process.
Preparation is Key: Gathering Materials and Tools
Prior to commencing the installation, it is essential to gather all necessary materials and verify that the work area is adequately prepared. A thorough preparation phase minimizes potential delays and ensures a smoother installation process.
Required materials include, but are not limited to:
- The Bootz Aloha bathtub itself, carefully unpackaged and inspected for any shipping damage.
- Drain assembly (typically purchased separately).
- Supply lines for the faucet.
- Caulking (100% silicone-based sealant recommended).
- Shims (wood or plastic).
- Mortar mix or setting compound (optional, but highly recommended for added stability).
Essential tools for the installation include:
- Level (at least 4 feet long).
- Tape measure.
- Pencil or marker.
- Adjustable wrench.
- Pipe wrench.
- Screwdrivers (Phillips and flathead).
- Pliers.
- Caulking gun.
- Safety glasses and gloves.
- Drill with appropriate drill bits (if installing grab bars or other accessories later).
- Plumber's putty (for drain assembly).
Before installation begins, the existing bathtub (if applicable) must be removed and the surrounding area cleared. Ensure the subfloor is clean, level, and structurally sound. Any necessary repairs to the subfloor should be completed before proceeding. Check the dimensions of the new bathtub against the existing space to confirm a proper fit. Review local plumbing codes and regulations to ensure compliance.
Detailed Installation Process: Step-by-Step Guide
The installation process requires careful attention to detail to prevent leaks and ensure the bathtub is securely mounted and properly aligned.
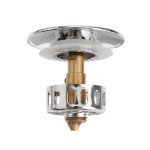
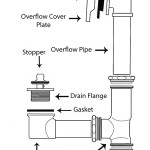
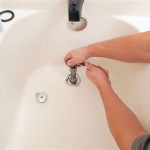
Step 1: Drain Installation. Install the drain assembly according to the manufacturer's instructions. Typically, this involves applying plumber's putty to the underside of the drain flange, inserting the flange into the bathtub drain opening, and then securing it from underneath with the drain body and associated hardware. Tighten the connections securely, ensuring a watertight seal. Wipe away any excess plumber’s putty.
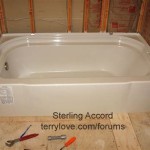
Step 2: Positioning the Bathtub. Carefully maneuver the bathtub into the prepared space. It is advisable to have assistance during this step due to the bathtub's weight. Align the bathtub with the drain connection and ensure it is centered within the alcove or designated area.
Step 3: Leveling and Shimming. Use the level to check the bathtub's level both lengthwise and widthwise. If the bathtub is not level, use shims to adjust its position. Place shims underneath the bathtub's support feet or along the rim where it contacts the framing. Check the level frequently and adjust the shims until the bathtub is perfectly level. Once level, consider using mortar mix or a setting compound beneath the base to provide more permanent support and prevent movement. This helps to distribute the weight of the tub and water evenly, reducing the chance of flexing or cracking over time.
Step 4: Securing the Bathtub. With the bathtub properly leveled and shimmed, it is necessary to secure it to the surrounding framing. This is typically done by attaching the bathtub's nailing flange (if present) to the wall studs using screws or nails. Ensure the fasteners are driven straight and do not overtighten, which could damage the flange. If the bathtub does not have a nailing flange, consider using construction adhesive in addition to shims to secure it to the framing.
Step 5: Plumbing Connections. Connect the drain tailpiece to the existing drain line using appropriate fittings and connectors. Ensure all connections are tight and leak-proof. Install the faucet and connect the hot and cold water supply lines. Check for leaks by slowly turning on the water supply. Address any leaks immediately by tightening connections or replacing fittings as needed.
Step 6: Caulking. Apply a bead of 100% silicone-based caulk along the perimeter of the bathtub where it meets the wall and the floor. This seals the gaps and prevents water from seeping behind the bathtub, which can lead to mold growth and structural damage. Ensure the caulk is applied smoothly and evenly. Use a caulk smoothing tool or a wet finger to create a professional finish.
Essential Considerations: Troubleshooting and Best Practices
During installation, certain challenges may arise, requiring troubleshooting and adherence to best practices to ensure a successful outcome.
Addressing Leaks. Leaks around the drain or faucet connections are a common issue. If a leak is detected, immediately turn off the water supply and inspect the connections. Tighten any loose fittings or replace worn-out washers or O-rings. If the leak persists, consider reapplying plumber's putty or Teflon tape to the threads.
Ensuring Proper Drainage. Proper drainage is crucial to prevent standing water in the bathtub. Ensure the drain line is properly sloped to allow water to flow freely. Check for any obstructions in the drain line that may be hindering drainage. If necessary, use a plumber's snake to clear any blockages.
Maintaining Levelness. Maintaining the bathtub's levelness throughout the installation process is essential. Regularly check the level and adjust the shims as needed. Uneven weight distribution can cause the bathtub to shift and become unlevel, leading to drainage problems and potential structural issues.
Preventing Damage. Exercise caution when handling the bathtub to prevent scratches or dents to the enamel finish. Use padding or protective coverings to protect the bathtub during installation. Avoid using abrasive cleaners or harsh chemicals that could damage the finish. Wear safety glasses and gloves to protect yourself from injury.
Following Local Codes. It is imperative to adhere to all local plumbing codes and regulations. These codes are designed to ensure the safety and functionality of plumbing systems. Consult with a local building inspector or plumbing professional if you have any questions or concerns about code compliance.
Proper ventilation. Ensure proper ventilation in the bathroom to prevent moisture buildup. An exhaust fan is highly recommended to remove excess moisture after showers or baths, helping to prevent mold and mildew growth.
Curing Time. Allow the caulk and any setting compounds (if used) to fully cure according to the manufacturer's instructions before using the bathtub. This ensures a watertight seal and proper adhesion.
Future Maintenance. Regularly clean the bathtub with non-abrasive cleaners to maintain its appearance and prevent stains. Inspect the caulk and plumbing connections periodically for any signs of damage or leaks. Address any issues promptly to prevent further damage.
By following these instructions and adhering to best practices, professional installation of the Bootz Aloha bathtub can be achieved, ensuring a functional and aesthetically pleasing addition to the bathroom.

Bootz Industries Aloha 60 In X 30 Soaking Bathtub With Right Drain White 011 3364 00

Bootz Industries Aloha 60 In X 30 Soaking Bathtub With Right Drain White 011 3364 00 The Home Depot

Bootz Industries Aloha 60 In X 30 Soaking Bathtub With Left Drain White 011 3365 00 The Home Depot

Bootz Industries Aloha 60 In X 30 Soaking Bathtub With Right Drain White 011 3364 00 The Home Depot

Bootzcast Bathtub Review And Installation Scrappy Geek

Bootz Industries Aloha 60 In X 30 Soaking Bathtub With Right Drain White 011 3364 00 The Home Depot

Bootz 011 3673 00 Aloha Afr 60 X 30 Porcelain Enamel Alcove Left Hand Drain Bathtub In White

Maui Plus Porcelain Enamel 60 X 32 16 5 8 Bathtub 011 2342 Rh Drain Slip Resistant 2343 Lh

Bootz 011 3364 06 Aloha 60 X 30 Porcelain Enamel Alcove Right Hand Drain Bathtub In Bone

Bootz Industries Aloha Plus 60 In X 32 Soaking Bathtub With Right Drain White 011 2366 00