Bootz Aloha Bathtub Installation: A Comprehensive Guide
Installing a Bootz Aloha bathtub is an exciting and rewarding project that can transform your bathroom into a tranquil oasis. However, proper installation is crucial for ensuring the functionality, safety, and durability of your new bathtub. Here is a comprehensive guide to help you through the essential aspects of Bootz Aloha bathtub installation:
Pre-Installation Preparation
Before starting the installation, it's essential to gather the necessary tools and materials, including a wrench, screwdriver, level, caulk gun, and silicone caulk. Ensure the bathtub area is clear of any obstacles and that the floor is level. If necessary, adjust the floor joists using shims to create a level surface.
Bathtub Placement
Carefully lift the Bootz Aloha bathtub into place and position it on the designated area. Use a level to ensure the bathtub is level in all directions. Adjust the leveling feet or shims underneath the tub as needed to achieve a stable and level installation.
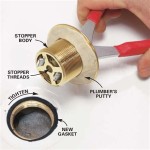
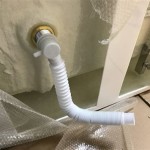
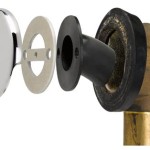
Drain and Overflow Installation
Connect the bathtub drain and overflow assembly following the manufacturer's instructions. Apply plumber's putty or caulk to the drain flange and tighten the drain assembly securely. Ensure that the overflow is properly aligned and the gasket is seated correctly.
Faucet Installation
If your Bootz Aloha bathtub has pre-drilled faucet holes, install the faucet according to the manufacturer's specifications. Apply plumber's tape to the faucet threads and hand-tighten the faucet into place. Use a wrench to further tighten the faucet, but avoid overtightening.
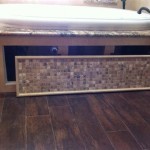
Tile Surround Installation (Optional)
If you're installing a tile surround around the bathtub, follow these steps:
- Apply a layer of thinset mortar to the wall behind the bathtub using a notched trowel.
- Press the tiles into the thinset, ensuring they are level and aligned.
- Use tile spacers to maintain even spacing between the tiles.
- Allow the thinset to cure according to the manufacturer's instructions.
Grout and Caulk Application
Once the thinset is cured, apply grout to the tile joints using a grout float. Smooth out the grout and allow it to dry. Finally, apply silicone caulk around the perimeter of the bathtub, where it meets the wall or tile surround, to create a watertight seal.
Final Inspection and Testing
After completing the installation, perform a thorough inspection to ensure everything is installed correctly. Turn on the water and check for any leaks. Adjust the drain stopper and overflow cover to ensure they function properly. Once you're satisfied with the installation, enjoy your new Bootz Aloha bathtub!

Bootz Industries Aloha 60 In X 30 Soaking Bathtub With Left Drain White 011 3365 00 The Home Depot

Bootz 011 3365 00 Aloha 60 X 30 Porcelain Enamel Alcove Bathtub In White Af Supply

Bootz Industries Aloha 60 In X 30 Soaking Bathtub With Left Drain White 011 3365 00 The Home Depot

Bootz Industries Aloha 60 In Left Drain Rectangular Alcove Soaking Bathtub White 011 4365 00 The Home Depot

Bootzcast Bathtub Review And Installation Scrappy Geek

Bootz Aloha 5 Bone Left Hand Porcelain Enamel Bathtub Jamaica Plumbing

Bootz Aloha 5 White Left Hand Porcelain Enamel Bathtub Jamaica Plumbing

Bootz Industries Aloha 60 In X 30 Soaking Bathtub With Left Drain Bone 011 3365 06 The Home Depot

Bathroom Renovation Questions Ceramic Tile Advice Forums John Bridge

Bootz Industries 114895 5 Ft Aloha Right Hand Bath Tub White Com