Bathworks DIY Bathtub Tile Refinishing Kit with Non-Slip Protection
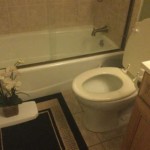
Refinishing a bathtub and surrounding tile can significantly revitalize a bathroom without enduring the extensive and costly process of full replacement. The Bathworks DIY Bathtub Tile Refinishing Kit, offering non-slip protection, presents a viable alternative for homeowners seeking to improve the aesthetic appeal and safety of their bathing area. This article provides a comprehensive overview of the kit, its components, the refinishing process, and key considerations for achieving a professional-looking and durable result. It will explore the advantages and limitations of choosing a DIY refinishing route, ultimately empowering homeowners to make informed decisions.
The Bathworks kit is designed to provide a cost-effective solution for addressing common bathroom issues such as chipped tile, stained surfaces, and dated colors. By applying a specialized coating, the kit aims to create a smooth, glossy, and water-resistant surface that emulates the look of a new bathtub and tile surround. Furthermore, the inclusion of non-slip protection addresses a critical safety concern in bathrooms, reducing the risk of slips and falls, especially important for households with children or elderly individuals.
Key Components of the Bathworks Refinishing Kit
A thorough understanding of the kit’s components is crucial for successful application and achievement of the desired outcome. The Bathworks DIY Bathtub Tile Refinishing Kit typically comprises several essential elements, each playing a specific role in the refinishing process.
The primary component is the two-part epoxy acrylic coating. This coating consists of a resin and a hardener, which, when mixed in precise proportions, create a chemical reaction that results in a durable and resistant finish. The quality and formulation of this coating are critical factors influencing the kit's overall performance. The coating is specifically formulated to bond to existing tile and bathtub surfaces, providing a smooth and protective layer.
The kit also includes a preparation solution, typically a cleaning agent designed to remove soap scum, mineral deposits, and other contaminants from the surfaces to be refinished. Proper surface preparation is paramount for ensuring adequate adhesion of the coating. This cleaner is often a powerful degreaser and etcher, prepping the surface for optimal bonding.
Sanding supplies are also generally included, such as sandpaper or sanding pads of varying grits, for further surface preparation. Sanding helps to create a slightly roughened surface, promoting better adhesion of the coating. These materials are essential for removing loose paint, rust, or imperfections on the existing surface.
Application tools, such as rollers, brushes, or spray applicators, are included to facilitate the even and consistent distribution of the coating. The type of application tool may vary depending on the kit and the desired finish. Proper application is crucial for achieving a uniform and professional look.
The non-slip additive constitutes another essential element of the kit. This additive is typically a fine powder or granules that are mixed into the coating prior to application. Once the coating dries, the non-slip additive creates a textured surface that provides enhanced traction, reducing the risk of slipping. The texture should be noticeable enough to provide grip but subtle enough to not be uncomfortable or visually unappealing.
Finally, safety gear is provided, including gloves and a respirator mask, to protect the user from exposure to potentially harmful chemicals during the refinishing process. Adequate ventilation is also crucial, and the kit often includes instructions emphasizing the importance of working in a well-ventilated area. Eye protection, such as safety glasses, is also recommended.
The Refinishing Process: A Step-by-Step Guide
The bathtub and tile refinishing process using the Bathworks DIY kit involves a series of steps that must be followed meticulously to achieve optimal results. Deviations from the recommended procedure can compromise the adhesion, durability, and overall appearance of the refinished surface.
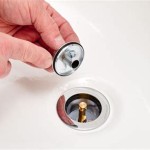
The initial stage involves thorough cleaning and preparation of the surfaces to be refinished. This includes removing all traces of soap scum, mold, mildew, and other contaminants using the provided cleaning solution. Scrubbing the surfaces vigorously is essential, paying particular attention to grout lines and areas with stubborn stains.
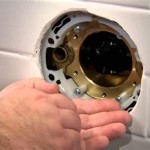
After cleaning, any loose paint, rust, or imperfections must be removed by sanding the surfaces thoroughly. The appropriate grade of sandpaper should be used to create a slightly roughened surface, facilitating better adhesion of the coating. It is imperative to feather the edges of any chipped or damaged areas to create a smooth transition.
Once sanding is complete, the surfaces must be rinsed thoroughly with water to remove any sanding debris. The surfaces must then be allowed to dry completely before proceeding to the next step. Any moisture present on the surfaces can interfere with the adhesion of the coating.
Next, the two-part epoxy acrylic coating must be mixed according to the manufacturer's instructions. It is crucial to adhere to the recommended mixing ratios to ensure proper curing and development of the coating's properties. The non-slip additive is then mixed into the coating, ensuring it is evenly distributed throughout the mixture.
The coating is then applied to the prepared surfaces using the provided application tools. Multiple thin coats are typically recommended, allowing each coat to dry completely before applying the next. This helps to prevent runs, drips, and other imperfections. The application should be even and consistent across the entire surface.
The drying time for the coating can vary depending on environmental factors such as temperature and humidity. It is essential to allow the coating to dry completely before exposing it to water or heavy use. The manufacturer's instructions will specify the recommended drying time. Premature exposure to moisture can compromise the integrity of the coating.
Once the coating has fully cured, the surfaces can be cleaned with a mild detergent and water. Abrasive cleaners should be avoided, as they can scratch or damage the finish. Regular cleaning and maintenance will help to prolong the life of the refinished surface.
Considerations and Limitations of DIY Refinishing
While DIY bathtub and tile refinishing offers a cost-effective alternative to professional services, it is important to acknowledge the inherent considerations and limitations. The success of a DIY refinishing project depends heavily on the homeowner's skill level, attention to detail, and adherence to the manufacturer's instructions.
One primary consideration is the potential for errors during the application process. Streaks, runs, drips, and uneven coverage can result in an aesthetically unappealing finish. These imperfections may be difficult or impossible to correct without stripping the coating and starting over. Professional refinishers possess the experience and expertise to minimize the risk of such errors.
Another key consideration is the durability and longevity of the refinished surface. While the Bathworks kit aims to provide a durable finish, the lifespan of the coating may be shorter compared to professional refinishing services. Factors such as water hardness, cleaning habits, and the frequency of use can influence the longevity of the finish. Professional refinishing often involves more advanced techniques and materials, resulting in a more durable and longer-lasting finish.
Furthermore, the DIY refinishing process can be time-consuming and labor-intensive. The cleaning, sanding, and application stages require significant effort and attention to detail. Homeowners should allocate sufficient time and resources to complete the project properly. Professional refinishing services offer the convenience of a quicker turnaround time and less disruption to the household.
The non-slip protection offered by the kit is a valuable safety feature, but it's important to consider the level of texture provided. Too little texture may not offer adequate slip resistance, while too much texture can make cleaning more difficult. It is important to test a small area of the refinished surface to ensure that the non-slip protection is suitable for the intended use.
Proper ventilation is crucial during the refinishing process due to the presence of potentially harmful chemicals in the coating. Insufficient ventilation can lead to respiratory irritation and other health problems. Homeowners should ensure that the work area is adequately ventilated and wear the provided respirator mask at all times. Professionals often have advanced ventilation equipment and safety protocols in place.
The preparation required for DIY refinishing can also be significantly more extensive than anticipated. Existing damage, such as deep chips or cracks, may require more extensive repair work before the coating can be applied. This may involve using fillers or patching compounds to create a smooth and even surface. Professional refinishers have the expertise to address these types of repairs effectively.
Finally, the resale value of a home may be affected differently by DIY versus professional refinishing. While a well-executed DIY refinishing project can improve the appearance of a bathroom, potential buyers may perceive it as less desirable than professional work. Disclosure of DIY refinishing should be considered when selling the property.
In summary, the Bathworks DIY Bathtub Tile Refinishing Kit with Non-Slip Protection offers a viable option for homeowners looking to refresh their bathrooms on a budget. However, it is crucial to carefully consider the limitations and requirements of the DIY process before embarking on such a project. Thorough preparation, meticulous attention to detail, and adherence to the manufacturer's instructions are essential for achieving a satisfactory outcome. Homeowners should realistically assess their skills and resources before deciding whether to proceed with a DIY refinishing project or opt for professional services.

Bathworks 22 Oz Standard Tub And Tile Refinishing Kit With Non Slip Protection Black Bmrk 114 The Home Depot

Bathworks 22 Oz Diy Bathtub And Tile Refinishing Kit With Slip Guard Protection Red Bwns 12 The Home Depot

Premium Kit With Non Slip Protection Bathworks

Bathworks Premium Quick Dry Bathtub Refinishing Kit With Non Slip Additive For Tub Tile More Bwqd 003 Bone Com

Bathworks Thrift Diving How To Refinish A Bathtub Using The 1 Best Kit In America

Bathworks 32 Oz Tub And Tile Refinishing Kit 2 Spray Cans White Bsp 001 The Home Depot

Bathworks Thrift Diving How To Refinish A Bathtub Using The 1 Best Kit In America

Contact Us Bathworks

Reviews For Bathworks 22 Oz Diy Bathtub Refinishing Kit With Slip Guard In Almond Pg 1 The Home Depot

Reviews For Bathworks 22 Oz White Standard Tub And Tile Refinishing Kit With Non Slip Protection Pg 1 The Home Depot
Related Posts