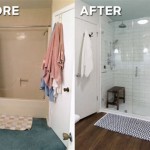
Bathworks DIY Bathtub Tile Refinishing Kit: A Comprehensive Guide
Refinishing a bathtub and its surrounding tile can drastically improve the aesthetic appeal and functionality of a bathroom. Over time, bathtubs and tiles can become stained, chipped, or simply outdated. Professional refinishing services can be costly. The Bathworks DIY Bathtub Tile Refinishing Kit offers a potentially more economical alternative for homeowners seeking to revitalize their bathrooms. This article explores the features of the Bathworks kit, the steps involved in its application, the pros and cons associated with DIY refinishing, and factors to consider before undertaking such a project.
The Bathworks DIY Bathtub Tile Refinishing Kit is marketed as a user-friendly solution for transforming worn or damaged bathroom surfaces. The kit typically includes a two-part epoxy acrylic coating, etching cleaner, non-skid additive (optional), application tools (rollers, brushes), and detailed instructions. The epoxy acrylic coating is designed to provide a durable, glossy finish that resists chipping, peeling, and staining. The etching cleaner prepares the surface for optimal adhesion of the coating. The optional non-skid additive enhances safety by reducing the risk of slipping on the newly refinished surface.
Understanding the Kit Components and Their Functions
The effectiveness of the Bathworks DIY Bathtub Tile Refinishing Kit hinges on the proper use of each included component. A thorough understanding of their purpose is crucial for achieving a satisfactory result.
Epoxy Acrylic Coating: This is the primary component responsible for the refinished look and protection of the underlying surface. The two-part epoxy acrylic coating requires mixing a resin and a hardener. This chemical reaction creates a durable, chemically resistant finish. The coating is designed to be applied in multiple thin layers, allowing for proper curing and preventing drips or runs. The glossy finish provides a clean, modern aesthetic.
Etching Cleaner: Surface preparation is paramount for any refinishing project. The etching cleaner is a crucial component in this process. It works by creating microscopic imperfections on the surface of the existing tile and bathtub. These imperfections provide a "tooth" that allows the epoxy acrylic coating to bond securely. Without proper etching, the coating is likely to peel or chip prematurely. The etching cleaner typically contains mild acids that dissolve mineral deposits and lightly roughen the surface.
Non-Skid Additive (Optional): Safety is a paramount consideration in the bathroom environment. The non-skid additive is designed to address the inherent slipperiness of glossy surfaces, particularly when wet. This additive consists of fine particles that are mixed into the epoxy acrylic coating before application. These particles create a slightly textured surface that increases traction and reduces the risk of falls. The use of the non-skid additive is highly recommended, especially for bathtubs and shower floors.
Application Tools: The kit typically includes a variety of application tools, such as rollers, brushes, and sometimes even a small paint sprayer. Rollers are generally used for applying the coating to large, flat surfaces, while brushes are better suited for corners, edges, and other intricate areas. The quality of the application tools can significantly impact the final finish. It's crucial to use high-quality brushes that minimize shedding and ensure even application of the coating.
Detailed Instructions: The included instructions are the roadmap for a successful refinishing project. These instructions typically provide step-by-step guidance on surface preparation, mixing the coating, applying the coating, and curing the finish. It is critical to read and understand the instructions thoroughly before beginning any work. Deviating from the instructions can compromise the final result and potentially damage the surfaces being refinished.
The Step-by-Step Refinishing Process: A Detailed Breakdown
Refinishing a bathtub and tile using the Bathworks DIY kit requires meticulous attention to detail and adherence to the manufacturer's instructions. The following steps outline the typical process:
1. Surface Preparation: This is arguably the most critical step in the entire process. Thorough surface preparation ensures proper adhesion of the epoxy acrylic coating and a long-lasting finish. The first step involves cleaning the bathtub and tile thoroughly with a degreasing cleaner to remove any soap scum, grime, or mildew. After cleaning, rinse the surfaces thoroughly with water and allow them to dry completely. Next, use the included etching cleaner according to the instructions to roughen the surface. This involves applying the etching cleaner, allowing it to sit for a specific amount of time, and then rinsing it off thoroughly with water. Finally, inspect the surfaces for any remaining imperfections, such as chips or cracks, and repair them with a suitable epoxy filler. Sand the repaired areas smooth and wipe away any dust.
2. Masking and Ventilation: Before applying the epoxy acrylic coating, it is essential to mask off all surrounding areas to protect them from overspray or drips. Use painter's tape and plastic sheeting to cover fixtures, walls, and any other surfaces that you do not want to be refinished. Adequate ventilation is also crucial during the refinishing process, as the epoxy acrylic coating can emit strong fumes. Open windows and doors to allow for fresh air circulation, and consider using a respirator mask to protect yourself from inhaling the fumes.
3. Mixing the Coating: The Bathworks DIY Bathtub Tile Refinishing Kit typically includes a two-part epoxy acrylic coating that requires mixing a resin and a hardener. Follow the manufacturer's instructions carefully to ensure the correct mixing ratio. Use a clean container and mixing stick to combine the two components thoroughly. Mix the coating until it is smooth and uniform in color. If using the non-skid additive, mix it into the coating at this stage, following the instructions provided.
4. Applying the Coating: Apply the epoxy acrylic coating in thin, even layers using the included rollers or brushes. Start with a thin primer coat and allow it to dry completely before applying subsequent coats. Apply two to three coats, allowing each coat to dry thoroughly before applying the next. Avoid applying the coating too thickly, as this can lead to drips, runs, and uneven drying. Work in small sections and maintain a wet edge to ensure a smooth, seamless finish. Pay close attention to corners, edges, and other intricate areas, using a brush to ensure proper coverage.
5. Curing the Finish: After applying the final coat of epoxy acrylic coating, allow the finish to cure completely according to the manufacturer's instructions. This typically takes 24 to 72 hours, depending on the temperature and humidity. Avoid using the bathtub or shower during the curing process. Do not allow water or other liquids to come into contact with the newly refinished surface until it is fully cured.
6. Clean-Up: Once the coating is fully cured, carefully remove the masking tape and plastic sheeting. Clean any spills or drips with appropriate solvents, following the manufacturer's recommendations. Dispose of used rollers, brushes, and other materials properly. Clean the surrounding area and inspect the refinished surfaces for any imperfections. Touch up any areas as needed.
Pros and Cons of Using a DIY Bathtub Tile Refinishing Kit
While the Bathworks DIY Bathtub Tile Refinishing Kit offers a potentially cost-effective solution for bathroom renovation, it's crucial to weigh the advantages and disadvantages before embarking on the project.
Pros:
- Cost Savings: DIY refinishing is significantly less expensive than hiring professional refinishing services.
- Convenience: The homeowner can control the timeline and work at their own pace.
- Customization: The homeowner has the freedom to choose the color and finish of the coating.
- Satisfaction: Completing a DIY project can provide a sense of accomplishment.
Cons:
- Time Commitment: Refinishing a bathtub and tile is a time-consuming process that requires patience and attention to detail.
- Skill Required: Achieving a professional-looking finish requires a certain level of skill and experience.
- Potential for Errors: Mistakes can be costly and time-consuming to correct.
- Durability Concerns: DIY refinishing may not be as durable as professional refinishing, especially if proper preparation is not followed.
- Fumes and Ventilation: The epoxy acrylic coating can emit strong fumes, requiring adequate ventilation and respiratory protection.
Ultimately, the decision of whether or not to use a DIY bathtub tile refinishing kit depends on the homeowner's skills, experience, and willingness to invest the time and effort required to achieve a satisfactory result.

Bathworks 22 Oz Diy Bathtub And Tile Refinishing Kit With Slip Guard Protection Red Bwns 12 The Home Depot

Bathworks 22 Oz Standard Tub And Tile Refinishing Kit With Non Slip Protection Black Bmrk 114 The Home Depot

Bathworks Thrift Diving How To Refinish A Bathtub Using The 1 Best Kit In America

Premium Kit With Non Slip Protection Bathworks

Diy Painted Bathtub Follow Up Your Questions Answered Addicted 2 Decorating

32oz Bathworks Bathtub Tile Spray Refinishing Kit 2 Cans White Com

Bathworks Diy Bathtub And Tile Refinishing Kit High Gloss Finish White 20 Oz

Reviews For Bathworks 20 Oz Diy Bathtub And Tile Refinishing Kit White Pg 1 The Home Depot

Bathworks Thrift Diving How To Refinish A Bathtub Using The 1 Best Kit In America

Bathworks Bathtub Tile Refinishing Kit Resin Finish White 20 Oz For
Related Posts