Bathtub Shower Faucet Leaking: Essential Aspects
A leaking bathtub shower faucet can be a nuisance, wasting water and potentially causing damage to your bathroom. Addressing the issue promptly is crucial to prevent further problems. Here are some essential aspects to consider:
1. Identifying the Source of the Leak:
Determine the exact location of the leak. Is it coming from the faucet handle, the showerhead, or the base of the faucet? Identifying the source will help you narrow down the potential causes.
2. Checking the Seals and Washers:
Worn or damaged seals and washers are common causes of faucet leaks. Inspect the O-rings, gaskets, and washers around the handle, faucet base, and showerhead. Replace any damaged or deteriorated components.
3. Inspecting the Valve Cartridge:
In some faucets, a valve cartridge controls the flow of water. If the cartridge is faulty or worn, it can cause leaks. Try cleaning the cartridge or replacing it if necessary.
4. Tightening Loose Connections:
Over time, connections can become loose, leading to leaks. Check the connections at the faucet base, shower arm, and any other fittings. Tighten any loose connections using a wrench or pliers.
5. Cleaning the Aerator:
A clogged aerator can restrict water flow and cause pressure buildup, leading to leaks. Remove the aerator from the end of the faucet and clean it thoroughly, removing any debris or mineral deposits.
6. Replacing the Faucet:
If the leak is severe or cannot be resolved through other methods, it may be necessary to replace the entire faucet. This is typically recommended for older faucets or those with significant damage.
7. Seeking Professional Help:
If you are not comfortable performing these repairs yourself or if the leak persists, do not hesitate to contact a qualified plumber. They have the expertise and tools to diagnose and resolve the issue effectively.
By understanding these essential aspects of bathtub shower faucet leaking, you can take informed steps to address the problem and prevent further issues. Regular maintenance and prompt repairs can help ensure your faucet operates smoothly and efficiently for years to come.

How To Fix A Leaky Tub Shower Faucet

How To Fix A Leaking Bathtub Faucet The Home Depot

How To Fix A Leaky Single Handle Tub Shower Faucet Danco

How To Fix A Leaky Bathtub Faucet Delta Shower Cartridge L Replace

How To Fix A Leaking Bathtub Faucet The Home Depot

Bathroom Repair How To Fix A Leaking Shower Faucet

Very Common Leak Around A Bathtub Or Shower Quick And Easy To Prevent By Every Homeowner

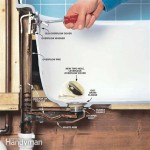
How To Fix A Leaking Bathtub Faucet Diy Family Handyman

Repairing A Leaky Two Three Handle Tub Shower Faucet

How To Repair A Shower Diverter Mr Rooter Blog