```html
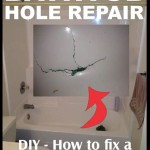
Bathtub Plug Replacement Seal: A Comprehensive Guide
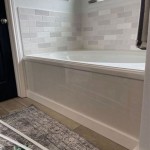
The bathtub is a sanctuary for relaxation and hygiene, a space where one can unwind after a long day or prepare for the activities ahead. A functional bathtub requires all its components to operate seamlessly. A seemingly minor, yet essential, element is the bathtub plug, and more specifically, the bathtub plug replacement seal. When this small ring of rubber or silicone fails, it can lead to a frustrating and wasteful drain, impacting water bills and potentially damaging the surrounding flooring.
The bathtub plug replacement seal serves as the primary barrier between the water in the tub and the drainpipe. Its function is to create a watertight closure, preventing water from seeping through. Over time, these seals, typically made of rubber or synthetic materials, can degrade due to exposure to water, soap scum, mineral deposits, and the constant pressure of being compressed. A damaged or worn-out seal results in a slow but persistent leak, which can be both annoying and costly.
Identifying a faulty bathtub plug replacement seal is usually straightforward. Common signs include a bathtub that slowly drains even when the plug is firmly in place, visible cracks or tears in the seal itself, and a general feeling of looseness or ineffectiveness when the plug is inserted. Addressing this issue promptly prevents water waste and potentially more significant problems associated with prolonged water exposure in the bathroom.
Replacing a bathtub plug seal is a relatively simple and inexpensive task that most homeowners can undertake themselves. This article provides a detailed guide to the process, covering the types of seals available, the necessary tools, step-by-step instructions, and preventative measures to extend the lifespan of the new seal.
Understanding Bathtub Plug Types and Seal Compatibility
Before embarking on the seal replacement, it is crucial to identify the type of bathtub plug currently in use. Bathtub plugs are not universally interchangeable, and the seal must be compatible with the specific plug design. The most common types of bathtub plugs include:
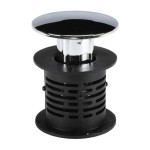
Lift-and-Turn Plugs: These plugs feature a knob or handle that is lifted and turned to engage or disengage the drain. The seal is typically located beneath the plug and is designed to compress against the drain opening when the plug is turned to the closed position. The seal is often a flat, flanged rubber washer.
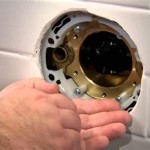
Push-and-Seal Plugs (Pop-Up Plugs): These plugs operate by pressing down on the plug to seal the drain and pressing again to release it. The seal is generally integrated into the plug's lower section and often consists of multiple concentric rings to ensure a tight fit. The replacement seals for this type can be more complex and may require specialized tools for installation.
Stopper Plugs (Rubber Plugs): These are the simplest type, consisting of a rubber or synthetic plug with varying diameters to fit different drain sizes. The seal is the entire plug itself. While simple, they can be effective if the correct size is chosen and the rubber remains pliable.
Toe-Touch Plugs: Similar to push-and-seal, these operate via foot pressure. The sealing mechanism and seal type are generally the same as the push-and-seal variety.
Chain and Stopper Plugs: These are classic designs where a rubber or plastic stopper is connected to a chain. The seal is the stopper itself, relying on its size and pliability to create a watertight barrier. Replacements are typically easy to find and install.
Identifying the plug type is essential because replacement seals are designed specifically for each type. Attempting to use an incompatible seal will likely result in a continued leak or even damage to the plug itself. Check the manufacturer's instructions for the plug or search online with the plug type identified alongside "replacement seal" to find the correct replacement component.
Step-by-Step Guide to Bathtub Plug Seal Replacement
Once the correct replacement seal has been acquired, the replacement process can begin. These steps provide a general guideline, but it is always advisable to consult the manufacturer's instructions specific to the plug being serviced.
1. Gather the Necessary Tools: The tools required for replacing a bathtub plug seal are typically minimal. These may include:
- New replacement seal
- Flathead screwdriver or putty knife
- Clean rags or paper towels
- Cleaning solution (mild soap and water or vinegar)
- Optional: Silicone grease or plumber's grease
2. Prepare the Work Area: Clear the area around the bathtub drain. This includes removing any bath mats or personal items that may obstruct access. Place a towel or cloth over the drain opening to prevent any small parts from falling into the drain during the replacement process.
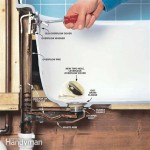
3. Remove the Old Seal and Plug: Depending on the plug type, the removal process will vary. For lift-and-turn plugs, loosen the screw or locking mechanism that secures the plug to the drain assembly. For push-and-seal plugs, gently pry the plug from the drain using a flathead screwdriver or putty knife. Stopper plugs are simply lifted out of the drain. Chain and stopper plugs are removed by simply detaching the chain.
4. Inspect the Plug and Drain: After removing the plug, thoroughly inspect it for any signs of damage, such as cracks or corrosion. Clean the plug and the drain opening with a cleaning solution to remove any soap scum, mineral deposits, or debris. A clean surface will ensure a proper seal with the new replacement.
5. Remove the Old Seal: Using a flathead screwdriver or putty knife, carefully pry off the old seal from the plug. Be mindful not to damage the plug itself during this process. Once the old seal is removed, clean the area where the new seal will be installed to remove any remaining residue.
6. Install the New Seal: Apply a small amount of silicone grease or plumber's grease to the new seal. This will help it slide into place more easily and create a better watertight seal. Position the new seal onto the plug, ensuring it is properly aligned and firmly seated. For some plug types, the seal may snap into place or require a slight twisting motion to secure it.
7. Reinstall the Plug: Reinstall the plug into the drain assembly, following the reverse of the removal process. For lift-and-turn plugs, tighten the screw or locking mechanism to secure the plug. For push-and-seal plugs, press the plug firmly into the drain until it clicks into place. For stopper plugs, simply place the stopper into the drain. Chain and stopper plugs are reattached by connecting the chain.
8. Test the Seal: Fill the bathtub with a small amount of water and observe the drain for any leaks. If the water drains slowly or at all, the new seal is functioning correctly. If a leak is detected, double-check that the seal is properly installed and seated. If necessary, remove the plug and reinstall the seal, ensuring proper alignment and a tight fit.
Tips for Extending the Lifespan of Bathtub Plug Seals
Taking preventative measures to maintain the bathtub plug seal can significantly extend its lifespan and prevent premature failure. Incorporating these habits into regular bathroom cleaning routines will ensure a long-lasting and effective seal.
Regular Cleaning: Clean the bathtub plug and drain area regularly to remove soap scum, mineral deposits, and other debris that can degrade the seal. Use a mild cleaning solution and a soft brush or cloth to gently scrub the plug and drain opening.
Avoid Harsh Chemicals: Avoid using harsh chemicals or abrasive cleaners on the bathtub plug and seal. These chemicals can damage the seal material, causing it to crack or lose its elasticity. Opt for mild, pH-balanced cleaning solutions specifically designed for bathroom surfaces.
Lubrication: Periodically apply a small amount of silicone grease or plumber's grease to the seal. This will help to keep it pliable and prevent it from drying out or cracking. It also reduces friction when the plug is inserted or removed, minimizing wear and tear.
Inspect Regularly: Regularly inspect the bathtub plug seal for any signs of damage, such as cracks, tears, or discoloration. If any damage is detected, replace the seal promptly to prevent leaks and further damage.
Gentle Handling: Avoid forcefully inserting or removing the bathtub plug. This can put unnecessary stress on the seal, causing it to wear out prematurely. Handle the plug gently and ensure it is properly aligned before inserting it into the drain.
By following these preventative measures, the longevity of the bathtub plug replacement seal can be considerably extended, minimizing the need for frequent replacements and ensuring a watertight seal for years to come.
```
Replacement Rubber Ring For A Bath Plug Mumsnet

How To Replace A Bathtub Drain

Bathtub Plug Replacement Sink Drain Valve Temu

Bathtub Plug Replacement Sink Drain Valve Temu

How To Replace A Bathtub Drain

Bath Pop Up Plug Fin Rubber Washer Seal 74000548

How To Replace Bathtub Drain Shoe Gasket

How To Replace A Bathtub Drain

Seal Drain Plug Suction Replacement Pool Water Massage System New

How To Replace Bathtub Drain Shoe Gasket