Bathtub Overflow Plate Replacement: A Comprehensive Guide
The bathtub overflow plate, often a small, unassuming component, plays a critical role in preventing water damage within a home. Its primary function is to provide an outlet for excess water when the bathtub reaches a certain level, preventing it from spilling over the rim. Over time, these plates can become damaged, corroded, or simply aesthetically unappealing, necessitating replacement. This article provides a comprehensive guide to bathtub overflow plate replacement, covering identification, preparation, removal, installation, and troubleshooting.
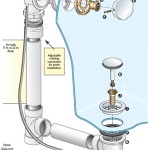
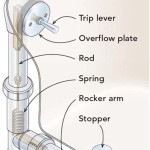
Understanding the different types of overflow plates is crucial before embarking on a replacement project. The most common type is a standard screw-in plate, typically secured with one or two screws. More modern designs often incorporate a lift-and-turn mechanism, which controls the drain stopper. Yet another type, often found in older homes, may be a trip-lever style which employs a lever to actuate a plunger that stops the drain. Discerning the existing style of overflow plate allows for the acquisition of a compatible replacement and ensures a smoother installation process.
Identifying the Need for Replacement
Several indicators signal the need for bathtub overflow plate replacement. Obvious signs include visible damage such as cracks, rust, or corrosion. These flaws can compromise the plate’s structural integrity, potentially leading to leaks or a failure of the drain control mechanism. Aesthetically, a discolored or outdated overflow plate can detract from the overall appearance of the bathroom. Functionally, if the drain stopper (if controlled by the overflow plate) is not operating correctly – failing to seal properly or sticking – the problem could stem from a faulty overflow plate mechanism. Water leaking from around the overflow plate during bathtub use is a crucial indicator of a failed gasket or a loose connection, demanding immediate attention.
Ignoring these signs can lead to more significant problems. A leaking overflow plate can cause water damage behind the wall, leading to mold growth, structural rot, and costly repairs. A malfunctioning drain stopper, controlled by the overflow, can result in wasted water and increased utility bills. Therefore, early detection and prompt replacement of a faulty bathtub overflow plate are essential for maintaining a functional and aesthetically pleasing bathroom.
Before beginning the replacement process, gathering the necessary tools and materials is paramount for a successful outcome. A new overflow plate – matching the existing style and finish – should be acquired. A screwdriver (usually Phillips head or flat head, depending on the screws) is essential for removing and installing the plate. Plumber's putty is crucial for creating a watertight seal around the new overflow plate. A clean rag or sponge is needed to clean the area around the overflow drain. A pair of pliers might be required to handle stubborn screws or the drain linkage mechanism. Finally, safety glasses are recommended to protect the eyes from debris. Having all these tools and materials readily available will streamline the replacement process and minimize potential delays.
Step-by-Step Removal of the Old Overflow Plate
The first step in removing the old overflow plate involves halting the water supply near the tub if necessary. This is usually not required unless you anticipate difficulty and wish to avoid accidental flooding. Remove the screws securing the overflow plate to the bathtub. For standard screw-in plates, this is a straightforward process. For lift-and-turn or trip-lever models, carefully examine the mechanism. There may be a hidden screw or a specific release mechanism that needs to be disengaged before the plate can be fully detached. Once the screws are removed, gently pull the overflow plate away from the bathtub. If the plate is stuck, applying slight pressure while wiggling it can help to loosen it.
With the plate removed, the drain linkage (if present) will be exposed. Carefully detach the linkage from the overflow drain mechanism. This may involve unscrewing a small connector or simply pulling the linkage free from a slot. Note the orientation of the linkage and any connecting parts, as this will be crucial during reassembly. Clean the area around the overflow drain thoroughly. Remove any old putty, caulk, or debris that may be present. A clean surface is essential for ensuring a watertight seal with the new overflow plate. Inspect the overflow drain pipe for any signs of damage or corrosion. If damage is present, addressing it before installing the new overflow plate is advisable. The existing pipe can be cleaned with a wire brush to remove loose rust and debris.
Following these steps carefully ensures the safe and efficient removal of the old overflow plate, preparing the way for the installation of the new one. Proceeding with a clean and properly prepared surface is vital for achieving a long-lasting and leak-free result.
Installing the New Overflow Plate and Ensuring a Watertight Seal
The first step in installing the new overflow plate is applying plumber's putty. Roll a small amount of plumber's putty into a thin rope and apply it to the back of the overflow plate, around the drain opening. Ensure the putty is evenly distributed to create a complete seal. Be generous enough to provide a good seal, but avoid excessive application that could squeeze out and create a mess.
Carefully align the new overflow plate with the overflow drain opening in the bathtub. For models with drain linkages, reattach the linkage to the overflow drain mechanism, ensuring it is connected in the same orientation as before. This may involve reattaching the linkage with a screw or slotting it back into place carefully. Once the linkage is properly connected, gently press the overflow plate against the bathtub, ensuring the plumber's putty makes contact with the tub surface. Secure the overflow plate with the screws, tightening them evenly. Avoid overtightening, which could crack the overflow plate or the bathtub itself. The goal is to achieve a snug fit that compresses the plumber's putty and creates a watertight seal.
After securing the plate, remove any excess plumber's putty that has squeezed out from around the edges. A clean rag can be used to wipe away the excess putty, leaving a clean and professional finish. Test the drain stopper mechanism (if applicable) to ensure it is functioning correctly. The stopper should open and close smoothly, creating a tight seal when closed. If the stopper is not functioning properly, readjust the linkage as needed until it operates correctly. Finally, run water into the bathtub and thoroughly inspect the overflow plate for leaks. If any leaks are detected, tighten the screws slightly to further compress the plumber's putty. If leaks persist, it may be necessary to remove the overflow plate, apply fresh plumber's putty, and repeat the installation process.
Properly installing the new overflow plate and ensuring a watertight seal is crucial for preventing water damage and maintaining a functional bathtub. Taking the time to carefully follow these steps will ensure a long-lasting and leak-free installation.
Troubleshooting common issues during overflow plate replacement can save time and frustration. If the screws are stripped or broken, a screw extractor tool can be used to remove them. If the new overflow plate does not match the existing one exactly, modifications may be necessary. The drain linkage might need to be adjusted or replaced to ensure compatibility. If the new overflow plate leaks even after applying plumber's putty, the overflow drain pipe itself may be damaged or corroded, requiring further repair or replacement. When encountering persistent leaks or complex issues, consulting a qualified plumber is recommended.

How To Install A New Bathtub Overflow Plate Assembly

Bathtub Overflow Cover Replacement

How To Replace Bathtub Overflow Plate With Trip Lever Easy Simple

Watco 3 25 In Brushed Nickel Overflow Plate Assembly Without S The Bathtub Shower Drain Accessories Department At Com

Watco Snap On Tub Overflow Plate The Innovator Fix My Drain

Replace A Bathtub Overflow Drain Plate

Replacement Parts For Brass Bathtub Drains

Westbrass Universal Patented Deep Soak Replacement 2 Hole Bathtub Overflow Cover Polished Chrome D493chm 26 The Home Depot

Replace A Bathtub Overflow Plate

How To Change Bathtub Overflow Plate That Has A Stopper Tiktok