Bathtub Overflow Cover Replacement: A Comprehensive Guide
An overflow cover is a crucial component of a bathtub, preventing water from overflowing and causing damage to your bathroom or adjacent areas. Replacing an overflow cover is a relatively simple task that can be completed with minimal tools and effort. However, there are certain essential aspects to consider to ensure a successful and functional replacement.
Removal of the Old Overflow Cover
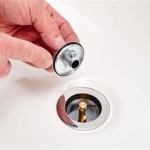
Before installing a new overflow cover, the old one must be removed. Locate the screws or clips securing the overflow cover to the bathtub and carefully remove them. Ensure you do not damage the bathtub surface during the removal process.
Selection of a New Overflow Cover
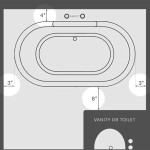
Choosing the right overflow cover is essential for both functionality and aesthetics. Consider the size, shape, and finish of the existing overflow hole and select a replacement that matches or enhances the overall look of your bathroom.
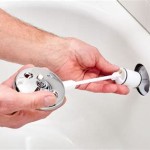
Installation of the New Overflow Cover
Align the new overflow cover over the overflow hole and secure it using the provided screws or clips. Avoid overtightening the screws to prevent cracking or damage to the cover or bathtub.
Testing the Overflow Cover
Once the overflow cover is installed, fill the bathtub with water and check for any leaks. If the water overflows through the cover, it may indicate an improper fit or a seal issue. Realign the cover and tighten the screws to resolve any potential issues.
Additional Considerations
Materials: Overflow covers are typically made from durable materials such as plastic, metal, or rubber. Consider the longevity and aesthetics of the material when making your selection.
Finish: Match the finish of the overflow cover to the bathtub and bathroom fixtures for a cohesive look. Common finishes include chrome, brushed nickel, gold, and white.
Maintenance: Regular cleaning and periodic replacement of the overflow cover are recommended to maintain its functionality and prevent water damage.
Replacing an overflow cover is an essential task that can improve the safety and aesthetics of your bathroom. By following these simple steps, you can effectively replace the overflow cover, preventing water overflows and ensuring the proper functioning of your bathtub.

Replace A Bathtub Overflow Plate

How To Install A New Bathtub Overflow Plate Assembly

Watco Snap On Tub Overflow Plate The Innovator Fix My Drain

Watco Innovator Snap On Bathtub Overflow Plate Kit In Brushed Nickel 18009 Bn The Home Depot

Silicone Bathtub Overflow Drain Cover How To Get A Deeper Bath With Better Soak

Bathtub Overflow Gaskets

Dad Replaces A Tub S Overflow Cover Plate

Easy To Install Universal Tub Drain Trim Kits Fits Common Tubs

Westbrass Universal Patented Deep Soak Replacement 2 Hole Bathtub Overflow Cover Powder Coat White D493chm 50 The Home Depot

Watco Snap On Tub Overflow Plate The Innovator Fix My Drain
Related Posts