Bathtub Faucet Leaking When Shower Is On
A dripping bathtub faucet when the shower is running is a common plumbing issue that can be both annoying and wasteful. While a minor drip might seem inconsequential, it can add up to significant water loss over time, increasing utility bills and potentially causing damage. Understanding the underlying causes and available solutions can empower homeowners to address this problem effectively.
Potential Causes of a Leaky Bathtub Faucet When Showering
Several factors can contribute to a leaky bathtub faucet when the shower is engaged. Pinpointing the specific cause is crucial for selecting the appropriate repair strategy.
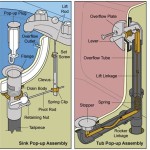
- Worn-out Diverter Valve: The diverter valve is responsible for redirecting water flow from the bathtub faucet to the showerhead. Over time, the valve can wear down, allowing water to seep through even when the shower is on. This is often the most common culprit.
- Damaged O-Rings or Seals: The diverter valve and other components within the faucet rely on O-rings and seals to create watertight connections. These rubber components can deteriorate with age, crack, or become dislodged, leading to leaks.
- Corroded Cartridge: Some faucets use a cartridge instead of a separate diverter valve. This cartridge controls both water flow and temperature. Corrosion or mineral buildup can interfere with the cartridge's functionality and cause leaks.
- Loose Connections: Loose fittings within the faucet assembly can also contribute to leaks. Vibrations from water pressure can loosen connections over time, compromising the integrity of the seals.
- High Water Pressure: Excessively high water pressure can strain the faucet components and exacerbate pre-existing weaknesses, leading to leaks.
Troubleshooting the Leak
Before attempting any repairs, it's essential to identify the specific source of the leak. The following steps can help pinpoint the problem:
- Inspect the Diverter Valve: If the leak occurs only when the shower is engaged, the diverter valve is the most likely culprit. Look for visible signs of wear or damage.
- Check for Loose Handles or Connections: Try tightening any loose handles or visible connections within the faucet assembly. This simple fix might resolve the issue in some cases.
- Listen for Unusual Sounds: Unusual noises, such as hissing or whistling, can indicate problems with the internal components of the faucet, including the cartridge.
Repair Options
Depending on the identified cause, several repair options are available:
- Replacing the Diverter Valve: This is a relatively straightforward repair that can often be done with basic tools. The specific process varies depending on the faucet type, but generally involves turning off the water supply, removing the faucet handle, and accessing the diverter valve.
- Replacing O-Rings and Seals: If worn-out O-rings or seals are the cause, replacing them is a simple and cost-effective solution. Be sure to use the correct size and type of replacement parts.
- Replacing the Cartridge: If the faucet utilizes a cartridge, a replacement cartridge might be necessary. This process is slightly more complex than replacing the diverter valve and might require specialized tools.
- Tightening Connections: For loose connections, simply tightening the fittings with a wrench can often resolve the leak. Be careful not to overtighten, which can damage the threads.
- Addressing High Water Pressure: If high water pressure is suspected, installing a pressure regulator can help protect the faucet and prevent future leaks.
Tools and Materials for Repair
Having the right tools and materials on hand simplifies the repair process. Common items include:
- Screwdrivers: Flathead and Phillips head screwdrivers are essential for removing faucet handles and other components.
- Adjustable Wrench: An adjustable wrench is useful for tightening or loosening connections and removing the diverter valve.
- Pliers: Pliers can be helpful for gripping and removing stubborn components.
- Replacement Parts: Acquire the necessary replacement parts, such as the diverter valve, O-rings, seals, or cartridge, before starting the repair. These are readily available at most hardware stores.
- Plumber's Tape: Plumber's tape is used to seal threaded connections and prevent leaks.
Preventing Future Leaks
Taking preventative measures can help minimize the risk of future leaks:
- Regular Inspection: Periodically inspect the faucet for any signs of wear or damage. Addressing minor issues early can prevent them from escalating into major problems.
- Avoid Excessive Force: Avoid using excessive force when operating the faucet handles. Gentle operation can help prolong the life of the components.
- Water Quality: Hard water can contribute to mineral buildup and corrosion within the faucet. Consider installing a water softener or using a water filter to improve water quality.
When to Call a Professional Plumber
While many bathtub faucet leaks can be addressed with DIY repairs, some situations warrant professional assistance:
- Complex Repairs: If the repair involves complex plumbing work or requires specialized tools, it's best to consult a qualified plumber.
- Persistent Leaks: If the leak persists despite attempted repairs, a professional plumber can diagnose and resolve the underlying issue.
- Lack of Experience: If you are uncomfortable working with plumbing fixtures, it's always advisable to seek professional help.

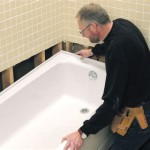
How To Fix A Leaking Bathtub Faucet Diy Family Handyman

How To Fix A Leaking Bathtub Faucet The Home Depot

How To Fix A Leaking Bathtub Faucet The Home Depot

How To Fix A Leaking Bathtub Faucet Diy Family Handyman

How To Fix A Leaky Bathtub Faucet 6 Ways Stop Drips

Fix Tub Spout That Leaks Water When Shower Is On

How To Fix A Leaking Bathtub Faucet The Home Depot

How To Fix A Leaking Bathtub Faucet Diy Family Handyman

Fix Tub Spout That Leaks Water When Shower Is On

Faucet Repair How To A Leaky Bath
Related Posts