Bathtub Faucet Leaking After Water Turned Off: Single Handle
A leaking bathtub faucet after the water has been turned off can be a frustrating and annoying problem. Fortunately, it's often a relatively simple issue to fix. In this article, we'll explore the most common causes of a leaking single-handle bathtub faucet and provide step-by-step instructions on how to repair it.
Causes of a Leaking Bathtub Faucet
There are several potential causes for a bathtub faucet to leak after the water has been turned off, including:
- Worn or damaged O-rings
- Loose connections
- Defective cartridge
- Faulty aerator
Step-by-Step Repair Instructions
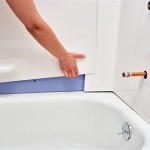
Turn off the water supply.
The first step is to turn off the water supply to the faucet. There will typically be two shut-off valves under the sink, one for hot water and one for cold water. Turn both valves clockwise to shut off the water.Remove the faucet handle.
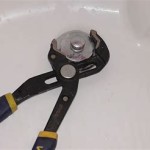
Once the water is turned off, you can remove the faucet handle. Most single-handle faucets have a cap that needs to be removed first. Once the cap is off, you can unscrew the handle with a wrench or pliers.Inspect the O-rings.
With the handle removed, you can inspect the O-rings. O-rings are small rubber rings that create a watertight seal between the handle and the faucet body. If the O-rings are worn or damaged, they will need to be replaced.Check the connections.
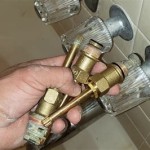
Next, check the connections between the faucet body and the water supply lines. If any of the connections are loose, they will need to be tightened. Use a wrench or pliers to tighten the connections.Replace the cartridge.
If the O-rings and connections are in good condition, the problem may be with the cartridge. The cartridge is a small cylindrical device that controls the flow of water. To replace the cartridge, you will need to remove the faucet body. Once the faucet body is removed, you can unscrew the cartridge and replace it with a new one.Replace the aerator.
The aerator is a small screen that is attached to the end of the faucet. It helps to break up the stream of water and reduce splashing. If the aerator is clogged or damaged, it can cause the faucet to leak. To replace the aerator, simply unscrew it from the end of the faucet and replace it with a new one.
Once you have completed the necessary repairs, turn the water supply back on and check for leaks. If the faucet is still leaking, there may be a more serious problem that requires the attention of a professional plumber.

How To Fix A Leaky Bathtub Faucet 6 Ways Stop Drips

How To Fix A Leaking Bathtub Faucet Diy Family Handyman

Why Does My Shower Faucet Leak When The Water Is Off Quora

How To Fix A Leaking Bathtub Faucet Diy Family Handyman

How To Fix A Leaking Single Handle Bathtub Faucet Quick And Easy

How To Fix A Leaking Bathtub Faucet The Home Depot

How To Fix A Leaky Bathtub Faucet Vintage Tub Bath

How To Fix A Leaking Bathtub Faucet The Home Depot

How To Fix A Leaking Bathtub Faucet Diy Family Handyman

Easy Fix For Leaking Bathtub Faucet Diverter W Shower