Bathtub Faucet Drips: Understanding the Causes and DIY Repairs
A dripping bathtub faucet is not only annoying, but it can also waste a significant amount of water and increase your utility bills. Understanding the causes of faucet drips and learning how to repair them yourself can save you money and keep your bathroom free from constant dripping.
Identifying the Source of the Drip
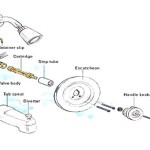
Before you can repair a dripping faucet, you need to determine where the drip is coming from. There are three main sources of faucet drips:
- Handle washer: When you turn the faucet handle, a rubber or plastic washer creates a seal against the valve seat to stop water flow. If the washer becomes worn or damaged, it can allow water to leak out around the handle.
- Valve seat: The valve seat is the surface against which the washer seals. If the valve seat becomes scratched or pitted, it can prevent the washer from sealing properly and cause a drip.
- Stem assembly: The stem assembly is the part of the faucet that connects the handle to the valve seat. If the stem becomes loose or damaged, it can allow water to leak out past the washer.
DIY Repair for Handle Washer Drips
If you have identified the drip as coming from the handle washer, it is a relatively easy fix that can be done with a few basic tools:
- Turn off the water supply to the faucet.
- Remove the handle by unscrewing the screw that holds it in place.
- Remove the old washer and replace it with a new one.
- Reinstall the handle and turn the water supply back on.
Repairing Valve Seat Drips
If the drip is coming from the valve seat, you will need to replace the seat. This is a more involved repair, but it is still possible to do yourself with the right tools:
- Turn off the water supply to the faucet.
- Remove the handle and stem assembly.
- Use a valve seat wrench to remove the old valve seat.
- Clean the valve body and apply a thin layer of pipe sealant around the new valve seat.
- Screw in the new valve seat.
- Reinstall the stem assembly and handle.
- Turn the water supply back on.
Addressing Stem Assembly Drips
If the drip is coming from the stem assembly, it is best to replace the entire assembly. This is a more complicated repair, but it is still possible to do yourself with the right tools:
- Turn off the water supply to the faucet.
- Remove the handle and stem assembly.
- Unscrew the stem assembly from the valve body.
- Clean the valve body and apply a thin layer of pipe sealant around the new stem assembly.
- Screw in the new stem assembly.
- Reinstall the handle and turn the water supply back on.
Conclusion
Repairing a dripping bathtub faucet is a project that can be done with a few basic tools and a little bit of knowledge. By understanding the causes of faucet drips and learning how to fix them yourself, you can save money and keep your bathroom drip-free.

How To Fix A Leaking Bathtub Faucet Diy Family Handyman

How To Fix A Leaky Bathtub Faucet 6 Ways Stop Drips

How To Fix A Leaking Bathtub Faucet The Home Depot

How To Fix A Leaking Bathtub Faucet Diy Family Handyman

Faucet Repair How To A Leaky Bath

How To Fix A Leaky Bathtub Faucet 6 Ways Stop Drips

How To Stop A Dripping Bathtub Faucet Nj Plumbing Repair Replacement And Maintenance

How To Fix A Leaking Bathtub Faucet The Home Depot

How To Fix A Leaking Bathtub Faucet Diy Family Handyman

How To Fix A Leaky Bathtub Faucet 6 Ways Stop Drips