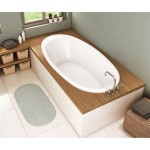
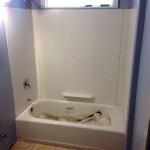
Bathtub Faucet and Handle Replacement
Replacing a bathtub faucet and handle can significantly enhance the bathroom's aesthetic appeal and improve functionality. While seemingly complex, this task is manageable for DIY enthusiasts with basic plumbing knowledge and the right tools. This article provides a comprehensive guide to replacing a bathtub faucet and handle, covering essential aspects from preparation to installation.
Gathering Necessary Tools and Materials
Before starting the replacement process, ensure all necessary tools and materials are readily available. This preparation will streamline the process and prevent interruptions. The essential items include:
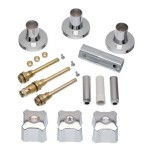
* Adjustable wrench * Channel-lock pliers * Philips screwdriver * Flathead screwdriver * Basin wrench * Plumber's putty * Teflon tape * New bathtub faucet and handle set * Penetrating oil * Bucket * Old towelsTurning Off the Water Supply
Turning off the water supply is crucial to prevent flooding during the replacement process. Locate the shut-off valves for the hot and cold water lines, typically found beneath the sink or in the basement. Turn both valves clockwise until they stop.
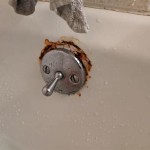
Removing the Old Faucet and Handles
Removing the old faucet and handles requires careful attention to avoid damaging surrounding fixtures. The following steps outline the removal process:
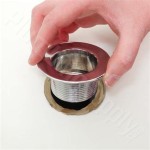
* Drain any remaining water from the bathtub faucet. * Remove the decorative caps on the handles, revealing the screws beneath. * Unscrew the handle screws and remove the handles. * Use a penetrating oil to loosen any corroded or stuck parts. * Remove the escutcheon plate, the decorative cover on the wall. * Use a basin wrench to loosen and remove the nuts holding the faucet in place. * Carefully pull the old faucet out of the bathtub wall.Preparing the New Faucet
Before installing the new faucet, it's essential to prepare it according to the manufacturer's instructions. This typically involves applying plumber's putty to the base of the faucet and wrapping Teflon tape around the threaded connections.
* Apply a thin, even layer of plumber's putty around the base of the new faucet where it will contact the bathtub surface. * Wrap Teflon tape clockwise around the threaded connections of the new faucet supply lines to ensure a watertight seal.Installing the New Faucet
Installing the new faucet requires carefully positioning it within the bathtub wall and securing it with the mounting nuts. The following steps outline the installation process:
* Insert the new faucet into the bathtub wall, ensuring it sits flush against the surface. * Use the mounting nuts to secure the faucet to the wall, tightening them evenly with a basin wrench. * Connect the new faucet supply lines to the hot and cold water supply lines, ensuring a tight seal.Installing the New Handles
Installing the new handles involves attaching them to the faucet stems and securing them with screws. Ensure proper alignment for optimal aesthetic appeal and functionality.
* Attach the new handles to the faucet stems, aligning them correctly. * Secure the handles with the provided screws, tightening them firmly but not over-tightening. * Replace the decorative caps on the handles.Testing the New Faucet and Handles
After completing the installation, testing the new faucet and handles is essential to ensure proper function and identify any leaks. The following steps outline the testing process:
* Turn the hot and cold water supply valves back on slowly. * Check for leaks around the faucet base, handle connections, and supply lines. * Test the hot and cold water functionality by turning the handles on and off. * Inspect for any dripping or unusual water flow patterns. * If leaks are detected, tighten connections or reapply Teflon tape as needed.Regular Maintenance
Regular maintenance helps ensure the longevity and optimal performance of the new bathtub faucet and handles. Simple cleaning practices can prevent mineral buildup and corrosion.
* Periodically clean the faucet and handles with a mild soap and water solution. * Avoid using abrasive cleaners that could damage the finish. * Inspect the faucet and handles regularly for any signs of wear or leakage.Addressing Common Issues
Occasionally, issues may arise with the new faucet and handles. Understanding common problems and their solutions can facilitate troubleshooting.
* Low water pressure: Check for clogged aerators or supply lines. * Dripping faucet: Replace worn-out O-rings or cartridges. * Loose handles: Tighten the handle screws or replace worn-out components. * Leaking connections: Tighten connections or reapply Teflon tape.By following these steps and addressing potential issues proactively, individuals can successfully replace their bathtub faucet and handles, enhancing both the functionality and appearance of their bathroom.

How To Fix A Leaking Bathtub Faucet Diy Family Handyman

Replace Faucet Handles In Existing Bathtub Home Improvement Stack Exchange

How To Fix A Leaking Bathtub Faucet Diy Family Handyman

Diy Bathtub Faucet Repair

How To Change A Bathtub Faucet 14 Steps With Pictures Wikihow

Replace Upgrade Your Shower And Bath Handle

How To Change A Bathtub Faucet 14 Steps With Pictures Wikihow

Diy Bathtub Handle Replacement Save 100 S

Plumbing How To Replace A Jacuzzi Bathtub Faucet Home Improvement Stack Exchange

How To Fix A Leaking Bathtub Faucet The Home Depot