Bathtub Drain Stopper Stuck In Open Position and Shower Head Replacement
A malfunctioning bathtub drain stopper can be a significant inconvenience, rendering the tub unusable for baths and potentially leading to wasted water. Often, the drain stopper becomes stuck in the open position, allowing water to drain continuously. While this might seem like a minor issue, it's crucial to address it promptly to conserve water and prevent potential damage to the plumbing system. Alongside this issue, homeowners often consider shower head replacements, either for aesthetic purposes or to improve water pressure and flow. This article will discuss troubleshooting a stuck bathtub drain stopper and provide a guide to replacing a shower head.
Understanding Common Bathtub Drain Stopper Mechanisms
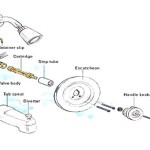
Before attempting to fix a stuck drain stopper, it's essential to understand the different types of mechanisms commonly found in bathtubs. Each type operates differently and requires specific troubleshooting approaches. The most common types include:
Lift-and-Turn Stoppers: These stoppers are operated by rotating the stopper itself. A lever inside the drain assembly raises and lowers a plug, controlling the flow of water.
Pop-Up Stoppers: These stoppers are activated by a lever located near the overflow drain. The lever manipulates a linkage that lifts and lowers the stopper in the drain opening.
Toe-Touch Stoppers: These stoppers are activated by pressing down on the stopper with a toe. The internal mechanism locks the stopper in either the open or closed position with each press.
Trip Lever Stoppers: These are similar to pop-up stoppers, but the lever is typically located higher up on the overflow drain, often near the faucet. The lever controls a plunger that seals or opens the drain.
Identifying the type of stopper is the first step in diagnosing and resolving the problem.
Troubleshooting a Bathtub Drain Stopper Stuck in the Open Position
Several factors can contribute to a bathtub drain stopper becoming stuck in the open position. These include debris accumulation, corrosion, and mechanical malfunction. A systematic approach to troubleshooting will help pinpoint the cause and determine the appropriate solution.
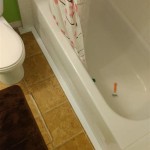
Initial Inspection: Begin by visually inspecting the stopper and the surrounding drain area. Look for any obvious signs of debris, such as hair, soap scum, or mineral deposits. Also, check for any visible signs of corrosion or damage to the stopper or the drain components.
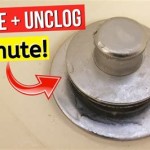
Cleaning the Stopper: In many cases, a buildup of debris is the culprit. Use a small tool, such as a bent wire or a pair of tweezers, to carefully remove any visible debris from around the stopper and inside the drain opening. Avoid using excessive force, which could damage the stopper or the drain assembly.
Adjusting the Linkage (Pop-Up and Trip Lever Stoppers): For pop-up and trip lever stoppers, the linkage connecting the lever to the stopper may be misaligned or damaged. Locate the access panel behind the overflow drain. Remove the screws and carefully detach the panel. Inside, you will see a series of levers and rods. Inspect the linkage for any signs of damage or disconnection. Try adjusting the linkage by loosening the screws and repositioning the rods. Ensure that the linkage moves freely and that the stopper is properly aligned with the drain opening. Tighten the screws once the adjustment is complete. This process may require some trial and error.
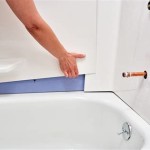
Lubrication: Corrosion can cause the stopper mechanism to become stiff and difficult to move. Applying a silicone-based lubricant to the moving parts of the stopper mechanism can help to loosen any corrosion and restore smooth operation. Apply the lubricant sparingly and work the stopper back and forth to distribute it evenly.
Replacing the Stopper: If cleaning, adjusting, and lubricating the stopper do not resolve the issue, it may be necessary to replace the stopper entirely. Replacement stoppers are readily available at most hardware stores. Ensure that the replacement stopper is compatible with the type of drain assembly in the bathtub. Follow the manufacturer's instructions for installing the new stopper. For pop-up and trip lever types, this may involve disconnecting the old linkage and connecting it to the new stopper.
Addressing Stubborn Clogs: If the drain remains slow or clogged even after addressing the stopper, a deeper clog may be present in the drainpipe. Consider using a drain snake to clear the clog. Alternatively, a chemical drain cleaner can be used, but exercise caution and follow the manufacturer's instructions carefully, as these cleaners can be corrosive.
Shower Head Replacement: A Step-by-Step Guide
Replacing a shower head is a relatively straightforward DIY project that can significantly improve showering experience. Whether the goal is to upgrade to a more modern style, improve water pressure, or simply replace a worn-out shower head, the process typically involves a few basic steps.
Gathering the Necessary Tools and Materials: Before starting the replacement process, gather the necessary tools and materials. These typically include:
- New shower head
- Adjustable wrench or pliers
- Teflon tape
- Clean cloth or towel
Having these items on hand will streamline the replacement process and prevent unnecessary delays.
Preparing the Work Area: Before disconnecting the old shower head, protect the surrounding area from water damage. Place a towel or cloth in the bathtub or shower stall to catch any drips. Also, turn off the water supply to the shower to prevent any accidental flooding. The shut-off valve is typically located near the shower or under the sink in the bathroom. If a dedicated shut-off valve is not available, turn off the main water supply to the house.
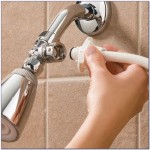
Removing the Old Shower Head: Use an adjustable wrench or pliers to loosen the nut connecting the old shower head to the shower arm. Turn the nut counterclockwise to loosen it. Once the nut is loose, carefully unscrew the shower head from the shower arm by hand. If the shower head is stuck, apply some penetrating oil to the threads and let it sit for a few minutes before attempting to unscrew it again. Be careful not to damage the shower arm during this process. If the shower arm is also corroded or damaged, it may need to be replaced as well.
Cleaning the Shower Arm Threads: After removing the old shower head, thoroughly clean the threads of the shower arm. Use a clean cloth or towel to remove any old Teflon tape, mineral deposits, or corrosion. A wire brush may be helpful for removing stubborn deposits. Ensure that the threads are clean and dry before applying new Teflon tape.
Applying Teflon Tape: Wrap the threads of the shower arm with Teflon tape. Apply the tape in a clockwise direction, overlapping each wrap slightly. Two or three layers of Teflon tape should be sufficient to create a watertight seal. Teflon tape helps to prevent leaks by filling in any gaps in the threads.
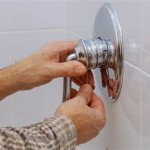
Installing the New Shower Head: Screw the new shower head onto the shower arm by hand, turning it clockwise. Once the shower head is hand-tight, use an adjustable wrench or pliers to tighten the nut slightly. Avoid overtightening the nut, as this could damage the shower head or the shower arm. The goal is to create a snug fit that prevents leaks.
Testing for Leaks: Turn the water supply back on and check for any leaks around the connection between the shower head and the shower arm. If leaks are present, tighten the nut slightly or reapply Teflon tape to the threads. Repeat this process until the leaks are eliminated. Once the connection is leak-free, run the shower to ensure that the new shower head is functioning properly.
Preventive Maintenance for Bathtub Drains and Shower Heads
Regular maintenance can help to prevent problems with bathtub drains and shower heads, extending their lifespan and ensuring optimal performance.
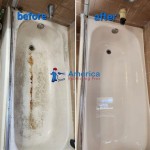
Regular Cleaning: Regularly cleaning the bathtub drain and shower head can prevent the buildup of debris and mineral deposits. For the drain, use a drain strainer to catch hair and other debris. Periodically remove the strainer and clean it thoroughly. For the shower head, soak it in a solution of vinegar and water to dissolve mineral deposits. This can be done by removing the shower head and submersing it in the solution, or by filling a plastic bag with the solution and attaching it to the shower head with a rubber band.
Inspecting and Maintaining the Stopper Mechanism: Regularly inspect the bathtub drain stopper mechanism for any signs of wear or damage. Lubricate the moving parts periodically to prevent corrosion and ensure smooth operation. For pop-up and trip lever stoppers, adjust the linkage as needed to maintain proper alignment and function.
Replacing Worn Parts: If any parts of the bathtub drain or shower head are worn or damaged, replace them promptly. This will prevent further damage and ensure that the system continues to function properly. Replacement parts are readily available at most hardware stores.
By following these preventive maintenance tips, homeowners can avoid costly repairs and ensure that their bathtub drains and shower heads remain in good working condition for years to come.

Bathtub How Can I Remove A Stuck Bath Stopper Assembly Home Improvement Stack Exchange

How To Remove A Bathtub Drain The Home Depot

How To Remove A Bathtub Drain Stopper

How To Remove A Bathtub Drain Stopper Mr Rooter

How To Remove A Bathtub Drain Stopper

Trouble Removing Lift And Turn Bathtub Stopper R Fixit

Bathroom Repair How To A Pop Up Tub Drain Stopper

6 Ways To Remove Stuck Bathtub Drain Rusted Won T Budge

Steps To Take In Order Remove A Drain Stopper Ricks Plumbing

How To Fix A Bathtub Or Sink Pop Up Stopper
Related Posts