Bathtub Drain Installation: A Comprehensive Guide
Replacing a bathtub drain can enhance the functionality and aesthetics of your bathroom. Whether you're a seasoned DIYer or a first-timer, understanding the essential aspects of bathtub drain installation is crucial for a successful project.
Tools and Materials Required
- Tub wrench
- Adjustable wrench
- Channel-lock pliers
- Plumber's putty
- Teflon tape
- New bathtub drain stopper and assembly
Step-by-Step Instructions
1. Disconnect the Old Drain
Use the tub wrench to loosen the large locking nut underneath the bathtub. Hold the drain stopper assembly to prevent it from falling into the drain.
2. Remove the Drain Assembly
Once the locking nut is loose, gently pull the drain assembly out of the tub. Inspect the rubber gasket and replace it if worn or damaged.
3. Apply Plumber's Putty
Roll a small amount of plumber's putty into a rope and place it around the base of the new drain assembly.
4. Insert the New Assembly
Push the new drain assembly into the tub opening until it fits snugly against the plumber's putty.
5. Tighten the Locking Nut
Using the tub wrench, hand-tighten the locking nut onto the drain assembly. Avoid overtightening to prevent cracking the tub.
6. Install the Drain Stopper
Fit the drain stopper into the drainpipe. Apply a thin layer of petroleum jelly or silicone grease to the stopper's edges for smooth operation.
7. Wrap with Teflon Tape
Wrap several layers of Teflon tape clockwise around the threads of the drainpipe. This will ensure a watertight seal.
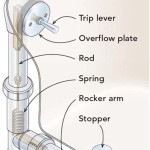
8. Install the Overflow Plate
If your bathtub has an overflow drain, insert the overflow plate into the overflow opening. Use an adjustable wrench to tighten the plate in place.
9. Test for Leaks
Plug the bathtub and fill it with water. Check for any leaks around the drain and overflow assembly. If leaks occur, tighten the connections or apply additional plumber's putty.
Maintenance Tips
To maintain your bathtub drain, follow these tips:
- Clean the drain stopper regularly to remove hair and debris.
- Avoid using harsh chemicals that can damage the drain finish.
- If the drain clogs, try using a drain snake or plunger.
- Inspect the drain assembly annually for wear or damage.
Conclusion
Installing a bathtub drain is a straightforward task that can enhance the functionality and appearance of your bathroom. By following the steps outlined in this guide, you can tackle this project with confidence and enjoy a properly functioning drain.

How To Install A Bathtub Toolrev

7 Bathtub Plumbing Installation Drain Diagrams

Bathtub Plumbing Installation Drain Diagrams

Tub Drain How To Seal And Unclog A Bathtub Knoxville Plumbing

How To Install A Bathtub Drain

Bathtub Plumbing Installation Drain Diagrams Diagram

How To Remove A Bathtub Drain Forbes Home

Replacing A Bathtub Fine Homebuilding

Sento Nickel Lift And Turn Bathtub Drain Assembly Stopper Kit Fit Both 1 2 Inch Or 5 8 Strainer Heavy Duty Metal With Matching S Easy Installation Satin Com

How To Replace Bathtub Drain Stopper With A Lift And Turn Diy