Bathtub Cut Out: Essential Aspects for a Successful Installation
Installing a bathtub can be a daunting task, especially if it requires cutting out a portion of the floor. Whether you're embarking on a bathroom renovation or simply replacing an existing bathtub, a bathtub cut out is often necessary to accommodate the new fixture. To ensure a successful installation, it's crucial to understand the essential aspects of bathtub cut out.
Determining the Cutout Size and Shape
The first step is to accurately determine the size and shape of the bathtub cut out. Measure the bathtub's base and add a few inches of clearance around the perimeter for proper installation. Consider the location of any pipes or obstacles that may affect the cut out's shape.
Choosing the Right Tools
Selecting the appropriate tools is essential for a clean and precise cut out. A circular saw or reciprocating saw with a sharp blade is recommended for cutting through the flooring material. Additionally, a pry bar, hammer, and measuring tape are necessary for completing the installation.
Cutting the Floor
Once the cut out size and tools are determined, it's time to cut the floor. Carefully mark the perimeter of the cut out and secure the flooring material with clamps or weights. Position the circular saw or reciprocating saw perpendicular to the floor and slowly cut along the marked lines. Use a pry bar to gently lift the cut section and remove it.
Framing the Cutout
To provide support for the bathtub, framing is required around the cut out. Cut pieces of lumber or plywood to the appropriate size and secure them to the floor using screws or nails. The frame should be level and sturdy to ensure the stability of the bathtub.
Installing the Bathtub
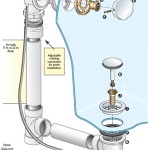
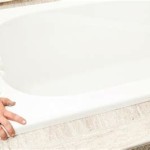
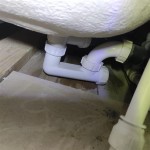
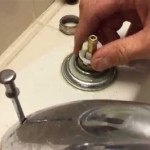
With the framing complete, the bathtub can be installed. Carefully lift the bathtub and position it within the cut out. Ensure that the bathtub is level and properly secured by attaching it to the framing and floor. Connect the plumbing fixtures and drain, making sure they are tight and free of leaks.
Finishing the Installation
Once the bathtub is installed, the final step is to finish the surrounding area. This may involve patching the flooring around the cut out, applying caulk or grout to seal any gaps, and installing a bathtub surround for aesthetic appeal. Proper waterproofing measures should be taken to prevent moisture damage.
By following these essential aspects of bathtub cut out, you can ensure a successful and professional-looking installation. Remember to prioritize safety, measure accurately, and use the right tools for the job. With careful planning and execution, you can achieve a beautiful and functional new bathtub in your bathroom.

Grab It Bathrooms Bathtub Cut Out

Cut Your Tub For Seniors Orca Healthcare Supplies

Cleancut Bath Cut Out Conversion Walk In Tubs

Tub Cut Outs Conversion To Walk In Shower Bild Of Milwaee Wi

Transformational Bathtub Cut Outs Lowell Ma Like Nu Refinishing Llc

Tub Cutouts

Bathtub Cut Out Ellas Bubbles Walk In Tubs

Tub Cut Out Or Walk In Which Is Right For You

Diy Cleancut Ultra Low Step In Shower Kit White 525 Cad

Cut Down Bath Kit Henrycare Shower Home Mods
Related Posts