Bathtub Base Moulding: A Comprehensive Guide
Bathtub base moulding, sometimes referred to as bathtub caulk trim or bathtub sealant strip, is a crucial element in bathroom design and maintenance. It serves both an aesthetic and functional purpose, bridging the gap between the bathtub and the bathroom floor. This seemingly small detail plays a significant role in preventing water damage, enhancing the overall look of the bathroom, and contributing to the longevity of the bathtub itself.
The primary function of bathtub base moulding is to create a watertight seal along the edge of the bathtub where it meets the floor or wall. This seal prevents water from seeping into the subfloor, which can lead to mold growth, structural damage, and costly repairs. Without proper moulding, even small amounts of water accumulating over time can cause significant problems. Furthermore, well-installed base moulding provides a clean and finished look, concealing any imperfections or gaps between the tub and the surrounding surfaces.
Choosing the right type of bathtub base moulding, understanding the installation process, and maintaining its integrity are essential for ensuring its effectiveness. Various materials, styles, and installation techniques are available, each with its own advantages and disadvantages. Selecting the appropriate option depends on factors such as the bathtub material, the overall bathroom design, and the homeowner's budget and skill level.
Types of Bathtub Base Moulding
Several materials are commonly used for bathtub base moulding, each offering different levels of durability, water resistance, and aesthetic appeal. Understanding the characteristics of each material is crucial for making an informed decision.
PVC (Polyvinyl Chloride) Moulding: PVC moulding is a popular choice due to its excellent water resistance, affordability, and ease of installation. It is resistant to rot, mildew, and insects, making it a durable option for wet environments like bathrooms. PVC moulding is available in a variety of profiles and colors, allowing it to blend seamlessly with different bathroom designs. Installation typically involves using adhesive or sealant, and it can be easily cut and shaped with common tools.
Wood Moulding: While wood moulding offers a classic and elegant look, it requires careful selection and treatment for use in bathrooms. Using hardwoods like cedar or redwood, which are naturally resistant to moisture, is recommended. Even with these woods, proper sealing and painting are essential to prevent water damage and warping. Wood moulding can be more challenging to install than PVC, requiring precise cuts and secure fastening. Regular maintenance, including re-sealing and painting, is necessary to maintain its integrity.
Tile Moulding: Tile moulding provides a seamless and durable option that complements tiled bathroom floors and walls. It is available in various materials, including ceramic, porcelain, and glass, allowing for a wide range of design possibilities. Tile moulding is highly water-resistant and easy to clean, making it a practical choice for bathrooms. Installation requires working with mortar and grout, which can be more complex and time-consuming than installing other types of moulding. However, the result is a long-lasting and aesthetically pleasing finish.
Rubber or Flexible Moulding: Rubber or flexible moulding is designed to conform to curved or uneven surfaces, making it ideal for bathtubs with contoured edges. It is highly water-resistant and easy to install, typically using adhesive or sealant. Flexible moulding is available in various colors and profiles, providing a versatile option for different bathroom styles. It is also resistant to cracking and peeling, making it a durable and low-maintenance choice.
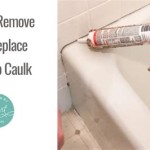
Peel and Stick Caulk Strips: These strips are an incredibly simple to install option for quickly sealing a tub. They are essentially a strip of sealant with an adhesive backing. They are ideal for quick fixes and small gaps, but are less durable and aesthetically pleasing than more permanent solutions. Their lifespan is typically shorter than other options.
Installation Techniques for Bathtub Base Moulding
Proper installation is critical to ensure the effectiveness and longevity of bathtub base moulding. The specific steps involved will vary depending on the type of moulding and the unique characteristics of the bathroom, but some general principles apply.
Preparation: Before installing any moulding, it is essential to thoroughly clean and dry the area where the moulding will be applied. Remove any old caulk, sealant, or debris. Ensure the surface is smooth and free of any imperfections that could prevent a proper seal. Using a scraper or utility knife can help remove stubborn residue. Applying a mold and mildew cleaner can also help prevent future growth.
Measuring and Cutting: Accurate measurements are crucial for a professional-looking installation. Measure the length of the bathtub edge where the moulding will be placed, and carefully cut the moulding to size using a saw or utility knife. For corners, use a miter saw to create precise angled cuts. Dry-fitting the moulding before applying adhesive or sealant is recommended to ensure a proper fit.
Applying Adhesive or Sealant: Apply a generous bead of high-quality waterproof sealant or adhesive to the back of the moulding and along the bathtub edge. Ensure the sealant is specifically designed for bathroom use and is resistant to mold and mildew. Press the moulding firmly against the bathtub and floor or wall, ensuring a tight seal. Remove any excess sealant with a damp cloth or sponge.
Securing the Moulding: Depending on the type of moulding, additional fasteners may be required to secure it in place. For wood moulding, finishing nails or screws can be used. For PVC or rubber moulding, clamps or tape can be used to hold it in place while the adhesive dries. Follow the manufacturer's instructions for the recommended drying time.
Finishing Touches: Once the moulding is securely in place and the adhesive or sealant is dry, inspect the installation for any gaps or imperfections. Apply additional sealant as needed to ensure a watertight seal. Smooth out any rough edges or seams with a sealant smoothing tool or your finger. Clean up any remaining sealant or debris.
Maintenance and Troubleshooting
Regular maintenance is essential to prolong the life of bathtub base moulding and prevent water damage. Inspect the moulding regularly for signs of cracking, peeling, or mold growth. Promptly address any issues to prevent them from escalating.
Cleaning: Clean the moulding regularly with a mild soap and water solution. Avoid using harsh chemicals or abrasive cleaners that could damage the material. For tile moulding, use a grout cleaner to remove any stains or discoloration. Rinse thoroughly and dry the moulding after cleaning.
Repairing Cracks and Peeling: If the moulding develops cracks or begins to peel, it is important to repair it promptly. Remove any loose or damaged material with a utility knife or scraper. Clean the area thoroughly and apply a fresh layer of sealant or adhesive. Press the damaged section of the moulding back into place and secure it with clamps or tape until the adhesive dries.
Addressing Mold and Mildew: Mold and mildew can grow on bathtub base moulding due to the damp environment. To remove mold and mildew, use a solution of bleach and water. Apply the solution to the affected area and let it sit for several minutes before scrubbing with a brush. Rinse thoroughly and dry the moulding. To prevent future mold growth, ensure adequate ventilation in the bathroom and regularly clean the moulding.
Replacing Damaged Moulding: If the moulding is severely damaged or cannot be repaired, it may need to be replaced. Remove the old moulding carefully, using a utility knife or scraper to loosen it from the bathtub and floor or wall. Clean the area thoroughly and install new moulding following the same steps as described earlier.
Preventative Measures: Several measures can be taken to prevent problems with bathtub base moulding. Ensure the bathroom is well-ventilated to reduce moisture buildup. Wipe down the bathtub and surrounding surfaces after each use to prevent water from pooling. Regularly inspect the moulding for any signs of damage or wear and tear. Address any issues promptly to prevent them from escalating.
In conclusion, bathtub base moulding is a vital component of bathroom design and maintenance. Choosing the right type of moulding, installing it correctly, and maintaining it regularly are essential for preventing water damage and ensuring the longevity of the bathtub. By understanding the different options available and following the recommended installation and maintenance procedures, homeowners can protect their bathrooms from costly repairs and enjoy a beautiful and functional space for years to come.
The selection of appropriate bathtub base moulding is not solely driven by practical considerations but also by aesthetic preferences. The moulding should complement the existing bathroom décor and enhance the overall visual appeal of the space. Considerations such as color, profile, and material should be carefully evaluated to achieve a cohesive and harmonious design.
Furthermore, the long-term benefits of investing in high-quality bathtub base moulding should not be overlooked. While cheaper options may be tempting, they often lack the durability and water resistance of more expensive materials. Investing in a durable and well-installed moulding system can save homeowners money in the long run by preventing water damage and reducing the need for costly repairs.
Ultimately, the importance of bathtub base moulding extends beyond its functional role in preventing water damage. It is an integral part of the overall bathroom design and contributes significantly to the comfort, safety, and longevity of the space. By carefully considering the various factors involved in selecting, installing, and maintaining bathtub base moulding, homeowners can ensure that their bathrooms remain beautiful, functional, and free from water damage for years to come.

10 Bathroom Makeover Quick And Easy Bathtub Trim

Vinyl Self Stick Tub Cove Moulding 60 M D Building S Inc

Diy Network Bathroom Baseboard Trim Merrypad

How To Install Baseboards Trim In A Bathroom Renovation Young House Love

T The Floor Let S Face

How To Install Baseboards Trim In A Bathroom Renovation Young House Love

How To Add Decorative Moulding A Bathtub The Home Depot

How To Install Baseboards Trim In A Bathroom Renovation Young House Love

Emily Winters Bathroom Renovation Day 12 Made Remade Baseboard Trim Tile

Diy Tub Skirt Decorative Panel For A Standard Soaking
Related Posts