Removing an American Standard Bathtub Faucet: A Step-by-Step Guide
Replacing a bathtub faucet can be a straightforward DIY project, even if you are unfamiliar with plumbing. This guide focuses on removing an American Standard bathtub faucet, providing a step-by-step process that simplifies the task. By following these clear instructions, you can confidently tackle this project and ensure a smooth and successful removal.
Gathering the Necessary Tools
Before you begin the removal process, gather the following tools: *
Adjustable Wrench:
A reliable adjustable wrench is essential for loosening and tightening nuts. *Channel-Lock Pliers:
Channel-lock pliers are helpful for gripping and turning stubborn fittings. *Flat-Head Screwdriver:
This tool assists in removing decorative caps or covers that often conceal the faucet's mounting screws. *Phillips-Head Screwdriver:
For removing screws that secure the faucet handles or other components. *Bucket:
A bucket is necessary for catching any water that may drain during the removal process. *Towels:
Use towels to protect surrounding areas from water spills and to prevent damage to your bathroom fixtures. *Safety Glasses and Gloves:
Always protect yourself with safety glasses and gloves to avoid potential injuries.Step-by-Step Removal Process
Now that you have all the necessary tools, follow these step-by-step instructions for removing your American Standard bathtub faucet:
-
Turn off the water supply:
Locate the water shut-off valve for your bathtub. Typically, this valve is located near the bathtub on the wall or beneath the sink. Turn the valve clockwise to fully shut off the water supply. -
Drain the bathtub:
Open the bathtub drain to allow any remaining water to drain. -
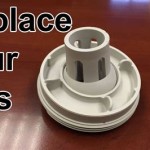
Remove the faucet handles:
Locate the decorative caps or covers that conceal the handle mounting screws. Use a flat-head screwdriver to remove these caps. Once the caps are off, use a Phillips-head screwdriver to remove the screws holding the handles in place. Carefully pull off the handles. -
Remove the spout:
The spout is typically held in place by a set screw located at the bottom or side of the spout. Use an adjustable wrench or channel-lock pliers to loosen and remove this screw. Once loose, the spout can be pulled out. -
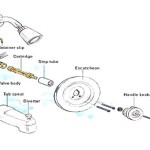
Remove the escutcheon:
The escutcheon is the decorative plate that covers the faucet mounting holes on the tub wall. It is typically held in place by screws or clips. Use your screwdriver tool to remove the screws or clips and detach the escutcheon. -
Remove the faucet body:
The faucet body is the main part of the faucet that contains the valves and plumbing connections. Inside the bathtub, you will typically find nuts (or a combination of nuts and a retaining clip) that secure the faucet body to the tub. Use your adjustable wrench to loosen and remove these nuts. Once the nuts are removed, the faucet body can be pulled out of the tub. -
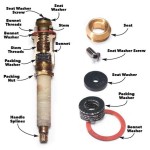
Inspect the fittings:
Before discarding the old faucet, take the opportunity to carefully inspect the plumbing fittings such as the supply lines and the drain pipe. Check them for cracks, leaks, or corrosion. If you find any issues, replace those components as well.
Tips for a Smooth Removal
Here are some helpful tips to make the removal process go more smoothly:
-
Apply pipe wrench lubricant:
If you are working with older faucets, the nuts might be stuck due to corrosion. Applying a lubricant like pipe wrench lubricant can help loosen the nuts and prevent damage to the fittings. -
Use a pipe wrench:
While most nuts can be loosened with an adjustable wrench, you may need a pipe wrench for particularly stubborn nuts that have corroded or seized. Apply the pipe wrench to the nut, making sure to use a secure grip. -
Be gentle:
When removing the faucet, be careful not to overtighten the nuts or force the parts. Too much force can damage the fittings or the tub itself.
Removing your American Standard bathtub faucet is a simple task that can be done with a few basic tools and a little patience. This guide provides a step-by-step process that will guide you through the removal process. Remember to gather the necessary tools, protect yourself with safety glasses and gloves, and always be gentle with the fittings to avoid any damage.

How To Replace A Bathtub Spout

Repair American Standard Shower Faucet

Learn How To Remove And Install Various Tub Spouts

American Standard Bathtub Faucet Repair

Lincoln S 111827 3 Handle Valve Rebuild Kit

Studio Bath And Shower Faucet From American Standard

Factory Direct Plumbing Supply Replacement American Standard Colony Soft 3 Valve Tub Shower P021 01205

For American Standard Shower Stem Removal Wrench

American Standard Push Pull Shower Faucet Rebuild

Learn How To Remove And Install Various Tub Spouts
Related Posts