Repairing Chipped Bathtubs: Essential Tips to Restore Your Bathroom's Beauty
A chipped bathtub can detract from the overall aesthetic of your bathroom, making it appear worn and outdated. However, repairing a chipped bathtub is a relatively straightforward task that can be completed with minimal effort and expense. By following these essential tips, you can restore your bathtub to its former glory and enhance the beauty of your bathroom space.
Step 1: Gather the Necessary Materials
To repair a chipped bathtub, you will need the following materials:
- Tub and tile cleaner
- Sandpaper (120-grit and 220-grit)
- Epoxy patch kit
- Putty knife
- Soft cloth
- Masking tape (optional)
Step 2: Prepare the Bathtub
Before beginning repairs, it is crucial to thoroughly clean the bathtub using tub and tile cleaner. This will remove any dirt or debris that could interfere with the adhesion of the epoxy. Once the bathtub is clean, allow it to dry completely.
Step 3: Sand the Chipped Area
Using 120-grit sandpaper, gently sand the chipped area and the surrounding surface to create a smooth and even surface. This will help the epoxy adhere better and create a seamless finish. Once you have sanded the area, use 220-grit sandpaper to smooth out any rough edges.
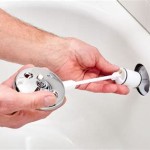
Step 4: Apply the Epoxy Patch
Follow the instructions provided with the epoxy patch kit. Typically, you will need to mix the epoxy resin and hardener components together and then apply the mixture to the chipped area using a putty knife. Fill the chip completely and smooth out the surface. If necessary, use masking tape around the chipped area to prevent the epoxy from spreading beyond the desired area.
Step 5: Allow the Epoxy to Cure
Allow the epoxy to cure completely according to the manufacturer's instructions. This process typically takes several hours or overnight. Once the epoxy has cured, use a soft cloth to gently remove any excess residue from the bathtub surface.
Step 6: Finish and Polish
Once the epoxy has cured, you can finish the repair by sanding the patched area with 220-grit sandpaper to create a smooth surface. You can also use a polishing compound to enhance the shine and restore the original luster of your bathtub.
By following these steps, you can effectively repair a chipped bathtub and restore its beauty. Remember to carefully follow the instructions provided with the epoxy patch kit to ensure a durable and successful repair.
Bathtub Chip Repair Tubworx And Showere Services

Bathtub Chip Repair For Only 199 Happy Tubs

Bathtub Chip Repair For Only 199 Happy Tubs

Chipped Porcelain Tub Repaired Kingsway

Bathtub Chip Repair Ugly Tub Ohio

Repairing Chipped Porcelain Bathtubs Us Bath S

Easy Ways To Fix A Chipped Bathtub 14 Steps With Pictures

Napco Bathtub Inlays Ltd

How To Fix A Chipped Bathtub Floor Diy Repair

Bath Chip Repair Highest Quality Bathtub Service Call Now
Related Posts