Removing Bathtub Caulk: A Comprehensive Guide
Maintaining a pristine bathroom requires regular cleaning and maintenance, including removing old and deteriorated caulk around the bathtub. Caulk plays a crucial role in preventing water damage and mold growth, ensuring the longevity and aesthetics of your bathroom. Removing caulk can seem daunting, but with the right tools and techniques, you can accomplish it efficiently and effectively.
Tools and Materials:
- Caulk removal tool
- Razor blade or utility knife
- Plastic scraper
- Cleaning solution (e.g., vinegar or bleach)
- Sponge or cloth
Preparation:
Before you begin, ensure you have adequate ventilation by opening windows or using a fan. Wear safety gloves and goggles to protect yourself from potential irritants.
Step-by-Step Instructions:
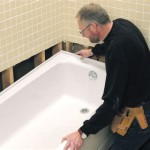
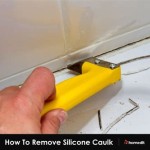
1. Score the Caulk:Use a caulk removal tool or a utility knife to carefully score the perimeter of the caulk along the bathtub and wall. This will weaken the bond and make it easier to remove.
2. Pry the Caulk:Insert the plastic scraper under the scored caulk and gently pry it away from the surfaces. Work slowly and carefully to avoid damaging the bathtub or tiles.
3. Cut and Remove:If necessary, use a razor blade or utility knife to cut away any stubborn caulk remnants. Hold the blade at a low angle to prevent gouging the surfaces.
4. Clean the Surface:Once the caulk is removed, clean the bathtub and wall thoroughly using a cleaning solution. This will remove any remaining caulk residue or debris.
Additional Tips:
- Use a heat gun to soften the caulk if it's particularly stubborn.
- Be patient and take your time, as rushing the process can lead to damage.
- If you encounter any mold or mildew growth, clean it thoroughly with a bleach solution before re-caulking.
- For best results, apply new caulk within 24 hours of removing the old caulk.
Conclusion:
Removing bathtub caulk is a relatively simple task that can significantly improve the appearance and functionality of your bathroom. By following these instructions and using the proper tools, you can effectively remove old caulk and prepare the surfaces for re-caulking. Remember to prioritize safety, patience, and thorough cleaning to ensure a successful outcome.

The Best Tricks How To Remove Caulk

Caulk Remover How To Remove Old Diy Bathroom

How To Remove And Replace Caulk In A Bathtub Ifixit Repair Guide

How To Remove Old Caulk Dap Global

Prevent Water Damage Replace The Old Caulk Around Your Tub

Remove Old Caulk And Install Trim Strips Like A Pro Instatrim

How To Caulk A Shower Or Tub True Value

Removing Hardened Caulk Fine Homebuilding

How To Remove And Replace Old Tub Caulk

How To Remove Silicone Caulk The Best Tricks