How To Replace A Bathtub Faucet In A Mobile Home
Replacing a bathtub faucet in a mobile home is a task that can be accomplished by a diligent homeowner with basic plumbing knowledge and the right tools. While the plumbing configurations in mobile homes may differ slightly from those in traditional houses, the fundamental principles of faucet replacement remain consistent. This article provides a comprehensive guide to replacing a bathtub faucet in a mobile home, ensuring a successful and leak-free installation.
Before commencing any plumbing work, it is crucial to prioritize safety. This involves understanding the potential risks associated with water and electricity and taking necessary precautions. Cutting off the main water supply to the mobile home is the first and most important step. Failure to do so will result in uncontrolled water flow once the old faucet is disconnected. Similarly, if any electrical components are near the faucet area, ensure the power is switched off at the breaker to prevent electrical shock. Furthermore, it is always advisable to wear appropriate safety gear, such as safety glasses and gloves, to protect against debris and potential irritants.
The process of replacing a bathtub faucet in a mobile home involves several key stages: preparation, removal of the old faucet, installation of the new faucet, and testing for leaks. Each stage requires careful attention to detail to ensure a successful outcome. Rushing through any step can lead to problems later on, such as leaks or improper faucet function.
Preparation and Gathering Necessary Tools
Proper preparation is essential for a smooth and efficient faucet replacement. The first step is to identify the type of faucet currently installed in the bathtub. Mobile homes can have various faucet types, including two-handle faucets, single-handle faucets, and shower diverter faucets. Understanding the type of faucet will dictate the specific tools and techniques required for removal and installation. A thorough inspection of the existing faucet and surrounding plumbing is recommended to identify any potential complications, such as corrosion or damaged pipes.
Gathering the necessary tools and materials is the next critical step. A basic plumbing toolkit should include: an adjustable wrench, a basin wrench (specifically designed for working in tight spaces under sinks and bathtubs), a pipe wrench, a screwdriver (both flathead and Phillips head), pliers, a utility knife, plumber’s putty, Teflon tape (also known as thread seal tape), a bucket, and a clean rag. The new faucet, along with any accompanying hardware, should be readily available. It’s crucial to ensure that the new faucet is compatible with the existing plumbing connections in the mobile home. Mobile homes sometimes have different pipe sizes or connection types compared to standard residential plumbing.
Once the tools and materials are assembled, protect the bathtub surface by covering it with a drop cloth or old towels. This will prevent scratches or damage during the removal and installation process. Adequate lighting is also crucial, particularly in the confined space under the bathtub. A flashlight or portable work light will improve visibility and make the job easier.
Removing the Old Bathtub Faucet
The removal of the old bathtub faucet requires a systematic approach to avoid damaging the surrounding plumbing. Begin by locating the shut-off valves that control the water supply to the faucet. These valves are typically located near the bathtub or in an adjacent cabinet. Turn both the hot and cold water supply valves clockwise until they are fully closed. After closing the valves, turn on the old faucet to relieve any residual pressure in the pipes. Allow the water to drain completely before proceeding.
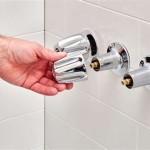
With the water supply shut off, begin disassembling the old faucet. The specific steps will vary depending on the type of faucet. For a two-handle faucet, start by removing the handles, which are usually held in place by screws or set screws. Once the handles are removed, unscrew the escutcheon plates (the decorative covers that conceal the faucet connections) from the wall. Use an adjustable wrench or basin wrench to loosen the nuts that connect the faucet body to the water supply pipes. Be prepared for some residual water to spill out, even after shutting off the valves; keep the bucket and rag handy.
For a single-handle faucet, the removal process is similar. Remove the handle, escutcheon plate, and then loosen the mounting nuts that secure the faucet body to the wall. Pay close attention to the order in which parts are removed, as this will be helpful during the installation of the new faucet. If the old faucet is heavily corroded or the nuts are difficult to loosen, apply a penetrating oil to help loosen the connections. Allow the oil to soak in for several minutes before attempting to unscrew the nuts. If the connections are still stubborn, consider using a pipe wrench for added leverage, but be careful not to damage the pipes.
Once the faucet body is completely disconnected from the water supply pipes, carefully remove it from the wall. Inspect the exposed pipe threads for any damage or corrosion. Clean the threads thoroughly with a wire brush to remove any debris or old plumber’s putty. If the threads are damaged, it may be necessary to repair or replace the pipes before installing the new faucet. In some cases, mobile home plumbing may use specialized fittings or connections. Ensure that the new faucet is compatible with these existing connections, or acquire the necessary adapters.
Installing the New Bathtub Faucet
The installation of the new bathtub faucet should be performed with precision and attention to detail. Before starting, thoroughly read the manufacturer's instructions that came with the new faucet. These instructions will provide specific guidance on the installation process for that particular model. Begin by applying Teflon tape to the threads of the water supply pipes. Wrap the tape clockwise around the threads several times, ensuring a tight and secure seal. This will help prevent leaks after the faucet is installed.
Carefully position the new faucet body against the wall, aligning the faucet connections with the water supply pipes. Hand-tighten the mounting nuts onto the pipes, ensuring that the faucet is properly aligned and level. Once the faucet is in the correct position, use an adjustable wrench or basin wrench to tighten the nuts securely. Avoid over-tightening, as this can damage the pipes or the faucet body. The goal is to achieve a tight seal without causing any stress on the plumbing connections.
After securing the faucet body, install the escutcheon plates and handles, following the manufacturer’s instructions. Ensure that the handles are properly aligned and that they function smoothly. Test the faucet by turning the handles to the “on” position and checking for any leaks around the connections. If any leaks are detected, tighten the mounting nuts slightly until the leaks stop. Do not overtighten, as this can strip the threads or damage the pipes. If leaks persist, remove the faucet and reapply Teflon tape to the threads, ensuring a tight and secure seal.
If the new faucet includes a shower diverter, ensure that it is properly connected and functioning correctly. The diverter mechanism allows you to switch the water flow between the bathtub spout and the showerhead. Test the diverter by pulling or pushing the lever to switch between the two water outlets. Check for any leaks around the diverter connections and tighten them if necessary.
Once the faucet is fully installed and all connections are secure, slowly turn on the water supply valves. Monitor the faucet and surrounding plumbing for any leaks. Check the connections under the bathtub as well, using a flashlight to inspect for any signs of moisture. If no leaks are detected, allow the water to run for several minutes to flush out any debris or air from the pipes. Finally, clean up the work area and remove any debris or tools.
Replacing a bathtub faucet in a mobile home requires patience, attention to detail, and a basic understanding of plumbing principles. By following these steps carefully and taking necessary precautions, homeowners can successfully complete this task and enjoy a functional and leak-free bathtub faucet.

How To Install A Bathtub Faucet In Mobile Home

How To Replace A Mobile Home Tub Shower Valve

How To Replace A Mobile Home Bathtub Faucet

How To Remove A Mobile Home Bathtub Faucet

Replacing Mobile Home 8 Bathtub Faucet Repair

How To Install A Bathtub Faucet In Mobile Home

How To Remove Tub Surround From Mobile Home

Tub Shower Faucet Install How To Measure Drywall Viewer Faqs Mobile Home Bathroom Renovation

Plumbing How To Replace A Jacuzzi Bathtub Faucet Home Improvement Stack Exchange

Danco Mobile Home And Rv 8 In 2 Handle Tub Shower Faucet Chrome 33156x The Depot
Related Posts