How To Replace a Bathtub Drain Trim Kit
Replacing a bathtub drain trim kit can revitalize the appearance of a bathroom and address issues such as corrosion, leaks, or general wear and tear. This DIY project, while appearing daunting, is manageable with the right tools, preparation, and understanding of the process. This article provides a comprehensive guide to safely and effectively replacing a bathtub drain trim kit.
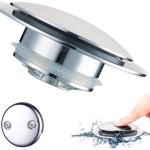
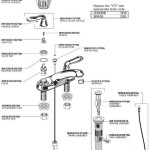
Before beginning, it's critical to understand the components involved. A typical bathtub drain trim kit includes a drain flange (the visible part inside the tub), a drain shoe (the part underneath the tub connected to the drainpipe), a stopper mechanism (which can be a lift-and-turn, push-button, or pop-up type), and associated hardware like screws and gaskets. The specific components and configuration will vary depending on the type of drain system installed in the bathtub.
Safety First: Prior to commencing any plumbing work, it is imperative to turn off the water supply to the bathroom. This often involves locating the shut-off valves for both hot and cold water lines, typically found near the toilet or under the sink. If these valves are not present or functioning correctly, the main water supply to the house must be shut off. Furthermore, wearing appropriate safety glasses protects the eyes from debris that might dislodge during the removal process. Gloves offer protection against sharp edges and potential contaminants found in the drain.
Key Point 1: Preparing for the Replacement
Proper preparation is crucial for a smooth and successful drain trim kit replacement. This involves gathering the necessary tools and materials, identifying the existing drain type, and understanding the layout of the plumbing under the bathtub.
Tools and Materials Required: The following tools are generally required for replacing a bathtub drain trim kit:
*New bathtub drain trim kit: Ensure the kit is compatible with the existing drain type (e.g., lift-and-turn, pop-up, push-button). Measure the diameter of the existing drain opening to ensure a proper fit.
*Flathead screwdriver: Used for removing old screws and prying components.
*Phillips head screwdriver: Used for installing new screws.
*Drain wrench (also known as a dumbbell wrench or tub drain tool): Specifically designed to grip and loosen the drain flange.
*Penetrating oil: Helps loosen corroded or stuck drain parts.
*Pliers or channel locks: Useful for gripping and turning smaller components.
*Putty knife or scraper: Used to remove old plumber’s putty or sealant.
*Clean rags or paper towels: For cleaning surfaces and absorbing spills.
*Plumber’s putty: Used to create a watertight seal between the drain flange and the tub.
*Adjustable wrench: For tightening nuts and fittings.
*Flashlight or work light: To illuminate the work area, especially under the bathtub.
Identifying the Drain Type: Bathtub drains come in various types, each with a slightly different removal and installation process:
*Lift-and-Turn: This type has a knob that is lifted and turned to open and close the drain.
*Pop-Up: This drain has a lever or knob, often located on the overflow plate, that activates a pop-up stopper.
*Push-Button: As the name suggests, this drain opens and closes with a simple push of the drain stopper.
*Toe-Touch: Similar to the push-button, but activated by pressing down on the stopper with a toe.
Knowing the specific type of drain installed will guide the removal and installation steps. Consult the manufacturer's instructions included with the new drain trim kit for specific guidance related to that model.
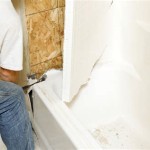
Accessing the Drain: Accessing the underside of the bathtub is essential for disconnecting and connecting the drain assembly. Depending on the bathtub's configuration, access can be gained through an access panel, from an unfinished basement, or by removing a section of the ceiling below. If access is limited, it may be necessary to use a mirror and flashlight to view the drain assembly. Adequate lighting is crucial for clear visibility and safe working conditions.
Key Point 2: Removing the Old Drain Trim Kit
Removing the old drain trim kit requires careful attention to avoid damaging the bathtub or the surrounding plumbing. This process involves loosening the drain flange, disconnecting the linkages (if applicable), and removing the drain shoe from the drainpipe.
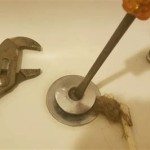
Loosening the Drain Flange: The drain flange is typically secured with plumber’s putty and, in some cases, screws. Start by applying penetrating oil around the edge of the drain flange where it meets the bathtub surface. Allow the oil to penetrate for at least 15-20 minutes to help loosen any corrosion or sealant.
Insert the drain wrench into the drain flange. Ensure the wrench is properly seated and provides a firm grip. Slowly and carefully turn the wrench counterclockwise to loosen the flange. If the flange is particularly stubborn, apply more penetrating oil and try again. Avoid applying excessive force, as this could damage the bathtub or the drainpipe.
Once the flange is loose, carefully unscrew it by hand until it is completely detached from the drain shoe. Remove the old plumber’s putty from the bathtub surface using a putty knife or scraper. Clean the area thoroughly with a clean rag to remove any remaining residue.
Disconnecting the Linkages (If Applicable): If the bathtub drain is a pop-up type, it will have linkages connecting the drain stopper to the overflow plate. Before removing the drain shoe, these linkages must be disconnected. Typically, this involves unscrewing a small screw on the overflow plate and pulling out the linkage rod. Carefully note the orientation and position of the linkage components to facilitate reassembly later.
Removing the Drain Shoe: The drain shoe is the part of the drain assembly that connects to the drainpipe underneath the bathtub. It is typically secured with a large nut or coupling. Use an adjustable wrench to loosen this nut or coupling by turning it counterclockwise. As the nut is loosened, be prepared for water to spill out, so have a bucket and rags nearby.
Once the nut is completely loosened, carefully detach the drain shoe from the drainpipe. Inspect the drainpipe for any signs of corrosion or damage. If the drainpipe is damaged, it may need to be repaired or replaced before installing the new drain trim kit.
Key Point 3: Installing the New Drain Trim Kit
Installing the new drain trim kit involves assembling the components, applying plumber’s putty, and connecting the drain shoe to the drainpipe. The installation process should follow the manufacturer's instructions included with the new kit.
Assembling the Components: Begin by assembling the components of the new drain trim kit according to the manufacturer's instructions. This typically involves inserting the drain stopper mechanism into the drain flange and attaching any necessary gaskets or seals. Ensure that all components are properly aligned and securely fastened.
Applying Plumber’s Putty: Roll a rope of plumber’s putty between the hands until it is approximately ½ inch thick. Apply the putty to the underside of the drain flange, ensuring that it forms a continuous ring around the flange. The putty will create a watertight seal between the flange and the bathtub surface.
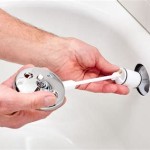
Installing the Drain Flange: Carefully insert the drain flange into the drain opening in the bathtub. Press down firmly on the flange to ensure that the plumber’s putty makes good contact with the bathtub surface. Screw the drain flange into the drain shoe by hand until it is snug. Use the drain wrench to tighten the flange further, but avoid over-tightening, which could damage the bathtub or the drain shoe. Remove any excess plumber's putty that squeezes out from under the flange.
Connecting the Drain Shoe: Position the new drain shoe underneath the bathtub and align it with the drainpipe. Apply pipe thread sealant or Teflon tape to the threads of the drainpipe. Screw the nut or coupling onto the drainpipe by hand until it is snug. Use an adjustable wrench to tighten the nut further, ensuring a secure and watertight connection. Avoid over-tightening.
Reconnecting the Linkages (If Applicable): If the bathtub drain is a pop-up type, reconnect the linkages between the drain stopper and the overflow plate. Ensure that the linkage rod is properly aligned and securely fastened to the overflow plate. Test the pop-up mechanism to ensure that it is functioning correctly.
Testing for Leaks: After installing the new drain trim kit, it is essential to test for leaks. Turn on the water supply to the bathroom and fill the bathtub with a few inches of water. Observe the drain area carefully for any signs of leaks. Check both the drain flange and the connection between the drain shoe and the drainpipe.
If any leaks are detected, tighten the connections further or reapply plumber’s putty or pipe thread sealant as needed. If the leaks persist, it may be necessary to consult with a professional plumber. Repeat the leak test until all leaks are resolved.
By following these steps carefully and methodically, any homeowner can replace a bathtub drain trim kit. This process not only improves the aesthetics of the bathroom but also ensures a functional and leak-free drain system.

How To Replace Bathtub Drain Trim Kit

How To Replace Bathtub Drain Trim Kit

How To Replace A Bathtub Drain

How To Replace Bathtub Drain Trim Kit

Easy To Install Universal Tub Drain Trim Kits Fits Common Tubs

Westbrass Universal Tip Toe Bathub Drain Trim Kit With 1 2 In Adapter Bushing And Converter Bracket Matte Black R931k 62 The Home Depot

Easy To Install Universal Tub Drain Trim Kits Fits Common Tubs

How To Replace Bathtub Drain Stopper With A Lift And Turn Diy

Black Bathtub Drain Single Hole Tub Temu

Danco Touch Toe Bath Tub Drain Trim Kit Matte Black 11081 The Home Depot
Related Posts