How To Fix a Bathtub Drain Seal
A leaking bathtub drain can present more than a minor inconvenience. It can lead to water damage beneath the bathroom floor, fostering mold growth and potentially compromising structural integrity. Therefore, promptly addressing a faulty bathtub drain seal is crucial. This article provides a comprehensive guide on identifying, diagnosing, and rectifying issues with bathtub drain seals.
Identifying a Leaking Bathtub Drain Seal
The first step in addressing a potential issue is confirming the source of the leak. Often, leaks manifest as dampness or water stains on the ceiling of the room directly below the bathroom. In some cases, the leak may be evident around the bathtub itself, particularly where the drain assembly meets the tub. However, these visible signs can be misleading, as water often travels before becoming apparent.
A more reliable method to pinpoint a drain seal leak involves a simple test. After ensuring the area beneath the bathtub is dry, plug the drain securely. Fill the tub with several inches of water. Allow the tub to sit for a few hours, periodically checking for any signs of water leakage below. If water appears during this time, it strongly suggests a faulty drain seal.
Additionally, inspect the drain and surrounding area closely. Look for cracks in the drain assembly, corrosion, or gaps between the bathtub and the drain flange. These visual cues can provide further evidence of a compromised seal. Remember to use a flashlight to illuminate hard-to-see areas.
Tools and Materials Required For Bathtub Drain Seal Repair
Before embarking on any repair, gathering the necessary tools and materials is essential. This preparation ensures a smooth and efficient process. The specific tools required may vary slightly depending on the type of drain and the nature of the problem, but the following list represents the common essentials:
*Plumber's putty:
Used to create a watertight seal between the drain flange and the bathtub surface. Choose a high-quality plumber's putty specifically designed for plumbing applications. *Silicone caulk:
Another sealant option, particularly useful for filling minor gaps or reinforcing the plumber's putty seal. Ensure it's 100% silicone and mildew-resistant. *Adjustable wrench:
Required to loosen and tighten the drain nut and other connections. A pipe wrench may also be necessary for stubborn fittings. *Channel-lock pliers:
Useful for gripping and maneuvering drain components. *Screwdrivers (Phillips and flathead):
Needed to remove the drain stopper and any other screws securing the drain assembly. *Putty knife or scraper:
Used to remove old plumber's putty or caulk. *Clean rags or paper towels:
For cleaning and wiping away excess sealant. *Bucket:
To catch any water or debris that may drain from the pipe. *Penetrating oil (optional):
If the drain is corroded or difficult to loosen, penetrating oil can help. *New drain seal or gasket (if needed):
If the old seal is damaged or deteriorated, replacing it is crucial. *Drain removal tool (Tub Drain Extractor Tool):
This is an optional but highly useful tool for removing stubborn or corroded bathtub drains.Step-by-Step Procedure for Replacing a Bathtub Drain Seal
The process of replacing a bathtub drain seal involves several key steps. Adhering to these steps ensures a proper and leak-free repair. This procedure assumes the drain assembly needs to be completely removed and resealed.
Step 1: Drain Preparation and Access:
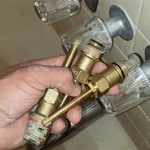
Begin by shutting off the water supply to the bathroom to prevent accidental water flow during the repair. Next, access the drain assembly from below the bathtub. This usually requires access through an access panel or by removing a section of the ceiling in the room below. Ensure adequate lighting is available to clearly see the drain connections. Place a bucket under the drain to catch any residual water. Remove the trip lever or drain stopper mechanism.
Step 2: Disconnecting the Drain Assembly:
Loosen the drain nut that connects the drainpipe to the bottom of the bathtub drain assembly. This nut can be quite tight, especially if it's corroded. Use an adjustable wrench and apply penetrating oil if necessary. Once the nut is loosened, carefully disconnect the drainpipe. Be prepared for some water to spill out.
Step 3: Removing the Old Drain Flange:
From inside the bathtub, remove the drain flange (the visible part of the drain in the tub). If it's stuck, try using a drain removal tool. This tool is specifically designed to grip the inside of the drain and allow you to turn it. If you don't have a drain removal tool gently use a flathead screwdriver and hammer to tap the drain flange counterclockwise to loosen it. Be cautious not to damage the bathtub surface. If necessary, apply penetrating oil around the edge of the flange to help loosen it. Once the flange is loose, carefully lift it out of the drain opening.
Step 4: Cleaning the Drain Area:
Thoroughly clean the drain opening and the underside of the bathtub where the drain flange sits. Remove all traces of old plumber's putty, caulk, or other debris. Use a putty knife or scraper to remove stubborn residue. Ensure the surface is clean, dry, and free of any imperfections that could prevent a proper seal.
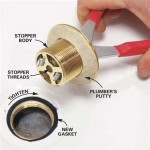
Step 5: Applying New Plumber's Putty:
Roll a rope of plumber's putty that is approximately ½ inch thick. Apply the putty evenly around the underside of the drain flange. Ensure there are no gaps or breaks in the putty ring. The putty should completely encircle the drain opening.
Step 6: Installing the Drain Flange:
Carefully insert the drain flange into the drain opening from inside the bathtub. Press down firmly on the flange to compress the plumber's putty and create a tight seal. The excess putty will squeeze out from under the flange. Remove the excess putty with a putty knife, leaving a smooth, clean bead.
Step 7: Reconnecting the Drain Assembly:
From below the bathtub, reattach the drainpipe to the bottom of the drain assembly. Tighten the drain nut securely, but avoid over-tightening, which could damage the drainpipe or the bathtub. Ensure the connection is watertight.
Step 8: Testing the Seal:
Before completely reassembling the area beneath the bathtub, test the seal for leaks. Plug the drain and fill the tub with several inches of water. Check for any signs of water leakage around the drainpipe or the drain flange. If leaks are detected, tighten the drain nut further or, if necessary, disassemble the drain and repeat the process with fresh plumber's putty.
Step 9: Final Steps:
Once you are confident that the drain is not leaking, replace the access panel or reassemble the ceiling. Reinstall the drain stopper or trip lever mechanism. Ensure everything is functioning properly and that there are no further signs of leaks.
Alternative Sealing Methods and Considerations
While plumber's putty is the most common sealant for bathtub drains, other options exist. Understanding these alternatives can help determine the best approach for a specific situation. One alternative is silicone caulk. Silicone caulk creates a flexible, watertight seal and is particularly useful for filling minor gaps or reinforcing the plumber's putty seal. When using silicone caulk, ensure it is 100% silicone and mildew-resistant.
Another consideration is the type of drain assembly. Some bathtub drains utilize rubber gaskets instead of plumber's putty. If the drain assembly uses a gasket, replacing the gasket is crucial to ensure a proper seal. Inspect the old gasket for signs of damage, wear, or deterioration. When installing the new gasket, ensure it is properly seated and aligned.
In some cases, the problem may not be the drain seal itself but rather a crack or defect in the drainpipe or drain flange. If this is the case, replacing the damaged component is necessary. Inspect the drainpipe and flange carefully for any signs of damage. If the damage is significant, consider replacing the entire drain assembly.

How To Replace Bathtub Drain Shoe Gasket

Easy Replacement Of A Bathtub Drain

How To Replace Bathtub Drain Stopper With A Lift And Turn Diy

How To Replace A Bathtub Drain

I Found The Leak How To Repair A Bathtub Overflow Drain

How To Replace A Bathtub Drain

Replacing A Tub Drain Bathtub Removal And Replacement

6 Steps To Eliminate Bathtub Drain Leaking

How To Replace A Bathtub Drain And Fix Leak

Bathtub Leaks How To Change A Overflow Drain Seal
Related Posts