How To Take Off a Bathtub Faucet Handle
Removing a bathtub faucet handle is a common task encountered during plumbing repairs or bathroom renovations. Whether the goal is to replace a worn handle, fix a leaky faucet, or upgrade the overall look of the plumbing fixtures, understanding the process for removing the handle is crucial. The procedure varies slightly depending on the type of faucet handle in question, but the underlying principles remain consistent.
Prior to commencing any plumbing work, safety precautions must be taken. The first step is to shut off the water supply to the bathtub. This is typically accomplished by locating the shut-off valves for the hot and cold water lines servicing the fixture. These valves are usually located near the bathtub itself, beneath the sink in the adjoining bathroom, or within the home's main plumbing access panel. Turning these valves clockwise will stop the flow of water, preventing potential flooding during the handle removal process. After shutting off the water supply, it's advisable to turn on the bathtub faucet to relieve any residual water pressure within the pipes.
The subsequent step involves identifying the specific type of faucet handle installed in the bathtub. There are several common designs, each requiring a slightly different approach for removal. The most prevalent types include single-handle faucets, two-handle faucets, and, less commonly, push/pull diverter faucets. Each of these types will be addressed in detail below.
Identifying the Faucet Handle Type
The process of removing a bathtub faucet handle is intrinsically linked to its design. Misidentification can lead to unnecessary force being applied or the damage of the fixture. Taking the time to carefully observe the handle and its surrounding components will save time and potentially prevent costly repairs.
Single-handle faucets are characterized by a single lever or knob that controls both the water temperature and the flow rate. Turning the handle to one side increases the water temperature, while turning it to the other side decreases it. Lifting or lowering the handle controls the water flow. These faucets often feature a hidden screw or set screw that secures the handle to the valve stem.
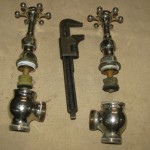
Two-handle faucets are straightforward: one handle controls the hot water, and the other controls the cold water. These handles can be secured by visible screws, hidden screws under decorative caps, or by a simple friction fit. Examination of the base of the handle often reveals the securing mechanism.
Push/pull diverter faucets, less common in modern installations, utilize a handle that is pushed or pulled to divert the water flow between the bathtub spout and the showerhead. These handles are often held in place by a set screw or a threaded connection.
Removing a Single-Handle Faucet
The removal of a single-handle faucet typically involves the following steps. First, carefully inspect the handle for any visible screws. If there are none, look for a small decorative cap, usually made of plastic or metal, located on the front or side of the handle. This cap conceals a set screw that secures the handle to the valve stem. Using a small, flat-head screwdriver or a specialized cap removal tool, gently pry off the cap. Exercise caution to avoid scratching or damaging the finish of the handle.
Once the cap is removed, the set screw will be visible. Using an Allen wrench (also known as a hex key) of the appropriate size, loosen the set screw by turning it counterclockwise. It may be necessary to apply some penetrating oil if the screw is corroded or stuck. Allow the oil to sit for a few minutes before attempting to loosen the screw again. Once the set screw is sufficiently loosened, the handle should slide off the valve stem. If the handle is still stuck, gently rock it back and forth while pulling outward. Avoid using excessive force, as this could damage the valve stem.
In some cases, single-handle faucets may not have a visible set screw even after removing the decorative cap. In these instances, the handle may be threaded onto the valve stem. To remove this type of handle, grip the handle firmly and turn it counterclockwise. It may be necessary to use a strap wrench or a similar tool to provide additional leverage. Again, exercise caution to avoid scratching or damaging the handle.
After the handle is removed, the valve stem will be exposed. This is the component that controls the flow of water. It may be necessary to remove additional components, such as a retaining nut or a cartridge, to access the internal parts of the faucet for repair or replacement. Refer to the manufacturer's instructions or a plumbing guide for specific instructions on how to remove these components.
Removing a Two-Handle Faucet
Removing a two-handle faucet follows a similar process, but it must be repeated for each handle. Begin by inspecting each handle for visible screws. Some two-handle faucets have screws located on the top or front of the handle, while others have screws hidden under decorative caps. If there are decorative caps, carefully pry them off using a small, flat-head screwdriver or a cap removal tool. Be careful not to scratch the finish of the handles.
Once the screws are visible, use a screwdriver of the appropriate size to loosen them by turning them counterclockwise. After the screws are loose, the handles should pull straight off the valve stems. If the handles are stuck, gently rock them back and forth while pulling outward. As with single-handle faucets, avoid using excessive force.
Some older two-handle faucets may not have screws at all. In these cases, the handles are likely held in place by a friction fit or a threaded connection. To remove a friction-fit handle, grip it firmly and pull straight outward. It may be necessary to use a handle puller tool to provide additional leverage. To remove a threaded handle, grip it firmly and turn it counterclockwise. A strap wrench may be helpful in this situation.
After both handles are removed, the valve stems for the hot and cold water will be exposed. It may be necessary to remove additional components, such as retaining nuts or valve cartridges, to access the internal parts of the faucet for repair or replacement. Consult the manufacturer's instructions or a plumbing guide for specific instructions on how to remove these components. It is crucial to identify which valve stem controls the hot water and which controls the cold water. This is often indicated by markings on the faucet body or on the valve stems themselves.
Addressing Common Challenges
During the process of removing a bathtub faucet handle, several challenges may arise. One common issue is a corroded or stuck set screw. In this case, applying penetrating oil to the screw and allowing it to sit for several minutes can often loosen it. If the screw is severely corroded, it may be necessary to use a screw extractor tool to remove it. Extreme caution should be exercised as excessive force can break the screw within the valve stem, potentially complicating the repair process.
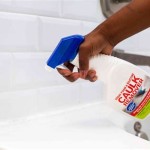
Another challenge is a handle that is stuck to the valve stem due to mineral buildup or corrosion. Gently rocking the handle back and forth while pulling outward can help to break the seal. Applying heat to the handle with a hairdryer can also help to loosen it. Avoid using a torch, as this could damage the handle or the valve stem. If the handle remains stuck, a handle puller tool can be used to provide additional leverage. When using a handle puller, ensure that the tool is properly aligned and that the pressure is applied evenly to avoid damaging the handle.
Stripped screws are another common problem. If the screw head is stripped, it may be difficult to grip it with a screwdriver. A rubber band placed between the screwdriver and the screw head can sometimes provide enough extra grip to remove the screw. Alternatively, a screw extractor tool can be used. In some cases, it may be necessary to drill out the screw and replace it.
Finally, it is essential to remember the order in which the components were removed. Taking photographs or making notes during the disassembly process can be helpful when reassembling the faucet. Retaining all removed screws, caps, and other small parts in a secure location will prevent loss and facilitate the reassembly process. A labeled container or small bags can be used to organize the parts.
Successfully removing a bathtub faucet handle requires careful observation, the appropriate tools, and a methodical approach. Taking the time to properly identify the handle type and address any challenges that arise will ensure a smooth and efficient repair or renovation process. After removing the handle, proceed with the planned repairs or replacements, ensuring that all components are properly installed and tightened before turning the water supply back on.

How To Replace A Bathtub Faucet

How To Replace Bathtub Faucet Handles

How To Fix A Leaking Single Handle Bathtub Faucet Quick And Easy

How To Change A Bathtub Faucet 14 Steps With Pictures Wikihow

How To Replace Shower Faucet Trim

Diy Bathtub Faucet Repair

How To Remove Bathtub Faucet Stems Quick And Easy

How To Remove Tub Spout Without Set Bostingner

How To Replace Bathtub Faucet Knob Easy Simple

Plumbing How Do I Remove These Wall Mount Faucet Handles For My Bathtub That Have No S Home Improvement Stack Exchange