How To Replace a Bathtub and Wall Surround in a Mobile Home
Replacing a bathtub and wall surround in a mobile home presents a unique set of challenges compared to a traditional home. Due to space constraints, the construction materials used, and the specific plumbing configurations often found in mobile homes, careful planning and execution are essential. This article provides a comprehensive guide to navigating this process successfully.
Before embarking on this project, it's crucial to assess one's skill level. Plumbing and carpentry experience are highly recommended. If unsure about any step, consulting with a qualified professional is advised to avoid costly mistakes and potential damage to the mobile home's structure or plumbing system. This project typically requires a moderate level of DIY proficiency.
Safety should be the primary concern throughout the entire process. Wearing safety glasses and gloves is mandatory when demolishing the old bathtub and surround. Ensure proper ventilation, especially while working with adhesives or sealants. Always disconnect the water supply to the bathtub before commencing any work on the plumbing. Consider wearing a respirator when dealing with moldy or dusty materials.
Key Point 1: Preparation and Assessment
The first critical step is a thorough assessment of the existing bathtub and surround. Identify the type of materials used, how they are attached to the wall, and the location of the plumbing connections. This inspection reveals the scope of the project and helps in selecting appropriate replacement materials and tools.
Mobile home bathtubs are often smaller and lighter than standard bathtubs used in conventional homes. Measure the existing bathtub's dimensions precisely, including the length, width, and height. These measurements are crucial for selecting a replacement that fits correctly within the available space. Take photos of the existing plumbing, particularly the drain and faucet connections, as a reference for reinstallation.
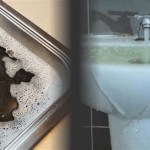
Examine the wall surround for any signs of water damage or mold growth. This information will inform the extent of demolition required and indicate whether any structural repairs are necessary. Pay close attention to the subfloor around the bathtub, as water leaks can cause significant damage over time. If the subfloor is rotted or weakened, it must be repaired or replaced before installing the new bathtub.
Next, choose the replacement bathtub and wall surround. Consider the material, style, and features. Acrylic bathtubs are a popular choice for mobile homes due to their durability, lightweight design, and ease of cleaning. Fiberglass bathtubs are another option, but they are generally less durable than acrylic. When selecting a wall surround, ensure it is compatible with the chosen bathtub and provides adequate protection against water damage. Evaluate the availability of specific mobile home sized tubs verses the dimensions of standard tubs; it may be more cost effective to go with a standard size and adjust the surrounding wall if needed.
Gather all necessary tools and materials before starting the demolition. These typically include: a utility knife, pry bar, screwdriver set, adjustable wrench, pipe wrench, level, tape measure, caulk gun, safety glasses, gloves, respirator (optional), stud finder, drill, and appropriate drill bits. In addition to the bathtub and surround, you will need plumbing supplies such as new drain and overflow assemblies, faucet connectors, Teflon tape, and PVC primer and cement (if applicable). High-quality waterproof caulk and adhesive are essential for sealing the bathtub and surround to prevent leaks.
Key Point 2: Demolition and Removal
Demolition should be performed carefully to avoid damaging the surrounding walls and plumbing. Begin by turning off the water supply to the bathtub. Locate the shut-off valves, usually located in the bathroom or underneath the mobile home. If shut-off valves are not present, the main water supply to the mobile home must be turned off.
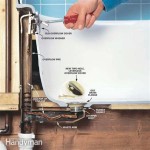
Disconnect the existing faucet and drain assembly. Use an adjustable wrench or pipe wrench to loosen the faucet connections. Place a bucket underneath the drain to catch any residual water. Carefully unscrew the drain assembly from the bathtub. If the drain is corroded or stuck, use penetrating oil to loosen it. In stubborn cases, cutting the drain pipe may be necessary, but exercise caution to avoid damaging the surrounding plumbing.
Remove the existing wall surround. Use a utility knife to score along the edges of the surround where it meets the wall. This will help to prevent the paint or wallpaper from peeling off when the surround is removed. Use a pry bar or putty knife to gently pry the surround away from the wall. Work slowly and carefully to avoid damaging the wall studs.
Once the wall surround is removed, inspect the wall studs for any signs of water damage or rot. Replace any damaged studs before proceeding. Ensure the studs are straight and plumb to provide a solid surface for the new wall surround. Use a stud finder to locate the studs and mark their locations. This will be helpful when installing the new surround.
Remove the old bathtub. Depending on the bathtub's construction, it may be necessary to cut it into smaller pieces for easier removal. Use a reciprocating saw or a multi-tool with a cutting blade to carefully cut the bathtub. Be extremely cautious when using power tools to avoid injury. Wear safety glasses and gloves to protect yourself from flying debris. Lift the bathtub out of the enclosure and dispose of it properly. Clean the surrounding area thoroughly to remove any debris or remaining adhesive.
Key Point 3: Installation and Finishing
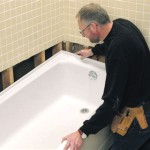
Before installing the new bathtub, ensure the subfloor is level and structurally sound. Use a level to check the subfloor and make any necessary adjustments. If the subfloor is uneven, use shims to level it. Secure the shims with construction adhesive.
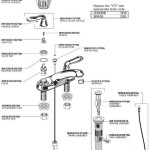
Position the new bathtub in the enclosure. Ensure it fits snugly and is properly aligned. Connect the drain and overflow assembly according to the manufacturer's instructions. Use Teflon tape on all threaded connections to prevent leaks. Tighten the connections securely but avoid over-tightening, which can damage the fittings.
Connect the faucet to the water supply lines. Use new faucet connectors to ensure a watertight seal. Turn on the water supply and check for leaks. Tighten any connections that are leaking. Re-check all plumbing and connections for any leaks after the installation process.
Install the new wall surround. Apply construction adhesive to the back of the surround panels according to the manufacturer's instructions. Position the panels against the wall, aligning them with the studs. Use screws or nails to secure the panels to the studs. Ensure the panels are level and plumb. Overlap the panels according to the manufacturer's instructions to create a watertight seal.
Caulk all seams and edges of the wall surround with high-quality waterproof caulk. Apply a bead of caulk along the top edge of the bathtub where it meets the wall surround. Smooth the caulk with your finger or a caulk smoothing tool. Allow the caulk to dry completely before using the bathtub.
Install any remaining trim or accessories, such as soap dishes or grab bars. Ensure they are securely attached to the wall. Clean the bathtub and wall surround thoroughly. Inspect the installation for any imperfections. Make any necessary touch-ups or adjustments.
Following these steps carefully will help ensure a successful bathtub and wall surround replacement in a mobile home. Proper planning, careful execution, and attention to detail are essential for achieving a professional and long-lasting result.
Consider obtaining all required permits from the appropriate local authorities. It is the homeowner's responsibility to ensure the replacement adheres to all mobile home construction codes.
The complexities that will arise are dependent on the mobile home design. As such, it is advisable to consult with specialized mobile home contractors. Their experience can greatly simplify the process and ensure the final product is safe and within code.

Replace Or Repair A Mobile Home Bathtub

How To Remove Tub Surround From Mobile Home

R G Supply Mobile Home Bathtubs And Surrounds

Installing A Bathtub In Our Mobile Home This Trick Will Save You From Having Water Damage

Removing A Fiberglass Bath And Surround

The Basics Of Replacing Your Mobile Home Bathtub Outfitters

Mobile Home Bathroom Guide Living

How To Install A Bath And Shower Surround Delta Classic 400

Mobile Home Bathroom Guide Living

How To Install A Shower Surround The Home Depot
Related Posts