How To Remove A Pop-Up Bathtub Drain Stopper
Bathtub drain stoppers, while seemingly simple devices, can become a source of frustration when they malfunction or require cleaning. The pop-up style, common in many modern bathtubs, offers a sleek aesthetic and convenient operation. However, its intricate mechanism is prone to hair clogs, debris accumulation, and eventual failure. When this occurs, removal of the pop-up drain stopper becomes necessary for cleaning, repair, or replacement. This article provides a comprehensive guide on how to safely and effectively remove a pop-up bathtub drain stopper.
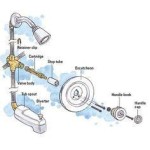
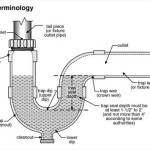
Before commencing any work on the drain stopper, it is crucial to understand the type of pop-up mechanism present in the bathtub. While variations exist, the core principle remains the same: a linkage connected to a lever or knob operates a plunger that seals or unseals the drain opening. Identifying the specific type of stopper will inform the appropriate removal method. Common types include those with visible screws on the stopper itself, internal linkages accessible through the drain opening, and those activated by a lever on the overflow plate.
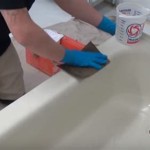
Prior to removal, gather necessary tools. These typically include a flathead screwdriver, a Phillips head screwdriver (if screws are present), pliers, penetrating oil, a flashlight, and rags or paper towels. A drain snake or wire coat hanger can also be useful for clearing debris that may be obstructing the stopper's movement. Ensuring that the working area is well-lit is paramount for visibility and safe operation. Place rags around the drain opening to protect the bathtub surface from scratches.
Identifying and Addressing Stopper Types: The Overflow Plate Method
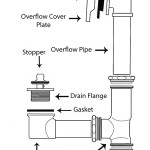
Many pop-up drain stoppers are linked to an overflow plate located near the top of the bathtub. This plate conceals a linkage that connects to the stopper mechanism. This method involves gaining access through the overflow plate.
First, locate the overflow plate. It is generally a circular or rectangular plate secured to the bathtub wall with one or two screws. Using a Phillips head screwdriver, carefully remove the screws holding the overflow plate in place. Store the screws in a safe location to prevent loss.
Once the screws are removed, gently pull the overflow plate away from the bathtub wall. Note that some plates may be sealed with caulk. If so, use a utility knife to carefully score the caulk line around the plate to break the seal before attempting to pull it free. With the plate removed, the linkage mechanism will be visible. This typically consists of a rocker arm and a spring-loaded plunger.
The next step involves disengaging the linkage from the stopper. This often requires maneuvering the rocker arm to release the plunger. Inspect the mechanism closely to understand how it operates. In some cases, the rocker arm can simply be pulled upwards or downwards to disengage it. In other cases, a small retaining clip or setscrew may need to be loosened first. A flashlight is helpful for illuminating the area and identifying any hidden fasteners.
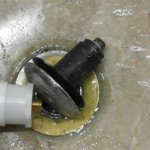
Once the linkage is disengaged, the pop-up stopper should be free to move. If the stopper is stuck, apply penetrating oil around its base and allow it to soak for several minutes. This will help to loosen any corrosion or debris that may be preventing the stopper from moving. After the oil has had time to work, gently try to wiggle the stopper loose. Avoid using excessive force, as this could damage the stopper or the drain assembly.
Grip the stopper firmly and pull it straight up. It may be necessary to rotate the stopper slightly while pulling to dislodge it completely. Once the stopper is removed, inspect it for any damage or wear. Clean the stopper thoroughly to remove any accumulated hair, soap scum, or debris. Use a small brush or a toothpick to clean any tight crevices. Also, inspect the drain opening for any obstructions. A drain snake or wire coat hanger can be used to clear any debris that may be lodged in the drainpipe.
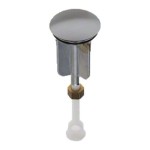
Direct Stopper Removal: When a Screw is Visible
Some pop-up stoppers feature a visible screw on the top surface. This method requires direct access to the stopper itself.
Inspect the stopper for a small screw, often located in the center. If a screw is present, use a flathead or Phillips head screwdriver (depending on the screw type) to carefully loosen and remove it. Be extremely cautious during this step, as the screw is often small and easily dropped into the drain. Using a magnetic screwdriver can prevent this issue.
With the screw removed, the stopper should be able to be lifted straight out. If the stopper is stuck, apply penetrating oil around the base and allow it to soak. After soaking, gently wiggle and pull the stopper upwards. If the stopper still resists, a pair of pliers can be used to grip the stopper more firmly. Wrap a rag around the stopper to protect its finish before using pliers. Avoid applying excessive force to prevent damage.
After removing the stopper, thoroughly clean it and the drain opening. Check for any signs of damage to the stopper or the drain assembly. If necessary, use a drain snake to clear any remaining debris from the drainpipe. This step is crucial for ensuring proper drainage after the stopper is reinstalled or replaced.
Dealing with Stubborn Stoppers and Common Issues
Even with the correct method, removing a pop-up drain stopper can sometimes be challenging. Several common issues can contribute to a stubborn stopper, including corrosion, debris buildup, and damaged linkages. Addressing these issues requires patience and careful troubleshooting.
Corrosion is a frequent culprit, particularly in older bathtubs. Mineral deposits and rust can accumulate around the base of the stopper, effectively cementing it in place. Penetrating oil is the primary solution for corrosion. Apply a generous amount of penetrating oil around the stopper's base and allow it to soak for an extended period – even overnight. Reapply the oil periodically to keep the area saturated. After soaking, gently try to wiggle and pull the stopper loose. If it remains stuck, use a rubber mallet to lightly tap around the stopper's base. The vibrations can help to break the corrosion's bond.
Debris buildup, primarily hair and soap scum, is another common obstacle. This debris can accumulate in the drainpipe and around the stopper mechanism, restricting its movement. A drain snake or wire coat hanger is effective for clearing debris from the drainpipe. Insert the snake or hanger into the drain opening and rotate it to snag any accumulated debris. Pull the debris out and dispose of it properly. For debris around the stopper mechanism, use a small brush or toothpick to carefully remove it. A wet/dry vacuum cleaner can also be used to suction out loose debris.
Damaged linkages can also prevent the stopper from being removed. If the linkage is bent, broken, or disconnected, it may need to be repaired or replaced. In some cases, the linkage can be accessed and repaired through the overflow plate opening. However, in other cases, it may be necessary to remove the entire drain assembly to access the linkage. If the linkage is severely damaged, replacing the entire pop-up drain stopper assembly may be the most practical solution.
After successfully removing and cleaning the pop-up drain stopper, reinstallation is the final step. Before reinstalling, ensure that all components are clean and free of debris. If any parts were damaged during removal, replace them with new parts. Lubricate the stopper and linkage with silicone grease to ensure smooth operation and prevent future corrosion. When reinstalling the stopper, carefully align it with the drain opening and push it firmly into place. Reconnect the linkage to the stopper, ensuring that it is properly engaged. Test the stopper to verify that it opens and closes smoothly. Reinstall the overflow plate and tighten the screws securely.
Regular maintenance can prevent future problems with the pop-up drain stopper. Periodically clean the stopper and drain opening to remove any accumulated debris. Avoid using harsh chemicals or abrasive cleaners, as these can damage the stopper and drain assembly. Consider using a drain strainer to catch hair and other debris before it enters the drainpipe. By following these simple maintenance tips, the pop-up drain stopper can be kept in good working order for years to come.

Remove Pop Up Bath Tub Drain Stopper 3 Ways

How To Remove Pop Up Tub Stopper Easy Method

How To Remove A Bathtub Drain The Home Depot

How To Remove A Bathtub Drain Stopper

So Easy How To Remove A Watco Pop Up Drain Plug

How To Remove Bathtub Drain Stopper

How To Fix A Bathtub Or Sink Pop Up Stopper

How To Easily Remove Bathtub Drain Plug Stopper Unclog In 1 Minute Jonny Diy

How To Remove A Bathtub Drain Stopper

How To Remove Bathtub Drain Stopper That Spins Freely
Related Posts