How to Replace a Bathtub Drain and Stopper
Replacing a bathtub drain and stopper is a common plumbing task many homeowners can undertake with the right tools and understanding. Over time, bathtub drains and stoppers can corrode, leak, or simply become ineffective, hindering the bathtub's ability to retain water. This article provides a comprehensive guide on how to replace a bathtub drain and stopper, covering preparation, removal of the old drain, installation of the new drain, and leak testing.
Identifying the Type of Bathtub Stopper
Before beginning the replacement process, it is crucial to identify the type of bathtub stopper currently installed. Different stopper types require different removal and installation techniques. The most common types include:
Lift-and-Turn Stoppers: These stoppers feature a knob that is turned to open or close the drain. They often have a setscrew that secures the stopper to the drain assembly.
Push-and-Pull Stoppers: These stoppers are operated by pushing down to close the drain and pulling up to open it. They typically have a central rod connecting to a linkage mechanism beneath the tub.
Toe-Touch Stoppers: Similar to push-and-pull stoppers, toe-touch stoppers are operated by pressing down with a toe. They often have a more streamlined design compared to push-and-pull models.
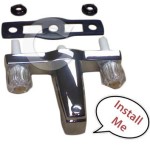
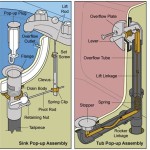
Pop-Up Stoppers: These stoppers utilize a linkage system connected to a lever located on the overflow plate. Moving the lever up or down raises or lowers the stopper.
Chain and Stopper: This is the oldest and simplest design, consisting of a rubber stopper attached to a chain that is manually placed into or removed from the drain.
Identifying the stopper type is essential for selecting the correct replacement drain and stopper kit and for understanding the specific removal and installation procedures.
Gathering the Necessary Tools and Materials
Having the right tools and materials on hand before starting the project will ensure a smoother and more efficient process. The following is a list of essential items:
New Bathtub Drain and Stopper Kit: Choose a kit compatible with the identified stopper type and bathtub drain size. Measure the existing drain flange diameter to ensure a proper fit.
Flathead Screwdriver: Needed for removing screws from the overflow plate and some types of stopper mechanisms.
Pliers: Useful for gripping and manipulating small parts, such as linkage rods and setscrews.
Adjustable Wrench: Required for loosening and tightening the drain nut located beneath the bathtub.
Channellock Pliers (Tongue-and-Groove Pliers): Provides a strong grip for loosening and tightening larger nuts and drain flanges.
Drain Removal Tool (Bathtub Drain Wrench or Inside Drain Wrench): This specialized tool is designed to grip the drain flange from the inside and provides leverage for unscrewing it. If access from underneath is restricted, this tool is essential.
Putty Knife or Scraper: Used to remove old plumber's putty or caulking from around the drain flange.
Plumber's Putty: Creates a watertight seal between the drain flange and the bathtub surface.
Silicone Caulk: Can be used as an alternative to plumber's putty or to supplement the seal in certain areas.
Rags or Paper Towels: For cleaning up spills and debris.
Bucket: To catch any water or debris that may fall during the drain removal process.
Penetrating Oil (Optional): Can help loosen stubborn drain nuts and threads.
Gloves: To protect hands from dirt and grime.
Safety Glasses: To protect eyes from debris.
By assembling these tools and materials beforehand, the replacement process can be completed more efficiently and safely.
Removing the Old Bathtub Drain and Stopper
The removal process varies depending on the type of stopper and drain assembly. However, the general steps can be outlined as follows:
Step 1: Remove the Stopper: For lift-and-turn stoppers, loosen the setscrew (usually located on the side of the stopper) with an Allen wrench or small screwdriver and lift the stopper out. For push-and-pull or toe-touch stoppers, try unscrewing the stopper by hand. If it is stuck, use pliers to gently grip and turn the stopper counterclockwise. For pop-up stoppers, remove the overflow plate. This will expose a linkage rod. Disconnect the linkage rod from the stopper mechanism.
Step 2: Prepare the Area: Use a putty knife or scraper to remove any old plumber's putty or caulking around the drain flange. This will help loosen the flange and prevent damage to the bathtub surface.
Step 3: Loosen the Drain Flange: The drain flange needs to be unscrewed from the drain body located underneath the tub. Accessing this from underneath the tub is the best option. If access from underneath is restricted, use a bathtub drain wrench. Insert the drain wrench into the drain flange and turn counterclockwise to loosen it. Apply penetrating oil if needed, and allow it to soak for a few minutes.
Step 4: Accessing from Underneath the Tub: If you can access the drain from underneath the tub, locate the large nut that secures the drain body to the bathtub. Apply penetrating oil to the nut and threads, if needed. Use an adjustable wrench or channel-lock pliers to loosen the nut. It may require significant force to break the seal. Once the nut is loose, carefully unscrew it completely while holding the drain flange from above to prevent it from falling.
Step 5: Remove the Old Drain: Once the flange is loosened or the nut underneath is removed, carefully push the drain flange down from above and remove the entire drain assembly from the bathtub. Clean the drain opening thoroughly, removing any remaining putty, caulking, or debris. Inspect the drainpipe for any signs of corrosion or damage. Replace the drainpipe if necessary.
Removing the old drain can be challenging, especially if it is corroded or has been in place for a long time. Patience and careful application of force are essential to avoid damaging the bathtub or drainpipe.
Installing the New Bathtub Drain and Stopper
After removing the old drain, the next step is to install the new drain and stopper assembly. The installation process generally involves the following steps:
Step 1: Prepare the New Drain Flange: Apply a generous bead of plumber's putty to the underside of the new drain flange. Ensure the putty covers the entire surface that will come into contact with the bathtub. Alternatively, use silicone caulk if preferred.
Step 2: Insert the Drain Flange: Carefully insert the drain flange into the drain opening from above. Press down firmly to ensure the putty or caulk creates a watertight seal between the flange and the bathtub surface. Remove any excess putty or caulk that squeezes out around the flange.
Step 3: Secure the Drain Body: From underneath the bathtub, slide the rubber or plastic washer (if included in the kit) onto the drain body. Then, thread the drain nut onto the drain body and tighten it securely using an adjustable wrench or channel-lock pliers. Be careful not to overtighten, as this could damage the drain body or bathtub.
Step 4: Install the Stopper Mechanism: The installation of the stopper mechanism varies depending on the stopper type. For lift-and-turn stoppers, insert the stopper into the drain and tighten the setscrew. For push-and-pull or toe-touch stoppers, screw the stopper into the drain until it is secure. For pop-up stoppers, reconnect the linkage rod to the stopper mechanism and reattach the overflow plate.
Step 5: Adjust the Stopper: After installing the stopper mechanism, test it to ensure it opens and closes the drain properly. Adjust the stopper height or linkage as needed to achieve a proper seal. If the stopper does not seal properly, water may leak out of the drain.
Step 6: Clean Up: Remove any excess putty, caulk, or debris from around the drain flange and drainpipe. Clean the area thoroughly with a damp cloth.
Ensuring a watertight seal between the drain flange and the bathtub surface is critical to prevent leaks. Take the time to apply the putty or caulk properly and tighten the drain nut securely.
Testing for Leaks
After installing the new drain and stopper, it is essential to test for leaks to ensure the installation was successful. The following steps outline the leak testing procedure:
Step 1: Close the Stopper: Close the stopper to seal the drain. Ensure that the stopper is properly seated and forms a tight seal.
Step 2: Fill the Bathtub: Fill the bathtub with a few inches of water. Observe the water level for any signs of leakage around the drain flange or drainpipe.
Step 3: Check for Leaks Underneath the Tub: While the bathtub is filling, check underneath the tub for any leaks around the drain nut or drainpipe connections. Use a flashlight to inspect the area thoroughly.
Step 4: Monitor Water Level: Allow the water to sit in the bathtub for at least 30 minutes. Periodically check the water level for any signs of dropping. If the water level decreases noticeably, it indicates a leak.
Step 5: Drain the Bathtub: After 30 minutes, open the stopper and allow the water to drain. Observe the drainpipe connections for any leaks as the water drains.
Step 6: Tighten Connections (If Necessary): If any leaks are detected, tighten the drain nut or drainpipe connections as needed. Be careful not to overtighten, as this could damage the drain or drainpipe. Reapply putty, caulk, as needed.
Step 7: Repeat Testing: After tightening the connections, repeat the leak testing procedure to ensure the leaks have been resolved. Continue testing until no leaks are detected.
Addressing leaks promptly is crucial to prevent water damage to the bathroom floor and surrounding structures. If leaks persist despite tightening connections, it may be necessary to disassemble and reinstall the drain with fresh putty or caulk. Sometimes, a professional plumber may be needed to solve the problem.

How To Remove A Bathtub Drain The Home Depot

How To Remove A Bathtub Drain The Home Depot

Replacing A Tub Drain Bathtub Removal And Replacement

Easy Replacement Of A Bathtub Drain

How To Replace Bathtub Drain Stopper With A Lift And Turn Diy

How To Easily Remove Bathtub Drain Plug Stopper Unclog In 1 Minute Jonny Diy

How To Remove A Bathtub Drain The Home Depot

Bathtub How Can I Remove A Stuck Bath Stopper Assembly Home Improvement Stack Exchange

How To Replace A Bathtub Drain

How To Replace Bathtub Drain Stopper With A Lift And Turn Diy
Related Posts