How to Paint a Bathtub: A Comprehensive Guide for Refinishing
Painting a bathtub, also known as bathtub refinishing or reglazing, is a cost-effective alternative to replacing a worn, stained, or outdated bathtub. While replacing a bathtub can involve significant plumbing modifications and demolition, painting offers a way to restore the bathtub’s appearance with substantially less disruption and expense. However, the success of the project hinges on proper preparation, material selection, and execution. Neglecting any of these aspects can lead to peeling, cracking, or discoloration, requiring further costly repairs.
This article details the process of painting a bathtub, outlining the essential steps and providing guidelines for achieving a durable and aesthetically pleasing finish. From surface preparation to the application of specialized coatings, each stage will be explained in depth, enabling individuals with moderate DIY skills to undertake this project with confidence.
Understanding the Challenges of Bathtub Painting
Painting a bathtub presents unique challenges compared to painting other surfaces. Bathtubs are exposed to constant moisture, temperature fluctuations, and the abrasive action of cleaning products. These factors demand a coating system that can withstand these harsh conditions without compromising its integrity or appearance. Standard paints are generally unsuitable for this application, as they lack the necessary adhesion, durability, and resistance to chemicals and water.
Furthermore, the bathtub's smooth, non-porous surface requires meticulous preparation to ensure proper adhesion. Residual soap scum, mineral deposits, and existing finishes must be completely removed to prevent the new coating from peeling or flaking. The choice of primer and topcoat is also critical, as these materials must be specifically formulated for bathtub refinishing and compatible with the existing surface material, whether it is porcelain, cast iron, acrylic, or fiberglass.
Failure to adequately address these challenges can result in a finish that fails prematurely, leading to disappointment and the need for more extensive repairs in the future. Therefore, a thorough understanding of the potential pitfalls is essential for successful bathtub painting.
Detailed Steps for Bathtub Painting
The following steps provide a comprehensive guide to painting a bathtub. Adhering to these procedures meticulously will maximize the chances of achieving a long-lasting and attractive finish.
1. Safety Precautions: Before commencing any work, ensure adequate ventilation in the bathroom. Open windows and use a fan to circulate air. Wear appropriate personal protective equipment (PPE), including a respirator mask to protect against fumes, safety glasses to prevent splashes, and gloves to shield skin from chemicals. Read and understand the safety data sheets (SDS) for all products used, and follow the manufacturer’s instructions carefully.
2. Surface Preparation: This is arguably the most crucial step in the entire process. Inadequate surface preparation is the primary cause of bathtub refinishing failures. The steps involved are:
a. Cleaning: Begin by thoroughly cleaning the bathtub with a strong alkaline cleaner, such as trisodium phosphate (TSP), to remove soap scum, body oils, and other contaminants. Rinse thoroughly with water and allow to dry completely.
b. Etching (for Porcelain or Ceramic): Porcelain and ceramic surfaces are inherently smooth and require etching to create a mechanical key for the new coating. Use an etching solution specifically designed for bathtubs. Apply the solution according to the manufacturer's instructions, typically involving scrubbing the surface with a scouring pad. Rinse thoroughly and allow to dry completely. For acrylic or fiberglass tubs, consult the coating manufacturer's recommendations as etching might not be necessary, or a specific type of abrasion might be recommended instead.
c. Repairing Chips and Cracks: Inspect the bathtub for any chips, cracks, or other damage. Repair these imperfections using a two-part epoxy filler specifically designed for bathtub repair. Apply the filler according to the manufacturer's instructions, ensuring it is flush with the surrounding surface. Allow the filler to cure completely, then sand it smooth with fine-grit sandpaper (e.g., 400-grit) to blend it seamlessly with the existing surface.
d. Sanding: Sand the entire bathtub surface with progressively finer grits of sandpaper. Start with a medium-grit sandpaper (e.g., 220-grit) to remove any remaining imperfections and create a slightly roughened surface for better adhesion. Then, follow with a finer-grit sandpaper (e.g., 400-grit) to smooth the surface. Ensure all corners and edges are thoroughly sanded. Remove all sanding dust with a tack cloth.
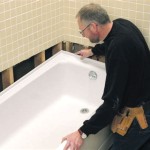
e. Masking: Protect surrounding surfaces from overspray by masking off the walls, fixtures, faucet, and drain with painter’s tape and plastic sheeting or masking paper. Pay particular attention to areas where overspray is likely to occur. Secure the edges of the masking material to prevent paint from seeping underneath.
3. Priming: Apply a specialized epoxy primer designed for bathtub refinishing. The primer serves as a bonding agent between the existing surface and the topcoat. Choose a primer that is compatible with the bathtub material and the intended topcoat. Apply the primer in thin, even coats, following the manufacturer’s instructions regarding drying time and application method (brush, roller, or spray). Allow the primer to dry completely before proceeding to the next step.
4. Topcoat Application: Select a two-part epoxy acrylic or a polyurethane topcoat specifically formulated for bathtub refinishing. These coatings offer superior durability, chemical resistance, and water resistance compared to standard paints. Thoroughly mix the two parts of the topcoat according to the manufacturer’s instructions, paying close attention to the mixing ratio and pot life. Apply the topcoat in thin, even coats using a high-quality brush, roller, or preferably a spray gun. Spraying typically provides the smoothest and most uniform finish. Allow each coat to dry completely before applying the next. Apply two to three coats for optimal coverage and durability. Avoid applying thick coats, as they can lead to runs, sags, and uneven drying.
5. Curing and Finishing: Allow the topcoat to cure completely according to the manufacturer’s instructions. Curing times can vary depending on the product and environmental conditions. Avoid using the bathtub during the curing period. Once the topcoat has fully cured, carefully remove the masking tape and plastic sheeting. Inspect the finish for any imperfections, such as drips or runs. If necessary, lightly sand these imperfections with fine-grit sandpaper (e.g., 1000-grit) and buff the surface to a smooth finish. Apply a sealant around the edges of the bathtub to prevent water from seeping underneath the coating.
Factors Affecting Bathtub Paint Longevity
Several factors influence the long-term durability and appearance of a painted bathtub. Addressing these factors proactively can significantly extend the lifespan of the refinished surface.
1. Material Compatibility: The compatibility between the primer, topcoat, and the existing bathtub material is crucial. Using incompatible materials can lead to adhesion problems, cracking, and discoloration. Always consult the manufacturer's recommendations and choose products that are specifically designed for the intended application.
2. Environmental Conditions: Temperature and humidity can affect the curing process and the adhesion of the coating. Avoid painting the bathtub in extremely hot, cold, or humid conditions. Ensure proper ventilation to promote even drying and curing.
3. Cleaning Practices: Harsh cleaning products and abrasive scrubbers can damage the painted surface. Use mild, non-abrasive cleaners specifically designed for acrylic or porcelain surfaces. Avoid using scouring pads or harsh chemicals, as they can scratch or dull the finish. Regularly clean the bathtub to prevent the buildup of soap scum and mineral deposits.
4. Water Quality: Hard water can leave mineral deposits on the bathtub surface, which can be difficult to remove without damaging the coating. Consider installing a water softener to reduce the mineral content of the water. Regularly wipe down the bathtub after each use to prevent water spots and mineral buildup.
5. Usage Patterns: Excessive weight or impact can damage the painted surface. Avoid dropping heavy objects into the bathtub or placing excessive weight on the bottom. Consider using a bath mat to protect the finish from scratches and wear.
By understanding and addressing these factors, individuals can significantly extend the lifespan of their painted bathtub and maintain its appearance for years to come. Proper maintenance and care are essential for preserving the integrity of the coating and preventing premature failure.
While painting a bathtub can provide a cost-effective solution for improving its appearance, it is important to recognize that it is not a permanent solution. The lifespan of a painted bathtub typically ranges from one to five years, depending on the quality of the materials used, the thoroughness of the preparation, and the level of care provided. For a longer-lasting and more durable solution, consider professional bathtub refinishing or replacement as alternatives.

Super Simple How To Paint A Bathtub

Before After How To Paint A Bathtub And Clean It Does Last Thrift Diving

How To Paint A Tub With Rustoleum What Not Do

Yes You Can Paint Your Bathtub And Tile Here S How Toolbox Divas

How To Paint Your Bathtub Yes Seriously Love Renovations

Diy Painted Bathtub Follow Up Your Questions Answered Addicted 2 Decorating

Should You Paint Your Bathtub 1 Year Review

How To Paint An Acrylic Bath Victorian Plumbing

How To Paint A Bathtub Yourself The Nifty Nester

How To Paint Your Bathtub
Related Posts