How To Fix A Leaky Bathtub Faucet Without Turning Off Water
A persistently dripping bathtub faucet is more than just an annoyance; it represents a continuous waste of water and, consequently, money. While the most responsible approach to addressing a leaky faucet typically involves shutting off the water supply to the entire house or at least the specific bathroom, certain circumstances might make this inconvenient or even impossible. Therefore, understanding the mechanics of faucet repair and identifying techniques that minimize water flow during the process can be invaluable.
Fixing a leaky bathtub faucet without turning off the water presents challenges, but it is not entirely impossible. The success of this approach depends on the type of faucet, the severity of the leak, and the resourcefulness of the individual undertaking the repair. This article outlines the strategies and considerations involved in such a scenario, emphasizing the importance of careful preparation and a thorough understanding of faucet components.
Identifying the Faucet Type and Leak Source
Before attempting any repair, it is crucial to accurately identify the type of bathtub faucet and pinpoint the source of the leak. Common types of bathtub faucets include compression faucets, ball faucets, cartridge faucets, and ceramic disc faucets. Each type operates differently and requires specific repair approaches.
Compression Faucets: These are the oldest and simplest type, recognizable by their separate hot and cold water handles. They use a rubber washer that compresses against the valve seat to stop the water flow. Leaks in compression faucets typically stem from a worn-out washer or a corroded valve seat.
Ball Faucets: Characterized by a single handle that controls both water temperature and flow, ball faucets use a slotted plastic or metal ball to regulate water mixing. Leaks in ball faucets are often caused by worn springs, seats, or O-rings within the valve assembly.
Cartridge Faucets: Similar to ball faucets in their single-handle design, cartridge faucets utilize a cylindrical cartridge that slides up and down to control water flow. Leaks in cartridge faucets often arise from a damaged cartridge or worn O-rings surrounding the cartridge.
Ceramic Disc Faucets: These modern faucets also feature a single handle and use two ceramic discs that slide against each other to control water flow. Leaks in ceramic disc faucets are less common but can occur due to mineral buildup or damage to the ceramic discs.
Once the faucet type is identified, the next step is to carefully observe the leak. Is the water dripping from the spout, around the handle, or from the base of the faucet? Pinpointing the exact location of the leak will help narrow down the potential causes and guide the repair process.
Strategies for Minimizing Water Flow During Repair
While completely stopping the water flow without shutting off the main supply is difficult, several strategies can help minimize water leakage during the repair process. These strategies primarily focus on isolating specific components or temporarily restricting water flow through the faucet.
Using Plumbers Putty and Temporary Plugs: One common technique involves using plumbers putty to create a temporary seal around the area being worked on. For example, if the leak is coming from around the handle, plumbers putty can be applied around the base of the handle to temporarily prevent water from escaping. Similarly, small rubber plugs or even tightly rolled pieces of cloth can be used to temporarily block the spout and slow down the dripping. Care must be taken not to force these plugs too hard, as this could damage the spout.
Disassembling Faucet Components Strategically: When disassembling the faucet, it is essential to have all the necessary tools and replacement parts readily available. This reduces the amount of time the faucet is open and exposed, minimizing water leakage. It is also advisable to work on one component at a time, rather than completely disassembling the entire faucet. For instance, if the problem lies with the washer in a compression faucet, focus on replacing only the washer before moving on to other parts.
Utilizing a Wet/Dry Vacuum: A wet/dry vacuum can be employed to continuously remove water as it leaks from the faucet. Position the vacuum hose directly under the drip to collect the water and prevent it from accumulating in the sink or tub. This method is particularly useful when dealing with more significant leaks or when the repair process is expected to take a longer time.
Adjusting Hot and Cold Water Supply Valves (Partially): While not completely shutting off the water, it might be possible to partially close the hot and cold water supply valves located under the sink. These valves, if present, allow for some control over the water flow to the faucet. By partially closing both valves, the water pressure can be reduced, thereby minimizing the amount of water that leaks during the repair. Exercise caution when adjusting these valves, as forcing them too much can damage them or cause them to leak.
Preparing a Containment System: Laying down towels or using a bucket strategically placed below the faucet can help contain any water that leaks during the repair. This helps prevent water damage to the surrounding area and makes cleanup easier.
Repairing Common Leaks in Different Faucet Types Without Shutting Off Water
Even with the water supply active, albeit minimized, specific repairs can be carried out depending on the faucet type. The key lies in speed, precision, and understanding the component functions.
Compression Faucet Washer Replacement: For a compression faucet leaking from the spout, the most likely cause is a worn-out washer. With a minimal drip achieved through the methods above, carefully disassemble the faucet handle. Remove the screw holding the handle in place and gently pull the handle off. Unscrew the packing nut and remove the stem. At the end of the stem, the washer will be visible. Remove the old washer and replace it with a new one of the same size and type. Apply a small amount of plumber's grease to the stem threads and reassemble the faucet in reverse order. Test the faucet to see if the leak has stopped.
Ball Faucet Seat and Spring Replacement: A leaky ball faucet often requires replacing the seats and springs located beneath the ball valve. First, loosen the setscrew that secures the handle to the faucet body. Remove the handle and unscrew the cap. Use a specialized ball faucet wrench to loosen the ball valve and lift it out. Inspect the seats and springs beneath the ball. Replace any worn or damaged seats and springs with new ones. Apply a small amount of plumber's grease to the ball valve and reassemble the faucet. Tighten the cap securely and reattach the handle. Test the faucet for leaks.
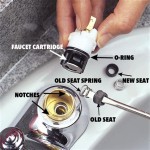
Cartridge Faucet Cartridge Replacement: If a cartridge faucet is leaking, replacing the cartridge is usually the best solution. First, locate and remove the decorative cap covering the cartridge retaining clip. Use pliers to pull out the retaining clip. Carefully grasp the cartridge and pull it straight out of the faucet body. If the cartridge is stuck, you may need to use a cartridge puller tool. Install the new cartridge, ensuring it is properly aligned. Reinsert the retaining clip and replace the decorative cap. Turn the water on and test the faucet for leaks.
Ceramic Disc Faucet Cleaning or Disc Replacement: Ceramic disc faucets are less prone to leaks, but mineral buildup can sometimes cause dripping. With water flow minimized, disassemble the faucet to access the ceramic discs. Clean the discs thoroughly with a solution of vinegar and water to remove any mineral deposits. If the discs are damaged, they will need to be replaced. Reassemble the faucet and test for leaks.
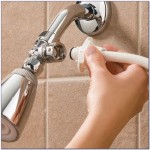
Addressing O-Ring Leaks: Many faucet types use O-rings to create a watertight seal between components. If a leak is coming from around the handle or base of the faucet, a worn or damaged O-ring is likely the culprit. With minimal water flow, disassemble the faucet to access the leaking O-ring. Remove the old O-ring and replace it with a new one of the same size and material. Lubricate the new O-ring with plumber's grease before reassembling the faucet.
Tightening Loose Connections: Sometimes, a leak can be caused by loose connections between faucet components. Examine all the connections and fittings, and tighten any that appear to be loose. Be careful not to overtighten, as this can damage the components. Use a wrench or pliers to tighten the connections, but avoid using excessive force.
Inspecting and Replacing the Valve Seat: In compression faucets, a corroded or damaged valve seat can also cause leaks. The valve seat is the part of the faucet body that the washer presses against to stop the water flow. If the valve seat is damaged, it will need to be repaired or replaced. Specialized tools are available for removing and replacing valve seats. If the valve seat is severely corroded, it may be necessary to replace the entire faucet body.
Dealing with Mineral Buildup: Mineral buildup can accumulate inside the faucet, restricting water flow and causing leaks. To remove mineral buildup, disassemble the faucet and soak the components in a solution of vinegar and water. Use a brush to scrub away any remaining mineral deposits. Rinse the components thoroughly with clean water before reassembling the faucet. Regular cleaning can help prevent mineral buildup from causing future leaks.
It is important to note that attempting these repairs without shutting off the water can be messy and may require patience. Always have plenty of towels on hand to clean up any spills. If the leak is severe or if you are unsure about any step of the repair process, it is always best to consult a qualified plumber. Attempting to repair a faucet without proper knowledge or tools can result in further damage and potentially hazardous situations.

Fix A Leaky Bathtub Faucet Without Shutting Off Water

How To Fix A Leaking Bathtub Faucet The Home Depot

How To Fix A Leaky Bathtub Faucet 6 Ways Stop Drips

How To Fix A Leaking Bathtub Faucet Diy Family Handyman

How To Fix A Leaking Bathtub Faucet The Home Depot

Fixing Faucets How Do I Fix Water That Keeps Running In A Tub Faucet

How To Fix A Leaking Bathtub Faucet The Home Depot

Tub Faucet Won T Stop Running Quick Fix

Fix A Leaky Bathtub Faucet Without Shutting Off Water

How To Fix A Leaking Bathtub Faucet The Home Depot