Sealant Use in Bathtub Spout Diverter Valve Replacement Kits: Instructions and Best Practices
Replacing a bathtub spout diverter valve is a common plumbing task that homeowners can often undertake themselves. A crucial, and often overlooked, component of this process is the proper application of sealant. Sealant, used correctly, ensures a watertight connection, preventing leaks that can lead to water damage, mold growth, and costly repairs. This article will detail the importance of sealant, the different types suitable for bathtub spout diverter valve replacement kits, and provide step-by-step instructions for its proper application.
The diverter valve, typically integrated into the bathtub spout, controls the flow of water, directing it either to the tub faucet or the showerhead. Over time, these valves can fail due to mineral buildup, corrosion, or general wear and tear. Replacing the spout is often the simplest and most cost-effective solution. However, a successful replacement hinges on creating a secure and watertight seal between the new spout and the water supply pipe. Sealant fills any microscopic gaps and irregularities in the connection, preventing water from escaping.
Understanding the Importance of Sealant in Diverter Valve Replacement
The primary function of sealant in a bathtub spout diverter valve replacement is to create a watertight barrier. This is paramount for several reasons. First, preventing leaks conserves water and reduces water bills. Even a small, persistent leak can waste significant amounts of water over time. Second, eliminating water leakage prevents damage to surrounding structures. A leak behind the bathtub wall or beneath the floor can lead to structural deterioration, wood rot, and mold growth, all of which require extensive and expensive remediation. Third, a properly sealed connection ensures the longevity of the plumbing components. Persistent leaks can cause corrosion and premature failure of pipes and fittings.
Furthermore, the type of sealant used and the method of application are critical. Using the wrong type of sealant or applying it incorrectly can be as detrimental as not using any sealant at all. Some sealants are not designed for plumbing applications and may degrade over time when exposed to water, while others may not be compatible with certain pipe materials.
Types of Sealant Suitable for Bathtub Spout Diverter Valve Replacement
Several types of sealant are suitable for use in bathtub spout diverter valve replacement kits, each with its own advantages and disadvantages. The most common and recommended types include plumber's tape (also known as Teflon tape or PTFE tape), pipe dope (also known as pipe joint compound), and silicone sealant. Each has specific application methods and is best suited for particular situations.
Plumber's Tape (PTFE Tape): This is a thin, white tape made from polytetrafluoroethylene (PTFE). It is wrapped around the threads of the pipe before the spout is screwed on. Plumber’s tape acts as a lubricant, allowing the threads to tighten more easily, and as a sealant, filling the gaps between the threads. It is relatively inexpensive and easy to apply, making it a popular choice for many homeowners. However, it is crucial to apply the tape in the correct direction and with sufficient overlap to ensure a proper seal.
Pipe Dope (Pipe Joint Compound): This is a thick, paste-like substance that is applied to the threads of the pipe. Pipe dope also acts as a lubricant and sealant. It typically contains a mixture of solvents, fillers, and resins that create a watertight barrier. Pipe dope is particularly effective for sealing connections that are exposed to high temperatures or pressures. However, it can be messier to apply than plumber's tape and may require a longer drying time.
Silicone Sealant: This is a flexible, rubber-like material that is often used to seal gaps and cracks around bathtubs and showers. While not typically used directly on the pipe threads, silicone sealant can be applied around the base of the spout where it meets the wall to prevent water from seeping behind the fixture. It is highly resistant to water and mold growth, making it an excellent choice for areas prone to moisture. However, it is important to use a 100% silicone sealant, as other types may not be as durable or water-resistant. It should be noted that silicone sealant is typically used in conjunction with plumber's tape or pipe dope, not as a replacement for them.
The selection of the most appropriate sealant depends on several factors, including the type of pipe material (copper, galvanized steel, or PVC), the water pressure, and the individual's preference and comfort level with each type of sealant. For most standard bathtub spout replacements, plumber's tape or pipe dope are the preferred choices for sealing the threaded connection to the water supply pipe.
Step-by-Step Instructions for Applying Sealant During Bathtub Spout Replacement
The following instructions outline the general procedure for applying sealant during a bathtub spout diverter valve replacement. It is essential to consult the specific instructions provided with the replacement kit, as variations may exist depending on the model and manufacturer.
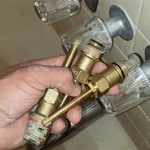
Step 1: Preparation and Safety: Before beginning any plumbing work, it is essential to shut off the water supply to the bathtub. This is typically done by turning off the shut-off valves located near the bathtub or by turning off the main water shut-off valve for the entire house. Once the water is shut off, open the existing bathtub faucet to relieve any remaining pressure in the pipes. Gather all necessary tools and materials, including the new bathtub spout, sealant (plumber's tape or pipe dope), a pipe wrench, a rag or towel, and potentially a putty knife for removing old sealant.
Step 2: Removing the Old Spout: The method for removing the old spout will vary depending on the type of connection. Some spouts are threaded and simply screw onto the pipe, while others are slip-on types that are held in place by a set screw. For threaded spouts, use a pipe wrench to loosen the spout by turning it counterclockwise. Wrap a rag or towel around the spout to protect its finish from scratches. For slip-on spouts, locate the set screw (usually on the underside of the spout) and loosen it with an Allen wrench or screwdriver. Once the set screw is loosened, the spout should slide off the pipe. If the spout is stuck, gently rock it back and forth to break any mineral buildup or corrosion that may be holding it in place.
Step 3: Cleaning the Pipe Threads: After removing the old spout, thoroughly clean the pipe threads to remove any old sealant, mineral deposits, or corrosion. Use a wire brush or a putty knife to scrape away any debris. Ensure the threads are clean and dry before applying the new sealant. This step is crucial for ensuring a proper seal.
Step 4: Applying Plumber's Tape (PTFE Tape): If using plumber's tape, wrap the tape around the pipe threads in a clockwise direction (when viewed from the end of the pipe). Overlap each wrap by about half the width of the tape. Apply at least three to five layers of tape, ensuring that the threads are completely covered. The tape should be applied snugly but not so tightly that it tears. Applying the tape in the correct direction is essential; otherwise, the tape may unravel as the spout is screwed on.
Step 5: Applying Pipe Dope (Pipe Joint Compound): If using pipe dope, apply a generous amount of the compound to the pipe threads using a brush or applicator. Ensure that all the threads are evenly coated. Avoid getting pipe dope inside the pipe opening. Some pipe dope products recommend a specific drying time before connecting the spout, so follow the manufacturer's instructions.
Step 6: Installing the New Spout: Carefully screw the new spout onto the pipe threads, turning it clockwise. Tighten the spout by hand until it is snug. Then, use a pipe wrench to tighten it further, but be careful not to overtighten it, as this can damage the pipe or the spout. If using a slip-on spout, slide the spout onto the pipe and tighten the set screw to secure it in place.
Step 7: Testing for Leaks: After installing the new spout, turn the water supply back on slowly. Check for any leaks around the connection between the spout and the pipe. If leaks are present, tighten the spout slightly. If the leaks persist, turn off the water supply and remove the spout. Inspect the sealant application and reapply if necessary. Ensure the threads are clean and dry before reapplying the sealant.
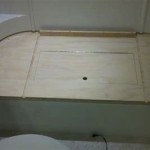
Step 8: Applying Silicone Sealant (Optional): If desired, apply a bead of 100% silicone sealant around the base of the spout where it meets the wall. This will help to prevent water from seeping behind the fixture. Smooth the sealant with your finger or a tool to create a clean, professional finish. Allow the silicone sealant to dry completely according to the manufacturer's instructions before using the bathtub.
By following these steps and using the appropriate sealant, homeowners can successfully replace a bathtub spout diverter valve and ensure a watertight connection, preventing leaks and the associated problems.

How To Fix A Shower Diverter Repair Or Replace

Learn How To Remove And Install Various Tub Spouts

Water Not Coming Out Of Shower Head Tub Spout Diverter Repair

How To Fix A Shower Diverter Repair Or Replace

Tub Spout Diverter How To Fix From Beginning The End Using Danco Repair Kit

Learn How To Remove And Install Various Tub Spouts

How To Seal Tub Spout And Valve Trim With Silicone Caulking The Fixer Clips

Tub Spout Diverter How To Fix From Beginning The End Using Danco Repair Kit

Tub Spout Diverter Repair Kit

How To Replace Or Fix Tub Spout Not Working
Related Posts