Bathtub Glass Panel Installation: A Comprehensive Guide
Bathtub glass panels are increasingly popular alternatives to traditional shower curtains. They offer a sleek, modern aesthetic, improve bathroom hygiene, and can enhance the overall value of a home. However, proper installation is crucial to ensure the panel functions correctly, prevents leaks, and maintains its structural integrity. This article provides a comprehensive guide to bathtub glass panel installation, covering essential considerations, necessary tools, and detailed step-by-step instructions.
Planning and Preparation
Prior to commencing any installation work, meticulous planning is paramount. This involves accurately measuring the bathtub area, selecting the appropriate glass panel style and dimensions, and gathering all required tools and materials. Accurate measurements are crucial; variations can lead to gaps and water leakage, compromising the effectiveness of the panel. Consider the desired height and width of the panel, taking into account the height of the showerhead and the amount of spray coverage needed.
Selecting the right glass panel type is equally important. Options include fixed panels, pivoting panels, and sliding panels. Fixed panels offer a minimalist design but provide limited access for cleaning. Pivoting panels allow for greater flexibility in access and ventilation. Sliding panels are ideal for smaller bathrooms where space is limited. The glass itself can be clear, frosted, or textured, each offering different levels of privacy and aesthetic appeal. Tempered glass is strongly recommended for safety reasons; it is significantly stronger than standard glass and shatters into small, relatively harmless fragments if broken.
Ensure compatibility between the chosen panel and the existing bathtub configuration. Check for any obstructions, such as pipework or tiles that may interfere with the installation process. Also, verify that the bathtub rim is level and in good condition. Any pre-existing damage may need repair prior to installation to achieve a watertight seal.
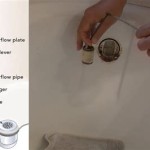
Finally, compile a comprehensive list of necessary tools and materials. This will prevent unnecessary delays during the installation process. Essential items typically include:
*Glass panel and mounting hardware (including screws, brackets, and seals)
*Drill with appropriate drill bits (for tile, if applicable)
*Level
*Measuring tape
*Pencil or marker
*Silicone sealant and applicator gun
*Safety glasses
*Gloves
*Clean cloths or sponges
*Putty knife or scraper
*Wood shims (optional, for leveling)
Step-by-Step Installation Procedure
Once the planning and preparation phases are complete, the actual installation can begin. It is crucial to follow a systematic approach to ensure accuracy and minimize potential errors. Safety precautions, such as wearing safety glasses and gloves, should be observed throughout the entire process.
Step 1: Preparation and Marking
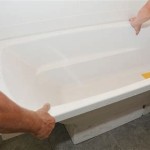
Begin by thoroughly cleaning the bathtub rim and the surrounding wall area where the glass panel will be installed. Remove any soap scum, mildew, or debris. Use a specialized bathroom cleaner to ensure a pristine surface for the sealant to adhere to effectively. Dry the surfaces completely before proceeding.
Position the glass panel along the bathtub rim to determine the desired placement. Use a level to ensure the panel is perfectly vertical. Mark the location of the mounting brackets or channels on the wall and the bathtub rim with a pencil or marker. These marks will serve as guides for drilling and screwing in the hardware.
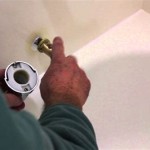
Step 2: Drilling Pilot Holes
If the wall is tiled, use a specialized tile drill bit to create pilot holes at the marked locations. Exercise caution to avoid cracking or chipping the tiles. Apply gentle pressure and use a slow drill speed. For walls made of drywall or plaster, use an appropriate drill bit suitable for those materials. Ensure the pilot holes are deep enough to accommodate the screws provided with the mounting hardware. If unsure, consult manufacturer's instructions for the glass panel.
Similarly, drill pilot holes into the bathtub rim if required by the mounting hardware. Again, use a drill bit appropriate for the material of the bathtub (e.g., acrylic, cast iron). Be extremely careful to avoid damaging the bathtub surface. Consider using a center punch to create a small indentation before drilling to prevent the drill bit from slipping.
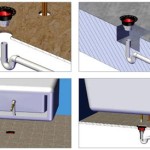
Step 3: Mounting the Brackets or Channels
Attach the mounting brackets or channels to the wall and bathtub rim using the screws provided. Ensure the brackets are securely fastened and aligned according to the marked locations. Use a level to verify that the brackets are perfectly vertical before tightening the screws completely. If necessary, use wood shims behind the brackets to compensate for any unevenness in the wall or bathtub rim.
It is imperative to use the correct type and size of screws. Over-tightening can damage the wall or bathtub, while under-tightening can compromise the stability of the panel. After installing, apply some force to the bracket – it shouldn’t move. If it does, double check the screw type and the tightness.
Step 4: Installing the Glass Panel
Carefully lift the glass panel into place and position it within the mounted brackets or channels. Ensure the panel is seated securely and aligned properly. Some installations may require the use of rubber gaskets or shims to ensure a snug fit and prevent rattling. Follow the manufacturer's instructions for securing the panel within the brackets or channels.
Double check that the panel is aligned properly and that the installation adheres to the manufacturer’s instructions. Using a level can once again be very helpful. Proper alignment is critical to both the aesthetic appeal of the finished project and the correct functionality of the glass panel.
Step 5: Applying Silicone Sealant
Apply a bead of silicone sealant along the edges of the glass panel where it meets the wall and the bathtub rim. Use a high-quality, mildew-resistant sealant specifically designed for bathroom applications. Ensure the sealant covers all gaps and crevices to prevent water leakage. Smooth the sealant with a wet finger or a sealant smoothing tool to create a clean, professional finish.
Remove any excess sealant with a damp cloth or sponge. Allow the sealant to cure completely according to the manufacturer's instructions before using the shower. This usually takes at least 24 hours.
Addressing Potential Challenges
While the installation process may seem straightforward, certain challenges can arise. Addressing these proactively can prevent complications and ensure a successful outcome.
Uneven Walls
Uneven walls are a common issue in older homes. If the wall is significantly out of plumb, it may be necessary to use shims or adjustable brackets to compensate for the unevenness. Consult with a professional installer if the wall is severely out of alignment.
Drilling Through Tile
Drilling through tile can be challenging, as tiles are prone to cracking. Use a specialized tile drill bit and apply gentle pressure to avoid damaging the tile. Consider applying masking tape over the drilling area to prevent chipping.
Gaps and Leaks
Gaps and leaks are a major concern with bathtub glass panel installations. Ensure the sealant is applied correctly and covers all potential leak points. If leaks persist, reapply the sealant or consult a professional installer.
In addition, if there are particularly large gaps, consider using backer rod or foam filler to fill in the space before applying the sealant. This helps to improve the sealant's adhesion and prevent it from sagging.
Glass Panel Stability
Ensuring the glass panel is stable and secure is crucial for safety. Double-check that the mounting brackets are securely fastened and that the panel is properly seated within the brackets. If the panel wobbles or feels unstable, tighten the screws or add additional support if necessary.
Large glass panels can be particularly susceptible to movement. Consider using additional brackets or supports to enhance stability, especially if the panel is not fully enclosed by a frame. This is particularly important for pivoting panels, as they can put extra stress on the mounting hardware when opened and closed.
By carefully planning the installation, following the step-by-step instructions, and addressing potential challenges proactively, one can successfully install a bathtub glass panel and enhance the functionality and aesthetics of the bathroom. Remember to prioritize safety throughout the entire process and consult with a professional if any uncertainties arise.

Bathtub Enclosures Double Swinging Door

Bathtub Glass Doors Screens

Es Diy 31 Quot X55 Bathtub Screen Framless Shower Door Tempered Glass Panel W122343125 The Home Depot

Bathtub Glass Doors Screens

Vigo Zenith 34 In X 62 Frameless Fixed Tub Screen With Clear Glass

Glass Warehouse 34 In X 58 Frameless Fixed Panel Bathtub Door Matte Black Without Handle Gw Bf Mb
How To Install Diy Bathtub Doors Or Panels

Why To Install Bathtub Glass Panels Shower Lagoon

Pros And Cons Of Putting Shower Glass Doors Over The Bathtub Gcs

4 Innovative Bathtub Door Designs To Transform Your Bathroom Pioneer Glass
Related Posts