```html
Refinishing Fiberglass Bathtubs: A Comprehensive Guide
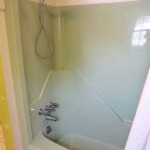
Fiberglass bathtubs offer a cost-effective and durable alternative to cast iron or porcelain. However, like any fixture exposed to water, soap scum, and daily use, fiberglass bathtubs can eventually become stained, chipped, or faded. Refinishing, also known as resurfacing or reglazing, provides a viable option to restore the bathtub's appearance and extend its lifespan without the expense and disruption of a full replacement. This article details the process of refinishing a fiberglass bathtub, covering preparation, application, and maintenance.
Assessing the Bathtub's Condition
Before undertaking a refinishing project, a thorough assessment of the bathtub's condition is crucial. Minor surface imperfections, such as light scratches or stains, are easily addressed with refinishing. However, significant structural damage, such as large cracks or extensive delamination (separation of fiberglass layers), may indicate that replacement is a more appropriate solution. The presence of widespread mold or mildew, especially if it has penetrated deep into the fiberglass, can also complicate the refinishing process and necessitate professional intervention. Assessing the overall structural integrity and the extent of existing damage is therefore paramount in determining the feasibility and potential longevity of a refinished fiberglass bathtub.
Furthermore, consider the age of the bathtub and its past maintenance. A bathtub nearing the end of its expected lifespan, even if refinished, may not provide a long-term solution. Similarly, a bathtub that has been repeatedly subjected to harsh cleaning chemicals or abrasive scouring pads may have weakened fiberglass that will not hold the new finish effectively.
Preparation: The Foundation of a Successful Refinishing Job
Proper preparation is arguably the most critical aspect of refinishing a fiberglass bathtub. A poorly prepared surface will result in adhesion failure, leading to peeling, chipping, and a generally unsatisfactory outcome. The preparation phase involves several key steps, each contributing to the overall success of the project.
Protecting the Surrounding Area: Begin by thoroughly protecting the surrounding bathroom fixtures and surfaces. Use painter's tape or masking film to cover tile, countertops, and faucets. Place drop cloths or plastic sheeting on the floor to prevent overspray and accidental spills. Adequate protection minimizes cleanup and prevents damage to other areas of the bathroom.
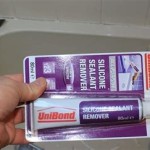
Cleaning and Degreasing: The next step involves removing all traces of soap scum, mineral deposits, and grime from the bathtub surface. Use a strong degreasing cleaner specifically designed for bathtubs. Apply the cleaner according to the manufacturer's instructions, allowing sufficient dwell time for it to penetrate the dirt and grease. Scrub the surface thoroughly with a non-abrasive scouring pad or brush. Rinse thoroughly with clean water and ensure all cleaner residue is removed.
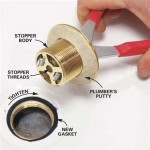
Repairing Chips and Cracks: Any chips or cracks in the fiberglass must be repaired before applying the refinishing coating. Use an epoxy-based filler specifically formulated for fiberglass repair. Clean the damaged area thoroughly and apply the filler according to the manufacturer's instructions. Allow the filler to cure completely. Once cured, sand the repaired area smooth with progressively finer grits of sandpaper, starting with a coarse grit (e.g., 80-grit) and finishing with a fine grit (e.g., 220-grit). Feather the edges of the repair to blend seamlessly with the surrounding surface.
Acid Etching (Optional but Recommended): Acid etching is a process that creates a slightly porous surface on the fiberglass, promoting better adhesion of the refinishing coating. This step involves applying a diluted acid solution to the bathtub surface.
Safety Precautions are paramount:
Wear appropriate protective gear, including gloves, eye protection, and a respirator, when working with acid. Follow the manufacturer's instructions carefully, and ensure adequate ventilation in the bathroom. Apply the acid solution evenly to the bathtub surface, allowing it to dwell for the recommended time. Rinse thoroughly with clean water and neutralize the acid with a baking soda solution. Rinse again with clean water and allow the bathtub to dry completely.Sanding: Sanding provides a mechanical key for the refinishing coating to adhere to. Use a fine-grit sandpaper (e.g., 320-grit or 400-grit) to lightly sand the entire bathtub surface. The goal is not to remove material but to create a slightly roughened surface for better adhesion. Use a sanding block to ensure even pressure and avoid creating deep scratches. After sanding, thoroughly remove all sanding dust with a tack cloth or a clean, damp cloth. Ensure the surface is completely dry before proceeding.
Application of the Refinishing Coating
The application of the refinishing coating requires careful attention to detail and proper technique. The type of coating used can vary, with options including epoxy-based coatings, acrylic urethane coatings, and others. Each type has its own advantages and disadvantages in terms of durability, ease of application, and cost. Regardless of the chosen coating, the following steps apply:
Choosing the Right Coating: Select a refinishing coating specifically designed for fiberglass bathtubs. Read the manufacturer's specifications carefully to ensure compatibility with fiberglass and suitability for bathroom environments. Consider factors such as chemical resistance, water resistance, and UV resistance. Purchase sufficient quantity of coating to cover the entire bathtub surface according to the manufacturer's recommendations.
Mixing and Preparation of the Coating: Most refinishing coatings are two-part systems that require mixing a resin with a hardener. Follow the manufacturer's instructions precisely when mixing the components. Use a clean mixing container and a mixing stick. Stir the mixture thoroughly until it is homogenous and free of lumps. Avoid introducing air bubbles into the mixture. Some coatings may require thinning with a solvent to achieve the desired viscosity. Follow the manufacturer's recommendations for thinning if necessary.
Applying the Coating: Apply the coating in thin, even coats using a high-quality spray gun or a specialized refinishing roller. Spraying typically provides a smoother and more professional finish, but it requires proper equipment and technique. When spraying, maintain a consistent distance from the bathtub surface and overlap each pass slightly. When using a roller, use a light touch and avoid applying too much pressure. Apply the first coat thinly and allow it to dry completely according to the manufacturer's instructions. Sand lightly with a fine-grit sandpaper (e.g., 400-grit) between coats to remove any imperfections and improve adhesion. Apply subsequent coats in the same manner, allowing each coat to dry thoroughly before applying the next. Typically, two to three coats are required to achieve adequate coverage and a smooth, durable finish.
Dealing with Runs and Sags: Runs and sags can occur if the coating is applied too thickly or if the spray gun is held too close to the surface. If runs or sags occur, allow the coating to dry slightly and then use a fine-bristle brush to smooth them out. If the runs or sags are severe, allow the coating to dry completely and then sand them smooth before applying another coat.
Drying and Curing: After the final coat has been applied, allow the coating to dry and cure completely according to the manufacturer's instructions. This may take several hours or even several days, depending on the type of coating and the ambient temperature and humidity. Avoid using the bathtub during the curing period. The coating will continue to harden and become more durable over time.
Post-Refinishing Care and Maintenance
Proper care and maintenance are essential to prolong the life of a refinished fiberglass bathtub. Avoid using abrasive cleaners or scouring pads, as these can scratch and damage the finish. Use mild, non-abrasive cleaners specifically designed for bathtubs. Rinse the bathtub thoroughly after each use to remove soap scum and mineral deposits. Address any minor scratches or stains promptly to prevent them from becoming more severe. With proper care, a refinished fiberglass bathtub can provide years of satisfactory service.
Avoid harsh chemicals like bleach or ammonia-based cleaners, especially in concentrated forms. These can dull or discolor the finish over time. Use a soft cloth or sponge when cleaning, and avoid excessive scrubbing. Regular cleaning and preventive maintenance will help maintain the bathtub's appearance and extend its lifespan.
Consider applying a sealant or wax specifically designed for refinished surfaces. This can provide an extra layer of protection against stains and water damage. Reapply the sealant or wax periodically according to the manufacturer's instructions.
```
How To Refinish Your Bathtub For 50

Can Plastic Acrylic Or Fiberglass Bathtubs Shower Stalls Be Reglazed Refinished America Refinishing Pros

How To Paint A Tub Shower Surround Before After Fiberglass Refinishing Diy Power Couple

Bathtub Refinishing Todds Porcelain Fiberglass Repair

How To Paint A Bathtub Yourself The Nifty Nester

Fiberglass Bathtub Refinishing Porcelain Tub

Bathtub Refinishing Todds Porcelain Fiberglass Repair

How To Paint A Tub Shower Surround Before After Fiberglass Refinishing Diy Power Couple

Bathtub Reglazing Los Angeles Ca Fiberglass Porcelain Refinishing

How To Refinish Your Bathtub For 50